AWS SSO User Connector Setup Guide
This guide walks you through setting up AWS IAM Identity Center (AWS SSO) and connecting it to Abacus.AI so that ChatLLM Teams and Abacus AI Agent can execute AWS operations (S3, EC2, Lambda, IAM, DynamoDB, and more) on your behalf using your own identity and permissions.
Once AWS SSO is connected from Profile → User Connectors, it works straight away in ChatLLM Teams chats with RouteLLM selected, and with the Abacus AI Agent.
- In ChatLLM Teams, click Connectors on the home page (or go to Profile → User Connectors) and connect AWS SSO.
- Open a new chat and select RouteLLM (
route-llm) from the model selector. - Ask a question about your AWS SSO data — for example "List my S3 buckets". The first time you query it you may be asked to authorize the connector; complete the sign-in once and the request continues automatically.
The Custom Chatbot steps below are only needed when you want a purpose-built bot with its own instructions and a restricted set of tools. See the User Connectors guide for the full walkthrough.
Overview
The AWS SSO connector uses the IAM Identity Center device authorization flow to securely authenticate your AWS identity. Once connected, the AWS Tool in ChatLLM Teams can:
- Execute any AWS API call using temporary credentials scoped to your SSO role
- Manage S3 buckets, EC2 instances, Lambda functions, IAM resources, and 100+ other AWS services
- Operate with the exact permissions defined by your SSO permission set — no separate AWS access keys required
Prerequisites
Before connecting AWS SSO to Abacus.AI, you need:
- ✅ An AWS account with IAM Identity Center enabled
- ✅ A user account created in IAM Identity Center
- ✅ A permission set assigned to your user for at least one AWS account
- ✅ Your SSO Start URL (e.g.,
https://mycompany.awsapps.com/start) - ✅ Your AWS Account ID and SSO Role Name
If you haven't set up IAM Identity Center yet, follow the AWS Setup Guide below first.
AWS IAM Identity Center Setup
If your organization already has IAM Identity Center configured, skip to Connecting AWS SSO to Abacus.AI.
Step 1: Enable IAM Identity Center
- Sign in to the AWS Management Console with your management account.
- Navigate to IAM Identity Center (search for "IAM Identity Center" in the AWS console search bar).
- Click Enable to activate IAM Identity Center.
- Choose your preferred identity source:
- IAM Identity Center directory (default) — Simplest option; create and manage users directly in AWS.
- Active Directory — Connect to your existing AWS Managed Microsoft AD or self-managed AD.
- External identity provider — Integrate with Okta, Azure AD (Entra ID), Google Workspace, or other SAML 2.0/SCIM providers.
For most setups, the IAM Identity Center directory (built-in) is the quickest option to get started. You can change the identity source later if needed.
Step 2: Create Users and Groups
- In the IAM Identity Center console, go to Users → Add user.
- Fill in the user details:
- Username — A unique identifier (e.g.,
jdoe) - Email address — The user's email for notifications and password setup
- First name and Last name
- Username — A unique identifier (e.g.,
- The user will receive an email to set up their password.
- (Optional) Create groups for easier access management:
- Go to Groups → Create group
- Name the group (e.g.,
Developers,DataEngineers) - Add users to the group
Step 3: Create Permission Sets
Permission sets define the level of AWS access a user or group receives:
- In IAM Identity Center, go to Permission sets → Create permission set.
- Choose the type:
- Predefined permission set — Select from AWS managed policies:
AdministratorAccess— Full access to all AWS servicesReadOnlyAccess— Read-only access to all servicesPowerUserAccess— Full access except IAM and Organizations managementViewOnlyAccess— View resources without read access to data
- Custom permission set — Define a custom IAM policy for fine-grained control
- Predefined permission set — Select from AWS managed policies:
- Configure session duration (default is 1 hour; maximum is 12 hours).
- Click Create to save the permission set.
The permission set you assign determines what the AWS Tool in Abacus.AI can do. For example, if you assign ReadOnlyAccess, the tool can list and describe resources but cannot create or modify them.
Step 4: Assign Users to AWS Accounts
- Go to AWS accounts in IAM Identity Center.
- Select the AWS account you want to grant access to.
- Click Assign users or groups.
- Select the user or group to assign.
- Choose the permission set to attach.
- Click Submit to complete the assignment.
Step 5: Locate Your SSO Details
After setup, gather these details for the Abacus.AI connector:
| Detail | Where to Find It |
|---|---|
| SSO Start URL | IAM Identity Center → Settings → Identity source section → Look for the AWS access portal URL (e.g., https://mycompany.awsapps.com/start) |
| SSO Region | The AWS region where IAM Identity Center is enabled (e.g., us-east-1). Visible in the top-right corner of the IAM Identity Center console. |
| AWS Account ID | The 12-digit account ID visible on the AWS accounts page in IAM Identity Center, or in My Account in the AWS console. |
| SSO Role Name | The name of the permission set assigned to your user (e.g., AdministratorAccess, ReadOnlyAccess, or your custom permission set name). |
Connecting AWS SSO to Abacus.AI
Step 1: Open the Connectors Panel
In ChatLLM Teams, click the Connectors link on the home page (or navigate to Profile → User Connectors).
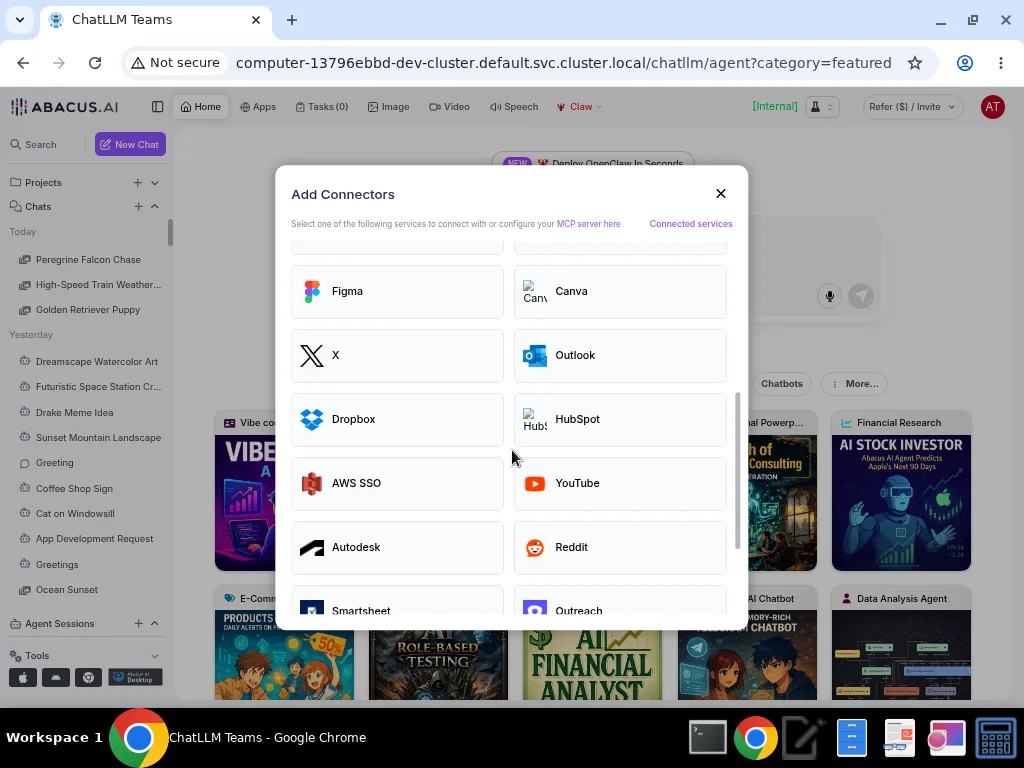
Step 2: Select AWS SSO
Scroll down in the connector list and click on AWS SSO.
Step 3: Enter Your SSO Details
A dialog will appear asking for your AWS SSO configuration:
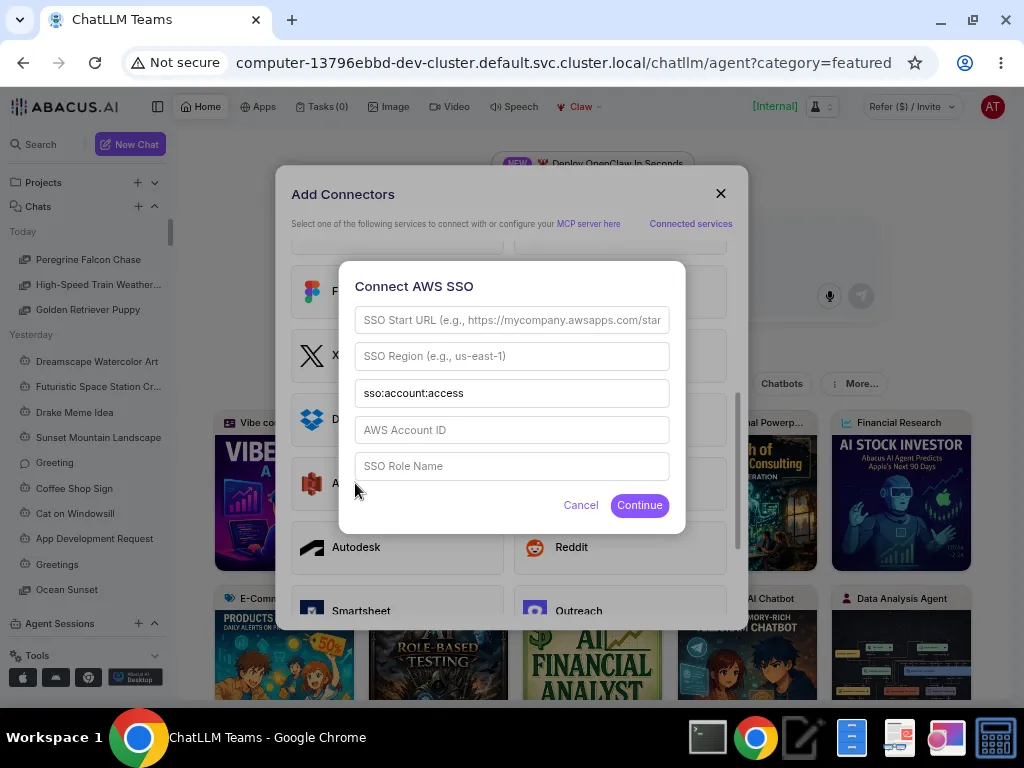
Fill in the following fields:
| Field | Description | Example |
|---|---|---|
| SSO Start URL | Your AWS SSO portal URL | https://mycompany.awsapps.com/start |
| SSO Region | AWS region where IAM Identity Center is enabled | us-east-1 |
| Registration Scopes | SSO scopes (leave default unless you have specific needs) | sso:account:access |
| AWS Account ID | The 12-digit AWS account ID to operate on | 123456789012 |
| SSO Role Name | The permission set / role name assigned to you | AdministratorAccess |
Click Continue to proceed.
Step 4: Authorize in Your Browser
After clicking Continue, Abacus.AI will initiate the device authorization flow:
- A verification link and a user code will be displayed.
- Click the verification link — it will open in a new browser tab.
- Sign in to your AWS SSO portal if prompted.
- Enter the user code when asked, and click Authorize.
- Return to Abacus.AI and click I've Authorized to complete the connection.
The authorization code expires after approximately 10 minutes. If it expires, simply click Cancel and start the process again.
Step 5: Verify the Connection
Once connected, AWS SSO will appear in your connected services. You can now use the AWS Tool in ChatLLM Teams to interact with your AWS resources.
Using the AWS Tool
Once your AWS SSO connector is set up, you can interact with AWS services directly from ChatLLM Teams.
Example Prompts
| Prompt | What It Does |
|---|---|
| "List all my S3 buckets" | Calls s3:ListBuckets |
| "Show me all running EC2 instances" | Calls ec2:DescribeInstances |
| "Create an S3 bucket named my-data-bucket in us-east-2" | Calls s3:CreateBucket |
| "List all Lambda functions" | Calls lambda:ListFunctions |
| "Who am I in AWS?" | Calls sts:GetCallerIdentity |
| "List all DynamoDB tables" | Calls dynamodb:ListTables |
| "Describe my CloudFormation stacks" | Calls cloudformation:ListStacks |
Important Notes
- Per-user credentials: Each user authenticates with their own AWS SSO identity. The AWS Tool operates with the exact permissions of your assigned SSO role.
- Temporary credentials: AWS SSO provides temporary credentials that are automatically refreshed. No long-lived AWS access keys are stored.
- Permission scope: The AWS Tool can only perform actions allowed by your SSO permission set. If an action fails with an access denied error, check your permission set in IAM Identity Center.
Troubleshooting
| Issue | Solution |
|---|---|
| "Failed to register OIDC client" | Verify your SSO Region is correct and IAM Identity Center is enabled in that region. |
| "Device authorization expired" | The verification code expired. Click Cancel and restart the connection process. |
| "Access denied by user" | You denied the authorization request in the browser. Try again and click Authorize when prompted. |
| "AWS SSO session has expired" | Re-connect the AWS SSO connector to refresh your credentials. |
| "Failed to get AWS role credentials" | Verify your AWS Account ID and SSO Role Name are correct, and that your user has been assigned the permission set for that account. |
| API calls return access denied | Your SSO permission set does not include the required permissions. Ask your AWS administrator to update the permission set. |