Azure Databricks User Connector Setup Guide
This guide describes how to configure a secure connection from Abacus.AI to data hosted on the Azure Databricks platform using the Databricks JDBC driver and Databricks OAuth.
When the connector is created with Import RBAC enabled, every end user signs in to Databricks with their own identity, and all queries run with that user's Databricks permissions.
Prerequisites
Before you begin, gather the following:
- Account admin access to the Databricks account console (
https://accounts.azuredatabricks.net)
- Required to create the OAuth application used for user sign-in (see Step 1).
- Databricks personal access token
- In your Databricks workspace, go to User Settings and generate a personal access token.
- JDBC connection details for your Databricks cluster
- Navigate to Compute, select your cluster, open Advanced options, and then the JDBC tab to view connection info.
- Note: Do not include
https://in the Database Server URL/IP. Use only the server hostname or address.
Step 1: Create an OAuth app in Databricks
Abacus.AI authenticates each end user through the Databricks account-level OAuth flow, so you must register Abacus.AI as a custom OAuth application (an "app connection") in your Databricks account console.
- Log in to the Databricks account console as an account admin, open Settings, and select the App connections tab.
- Click Add connection.

- Application Name: enter a name that identifies the integration, for example
Abacus.AI. - Redirect URLs: enter the Abacus.AI callback URL exactly as shown, on its own line:
https://abacus.ai/oauth/callback
- Access scopes: using the Add scope dropdown, make sure the application grants the scopes that Abacus.AI requests:
sql— required. Abacus.AI requests this scope so it can list catalogs, schemas and tables and run queries through the Databricks JDBC driver on behalf of the signed-in user.offline_access— required. Issues the refresh token that keeps a user signed in between queries.openid,emailandprofileare added by Databricks automatically for the ID token; leave them in place.
- Client secret: keep Generate a client secret selected. Abacus.AI connects as a confidential client and needs the secret. Copy the secret as soon as it is displayed — Databricks does not show it again, and it cannot be changed after the connection is created.
- Single-use Refresh Tokens: leave Enable single-use refresh tokens (refresh token rotation) unselected. Abacus.AI stores the refresh token issued at sign-in; with rotation enabled that stored token stops working after the first refresh and users are asked to sign in again.
- Leave the Access token TTL and Refresh token TTL values at their defaults unless your organization requires different lifetimes.
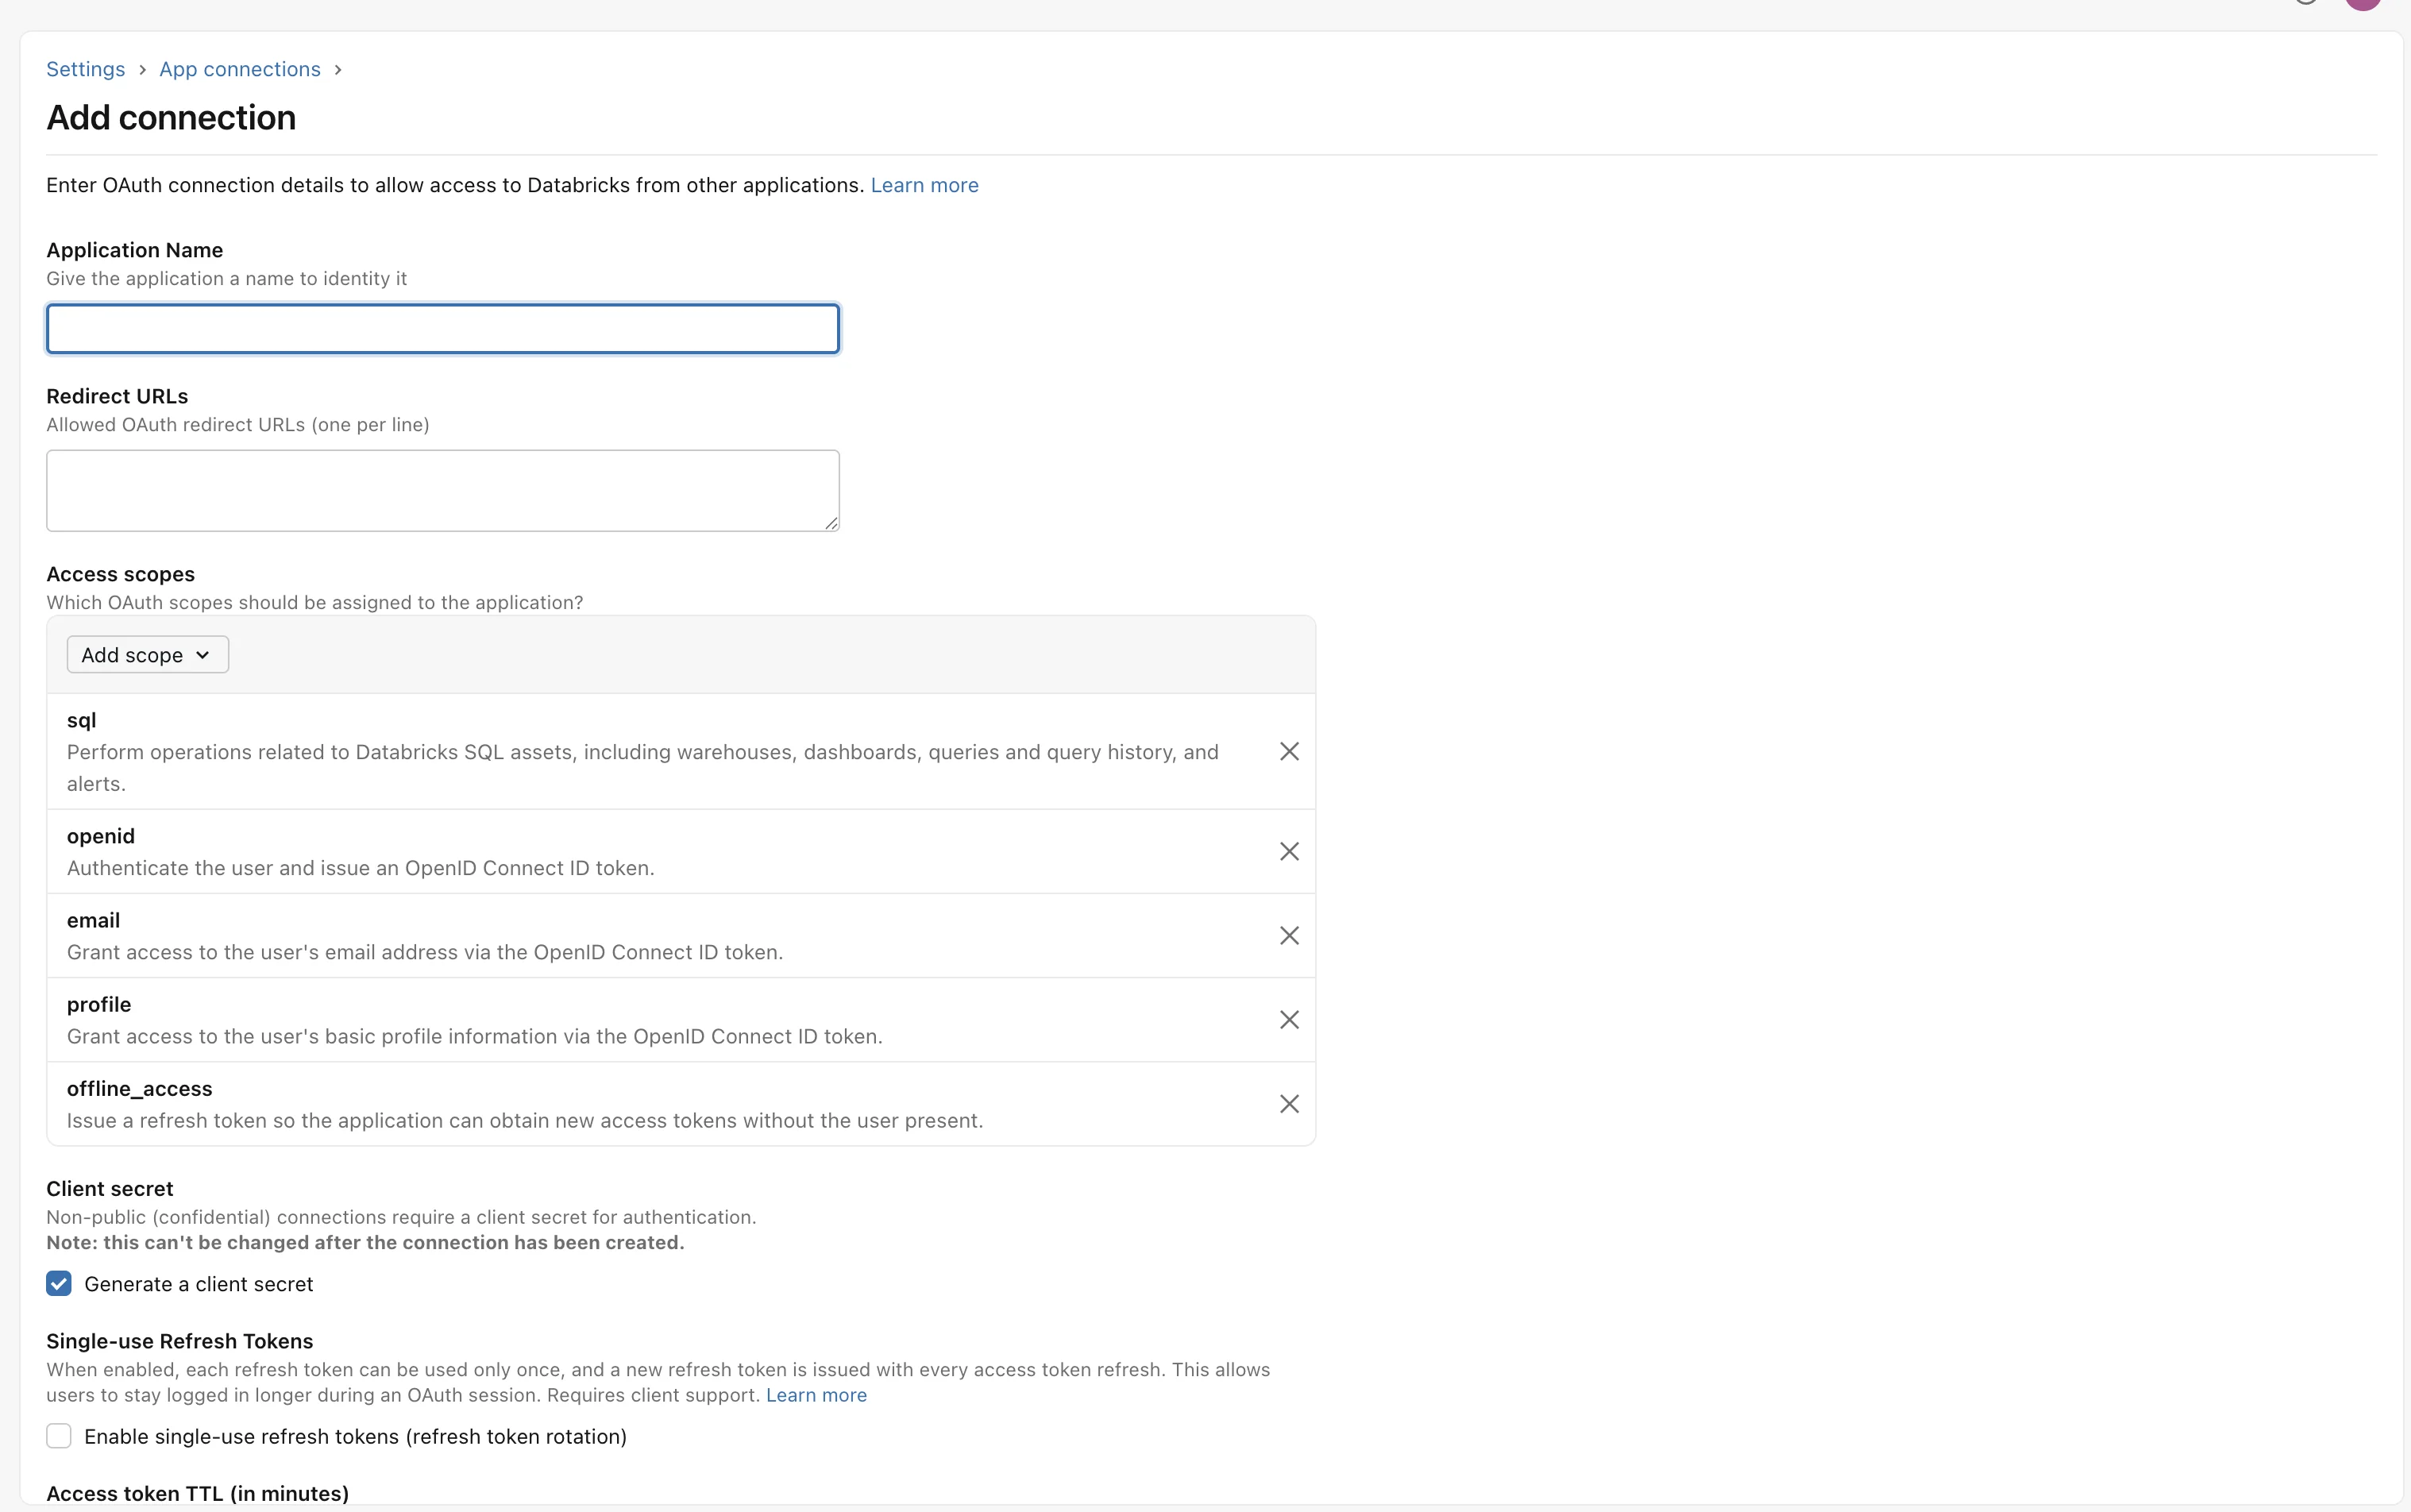
- Save the connection, then copy the Client ID and Client secret.
- Copy your Databricks Account ID from the account console (available in the user menu in the top-right corner of the console).
Note: Databricks can take up to 30 minutes to apply a new or updated OAuth application.
With this app in place, Abacus.AI sends users to https://accounts.azuredatabricks.net/oidc/accounts/<account-id>/v1/authorize to sign in. If your Databricks account is hosted on AWS or GCP, the same app connection is created in the corresponding account console (accounts.cloud.databricks.com or accounts.gcp.databricks.com).
Step 2: Set up the connector in Abacus.AI
-
Open the Abacus.AI Connected Services Dashboard: https://abacus.ai/app/profile/connected_services
-
Click Add New Connector, choose ODBC/JDBC, and select Databricks JDBC driver from the Driver dropdown.
-
Turn on the Import RBAC toggle. Note: Please enable the Import RBAC toggle; otherwise, users will use the JDBC/ODBC connection and will have access to more data than expected.
-
Enter the OAuth details of the Databricks app connection created in Step 1:
- Client ID: the client ID of the Databricks app connection.
- Client Secret: the client secret generated for that app connection.
- Account ID: your Databricks account ID.
- Hosted Platform:
Azure. SelectAWSorGCPif your Databricks account is hosted there, orCustomfor a custom-hosted platform —Customadditionally requires the OAuth authorization and token URLs of your deployment.
-
Fill in all Databricks configuration details gathered above (server hostname/address, JDBC info, token, etc.) and click Save.
-
Click Verify and wait for the connector to be validated. If an error appears, follow the message to troubleshoot and correct your configuration.
Build a Custom Chatbot on the connector
Databricks is a database user connector: it is used through a Custom Chatbot and is not a direct chat tool for RouteLLM.
Follow Use a database connector in a Custom Chatbot: create a Custom Chatbot project, train the model with Structured data source → External Databases, select the Databricks connector from Step 2 and add the tables to use, then deploy and test it.
End-user sign-in
When a user enters their first question, they are asked to sign in to Databricks once and to approve the scopes requested by the Abacus.AI app connection. Queries then run with that user's own Databricks permissions.
Troubleshooting
-
Sign-in fails with a redirect URI or invalid client error
- Confirm the app connection lists
https://abacus.ai/oauth/callbackexactly, with no trailing slash or extra path. - Confirm the Client ID, Client Secret and Account ID in the connector match the Databricks app connection.
- A newly created or edited app connection can take up to 30 minutes to become active.
- Confirm the app connection lists
-
Sign-in fails with an invalid or insufficient scope error
- Confirm both
sqlandoffline_accessare listed under the app connection's access scopes.
- Confirm both
-
Users are asked to sign in repeatedly
- Confirm single-use refresh tokens (refresh token rotation) is disabled on the app connection.
- Check the refresh token TTL configured for the app connection.
-
Verification fails on connector save
- Re‑check server hostname/address formatting (no
https://). - Confirm the personal access token is valid and not expired.
- Ensure JDBC details (from Compute > Advanced options > JDBC) match the active cluster.
- Re‑check server hostname/address formatting (no
-
Unable to access tables after verification
- Confirm the user or service principal has the necessary Databricks and data permissions (RBAC).
- Re‑verify the connector to surface detailed error messages.