NetSuite Connector Setup Guide
This guide explains how to set up the NetSuite connector end to end — the one-time administrator setup, how each user connects their own NetSuite account, and how to enable the NetSuite tool in a Custom Chatbot. Once set up, your chatbots and agents can read and write NetSuite records — customers, sales orders, invoices, items, vendors and more — and run SuiteQL queries through the SuiteTalk REST Web Services API.
Setting up NetSuite is a two-part process:
| Part | Who does it | What it does |
|---|---|---|
| 1. Config connector | A NetSuite administrator together with an Abacus.AI workspace administrator | Registers your NetSuite Integration Record (OAuth 2.0 application) credentials once for the whole workspace. |
| 2. User-level connector | Each end user | Signs in to NetSuite through OAuth 2.0 so the agent acts under that user's own NetSuite login and permissions. |
Once NetSuite is connected from Profile → User Connectors, it works straight away in ChatLLM Teams chats with RouteLLM selected, and with the Abacus AI Agent.
- In ChatLLM Teams, click Connectors on the home page (or go to Profile → User Connectors) and connect NetSuite.
- Open a new chat and select RouteLLM (
route-llm) from the model selector. - Ask a question about your NetSuite data — for example "List the NetSuite sales orders created this week". The first time you query it you may be asked to authorize the connector; complete the sign-in once and the request continues automatically.
An organization admin must create the NetSuite config connector first (Part 1 below).
The Custom Chatbot steps below are only needed when you want a purpose-built bot with its own instructions and a restricted set of tools. See the User Connectors guide for the full walkthrough.
Prerequisites
Before starting, ensure you have:
- Access to the Abacus.AI platform.
- For Part 1: a NetSuite account with the Administrator role (needed to enable features, create an Integration Record and edit roles), your NetSuite Account ID, and administrative access in Abacus.AI to create connectors.
- For Part 2: a NetSuite user account with a role that carries the Log in using OAuth 2.0 Access Tokens, OAuth 2.0 Authorized Applications Management and REST Web Services permissions.
A config connector is required for the NetSuite user connector to work. An administrator must first register your NetSuite Integration Record (Account ID, Client ID and Client Secret) as a config connector. Without it, users have no OAuth application to authenticate against and connecting fails with "NetSuite organization-level setup is incomplete".
Part 1: Administrator setup
Step 1: Find your Account ID
In NetSuite, go to Setup → Company → Company Information and note the Account ID.
It looks like 1234567 for a production account or 1234567_SB1 for a sandbox. Abacus.AI uses this value to build the account-specific SuiteTalk endpoints for your instance.
Step 2: Enable the required features
Go to Setup → Company → Enable Features and open the SuiteCloud subtab, then:
- Under SuiteTalk (Web Services), check REST WEB SERVICES.
- Under Manage Authentication, check OAUTH 2.0.
- Accept the SuiteCloud Terms of Service if prompted.
- Click Save.
Step 3: Create the Integration Record (OAuth 2.0 application)
Go to Setup → Integration → Manage Integrations → New and configure the record:
-
Name — something recognizable, for example
Abacus.AI. -
State — set to Enabled.
-
Under OAuth 2.0, check AUTHORIZATION CODE GRANT.
-
REDIRECT URI — enter exactly:
https://abacus.ai/oauth/callback -
Under SCOPE, check REST WEB SERVICES. Only check RESTLETS or SuiteAnalytics Connect if your integration also needs them.
-
Leave TOKEN-BASED AUTHENTICATION and the client credentials (machine-to-machine) options unchecked — Abacus.AI uses the interactive Authorization Code Grant.
-
Click Save.
NetSuite displays the CLIENT ID (CONSUMER KEY) and CLIENT SECRET (CONSUMER SECRET) only once, immediately after you save the Integration Record. Copy both values before leaving the page. If you lose the secret you must reset it from the Integration Record and update the Abacus.AI config connector.
Step 4: Grant the required role permissions
Every user who will connect to NetSuite needs a role that carries the OAuth 2.0 and REST Web Services permissions.
Go to Setup → Users/Roles → Manage Roles, edit the role your users will use, open the Permissions tab and then the Setup subtab. Add the following three permissions with Level set to Full:
| Permission | Level | Why it is needed |
|---|---|---|
| Log in using OAuth 2.0 Access Tokens | Full | Allows the role to sign in with an OAuth 2.0 access token. |
| OAuth 2.0 Authorized Applications Management | Full | Allows the user to authorize the Abacus.AI Integration Record. |
| REST Web Services | Full | Allows the role to call the SuiteTalk REST API. |
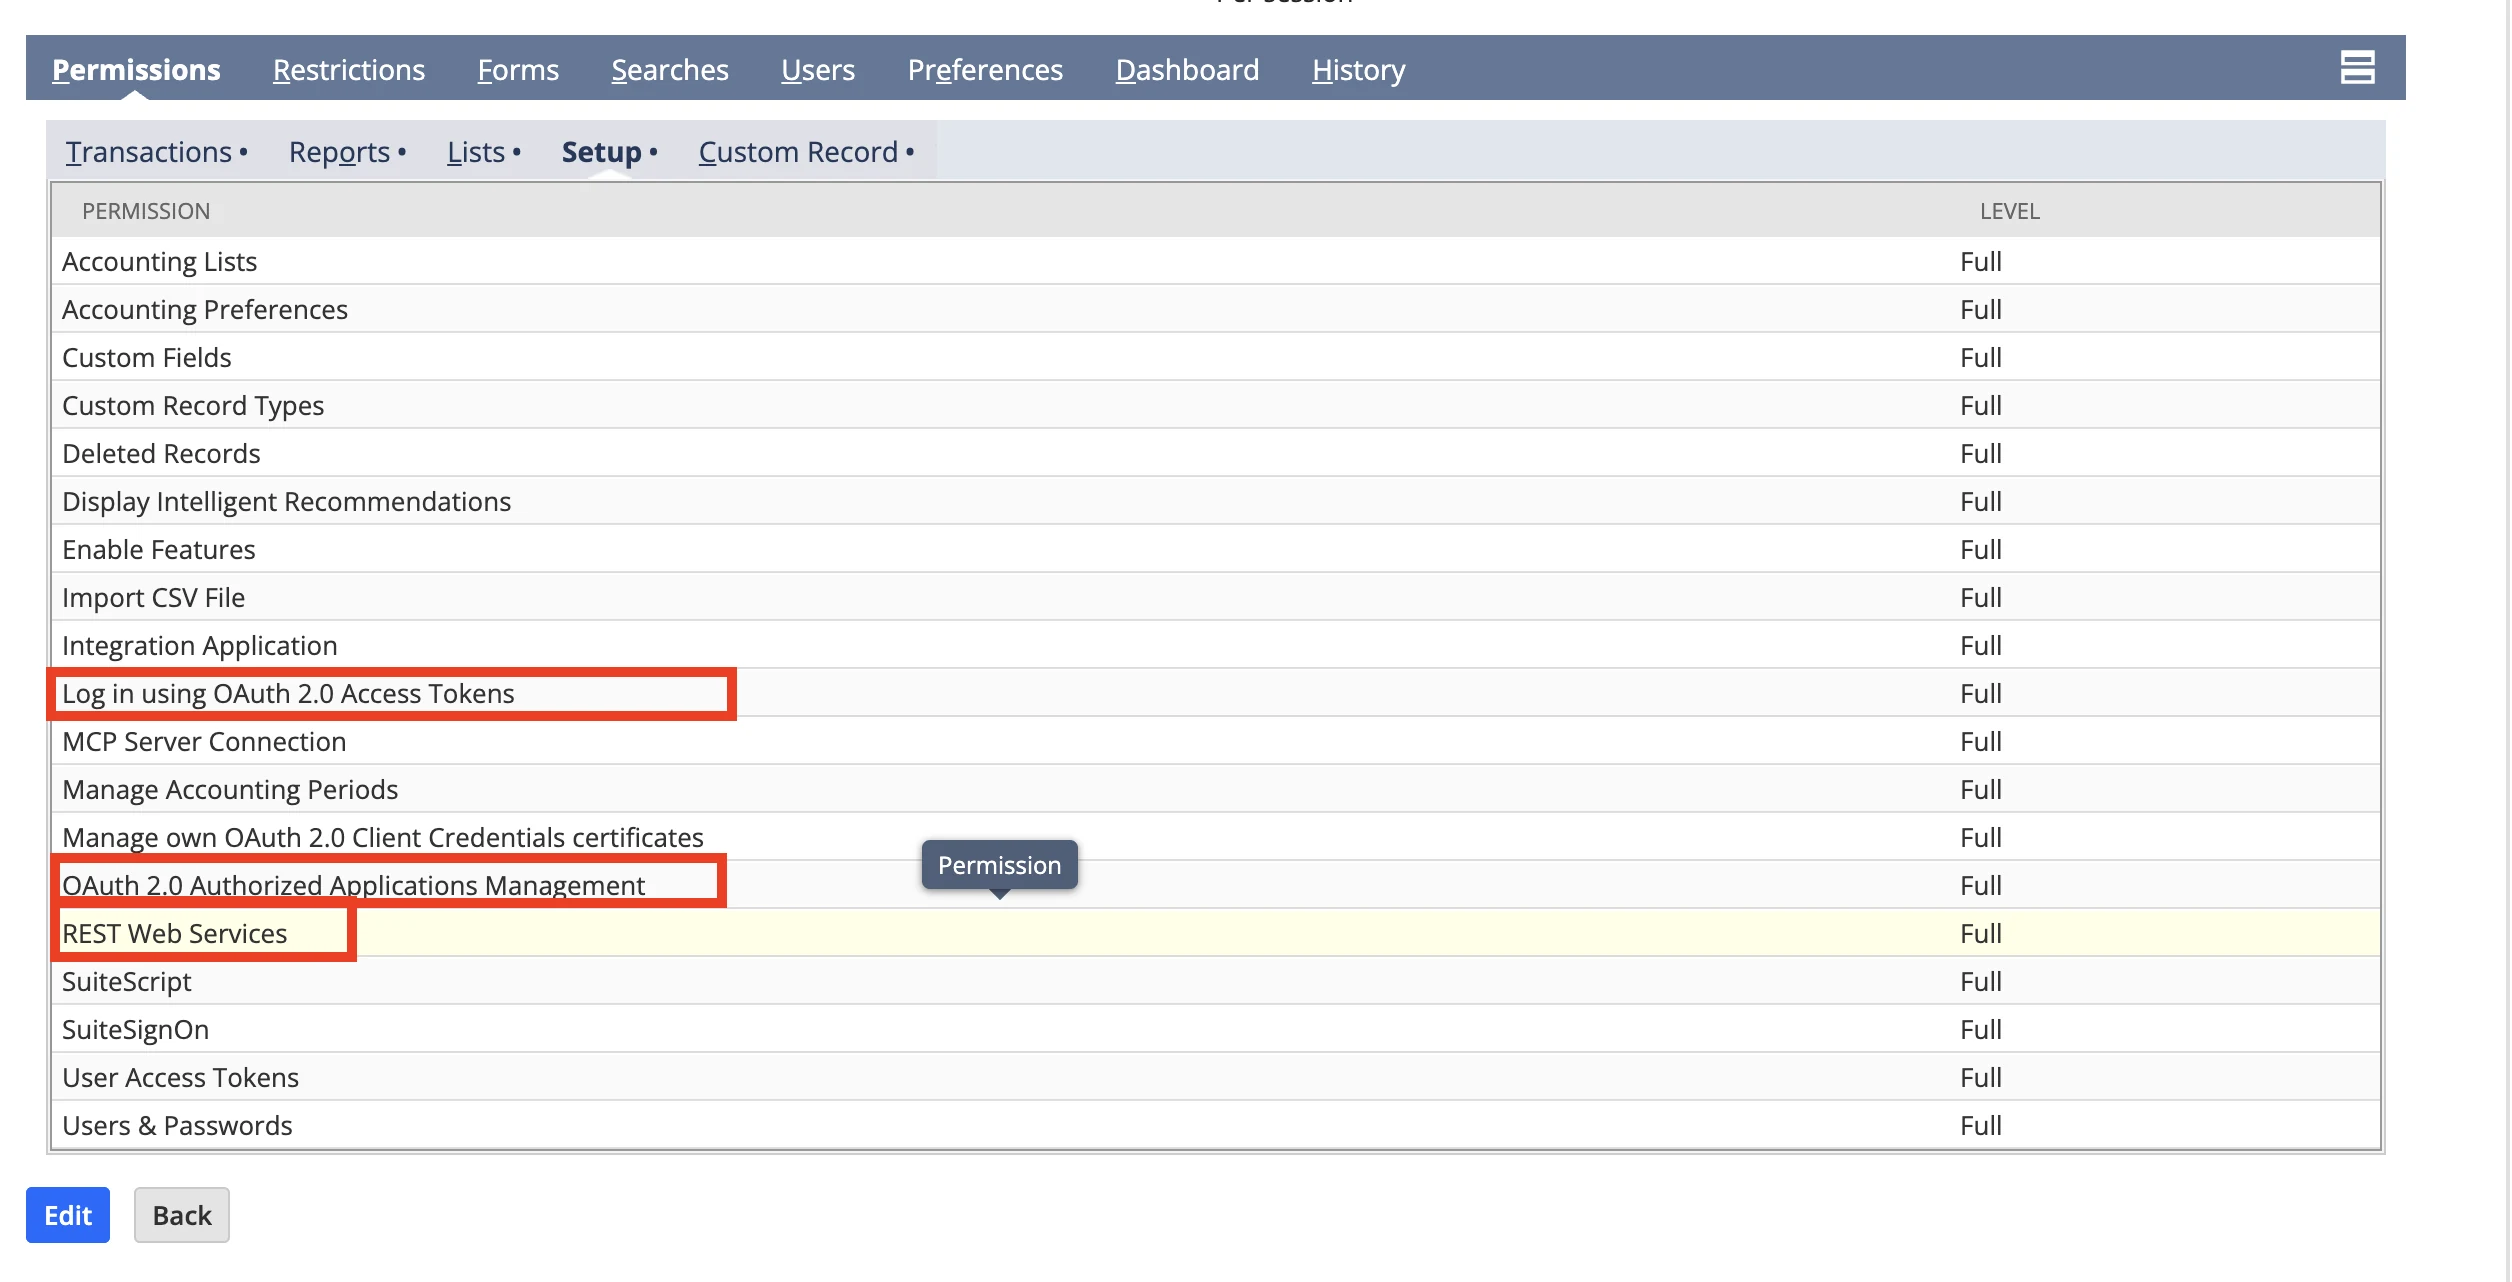
Also grant the record-level permissions the agent needs on the Transactions, Lists, Reports and Custom Record subtabs. For example, reading customers requires the Customers permission under Lists, and reading sales orders requires Sales Order under Transactions. The connector can only see what the role can see.
Do not use a Web Services Only or Single Sign-On Only role. Those role types block the interactive browser sign-in and users will see "Your Role Does Not Support OAuth2 Login" when they try to connect.
Step 5: Assign the role to your users
Go to Setup → Users/Roles → Manage Users, edit each user who will connect, open the Access tab and add the role from Step 4. Save.
Step 6: Create the config connector in Abacus.AI
-
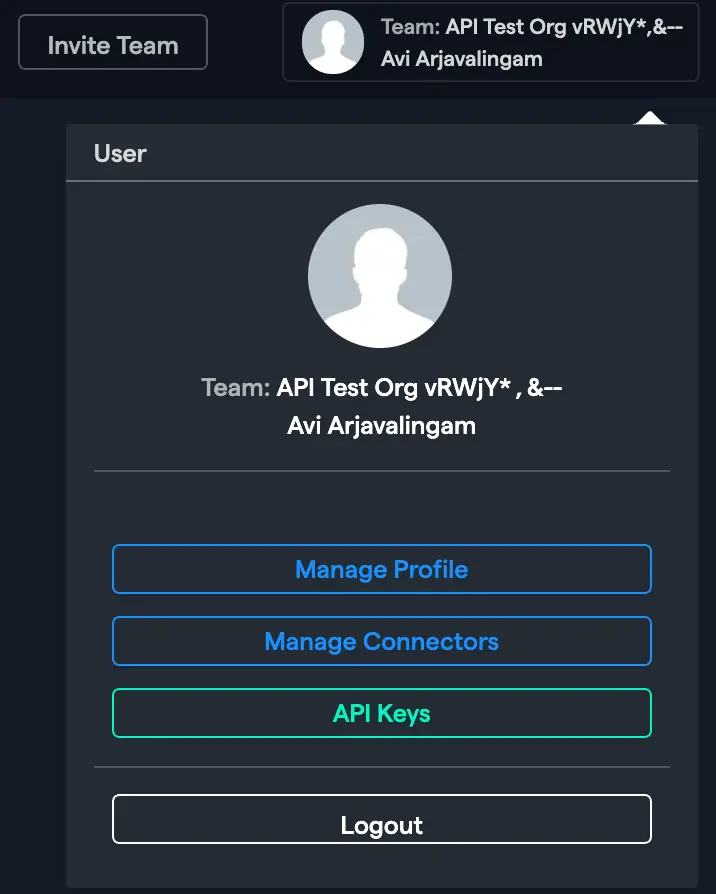
Navigate to the Abacus.AI Connected Services Dashboard. You can also click your profile picture in the top right corner and select "Manage Connectors".

-
Click "Add New Connector" and choose "NetSuite" from the "Select a Service" popup.
-
Fill in the Integration Record details you collected in the previous steps:
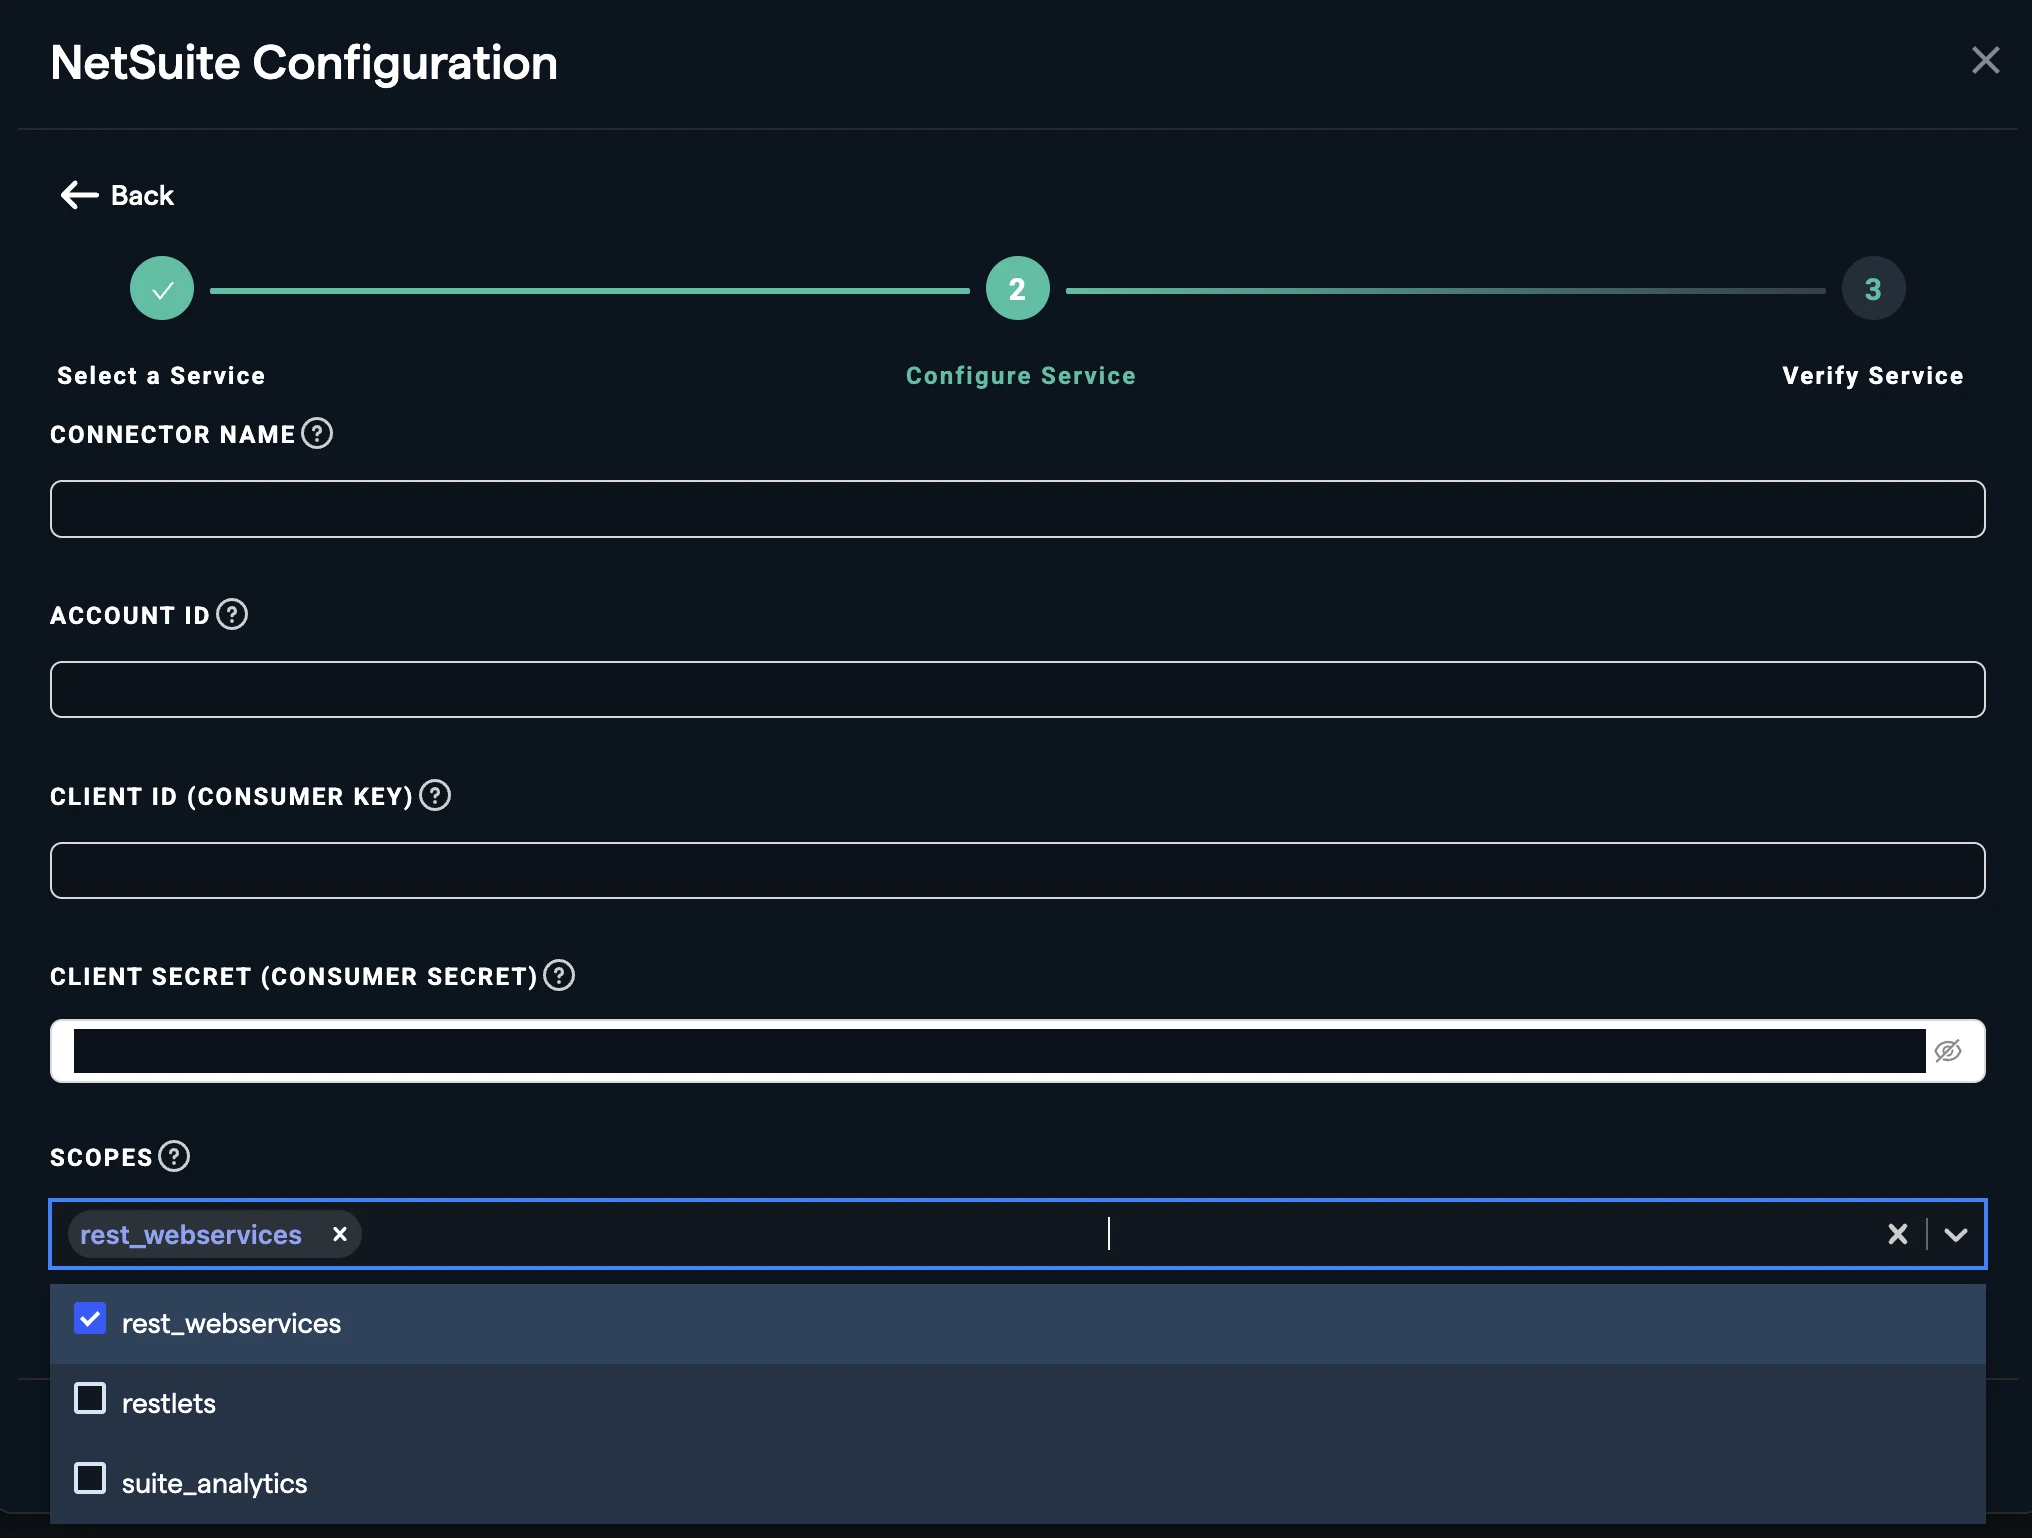
Field Required Description Connector Name No A name to identify this NetSuite config connector. Defaults to NetSuite Config Connector - <org id>.Account ID Yes Your NetSuite Account ID from Step 1, e.g. 1234567or1234567_SB1.Client ID (Consumer Key) Yes The Client ID / Consumer Key of the Integration Record from Step 3. Client Secret (Consumer Secret) Yes The Client Secret / Consumer Secret of the Integration Record from Step 3. Scopes Yes OAuth 2.0 scopes requested when users authenticate. rest_webservicesis selected by default and is required. Addrestletsorsuite_analyticsonly if you also enabled those scopes on the Integration Record. -
Click "Create".
The NetSuite config connector is inherently config-only — it stores credentials for user connections and does not itself connect to NetSuite, so there is no "Config Only" toggle to set. You can edit it later from the Connected Services Dashboard if the Account ID, credentials or scopes change.
Part 2: Connecting NetSuite in ChatLLM Teams
Once the config connector exists, each end user creates their own NetSuite connection through an OAuth sign-in.
- In ChatLLM Teams, click the Connectors link on the home page, or click your profile in the top right and navigate to Profile → User Connectors.
- Find NetSuite in the list and click it.
- A browser pop-up opens on your NetSuite account's login page. Sign in with the NetSuite user whose role has the permissions from Step 4.
- Review the requested access and click Allow.
- The pop-up closes and NetSuite appears under your connected services, ready to use in chat.
The sign-in page is hosted on your own NetSuite account domain, which is derived from the Account ID on the config connector. If you are already signed in to NetSuite in the same browser, NetSuite may skip straight to the authorization prompt.
Part 3: Using NetSuite in a Custom Chatbot
Follow these steps to build a Custom Chatbot that uses the NetSuite tool.
1. Navigate to Projects Page
Navigate to the projects page by clicking on the ABACUS.AI logo.
2. Create New Project
Click on "Create a new project" to begin setting up your ChatLLM project.
3. Select Project Type
Choose GenAI → Custom Chatbot option from the available project types.
4. Configure Project Name
Enter a descriptive name for your project that reflects its purpose.
5. Skip to Dashboard
Select "Skip to project dashboard" to proceed directly to the project configuration.
6. Access Model Training
- Click on the Model option in the left toolbar.
- Select "Train Model" in the top right corner of the page.
7. Configure Advanced Options
Navigate through the following menu structure:
- Select Advanced Option
- Choose Tool Use
- Select Netsuite_Tool
- Navigate to Config Connectors and pick the NetSuite config connector created in Step 6.
Make sure to select the config connector. Without it, end users will not be able to connect to NetSuite when they use the chatbot.
8. Initiate Model Training
Click on "Train Model" to begin the training process.
9. Access Trained Model
Once training is complete:
- Click on Models in the navigation.
- Select your newly trained model.
10. Create Deployment
Click on "Create a new deployment" to make your model available for use.
11. Configure Deployment Type
- Select "Offline Batch + Realtime" deployment option.
- Click "Next" to proceed.
12. Name Your Deployment
Enter a user-friendly name that your end users will see, then click "Deploy".
13. Monitor Deployment Status
- Return to your model by clicking Models → [Your Model Name].
- Wait for the deployment status to show as "Active".
- Click on the deployment name once active.
14. Access Prediction Dashboard
Click on the "Prediction Dash" option under the Deployment section.
15. Test Your Bot
Click on "Go to Abacus.AI Chat" to access the testing interface.
16. Start Using the Chatbot
Enter your questions or prompts in the chat interface. Each user is prompted to Connect to NetSuite once; completing the NetSuite sign-in stores their connection for future conversations.
Supported NetSuite Tool Actions
The NetSuite user connector provides a thin REST wrapper that lets the AI agent call the SuiteTalk REST Web Services API. The tool resolves your account host from the connector, attaches the OAuth access token, and refreshes it automatically when it expires. You only provide the path after the /services/rest/ base.
Common Operations
| Operation | Endpoint | Method | Description |
|---|---|---|---|
| List customers | record/v1/customer | GET | List customer records |
| Get customer | record/v1/customer/{id} | GET | Fetch a single customer |
| Update customer | record/v1/customer/{id} | PATCH | Update fields on a customer |
| List sales orders | record/v1/salesOrder | GET | List sales orders |
| Create sales order | record/v1/salesOrder | POST | Create a sales order |
| Get invoice | record/v1/invoice/{id} | GET | Fetch a single invoice |
| Run SuiteQL | query/v1/suiteql | POST | Run a SuiteQL query with a JSON body such as {"q": "SELECT id, companyname FROM customer"} |
The {account} host is derived automatically from the config connector's Account ID — never include it in the endpoint path. Pagination uses the limit and offset query parameters; NetSuite returns a hasMore flag and links for the next page. The Prefer: transient header required by SuiteQL is set automatically.
Important Notes
- Config Connector Required: The NetSuite config connector must exist before any user can connect. See Part 1: Administrator setup.
- Per-user identity: Each user authenticates with their own NetSuite login, so the agent is limited to that user's NetSuite role permissions.
- Automatic token refresh: NetSuite access tokens are valid for a fixed 60 minutes and are refreshed automatically. NetSuite also rotates the refresh token on every refresh, and Abacus.AI persists the new value for you.
- Refresh token lifetime: The refresh token lifetime is configured on the Integration Record (1–720 hours, 7 days by default). If a user does not use the connector within that window, they will be asked to reconnect.
- Scopes:
rest_webservicesis required.restletsandsuite_analyticsare optional and only take effect if the administrator selected them both on the Integration Record and on the config connector. - Sandbox accounts: A sandbox Account ID such as
1234567_SB1points at a different SuiteTalk host than production. Use a separate config connector if you need to reach both.
Troubleshooting
- "NetSuite config-only setup requires the following fields: ...": One of Account ID, Client ID or Client Secret is missing on the config connector. Re-open it and fill in every required field.
- "NetSuite organization-level setup is incomplete": The config connector is missing or incomplete. Ask an administrator to complete Part 1: Administrator setup.
- "Your Role Does Not Support OAuth2 Login": Your NetSuite role is a Web Services Only or Single Sign-On Only role, or it is missing the Log in using OAuth 2.0 Access Tokens permission. See Step 4.
- "Not enough permissions granted to access the requested resources": The scopes requested by Abacus.AI are not all enabled on the NetSuite Integration Record. Ask your administrator to align the Integration Record SCOPE checkboxes with the connector's Scopes field.
- Invalid redirect URI on the NetSuite sign-in page: The Integration Record must list
https://abacus.ai/oauth/callbackexactly, with no trailing slash. - Wrong account or sandbox: The Account ID determines the SuiteTalk host. A sandbox Account ID such as
1234567_SB1resolves to a different host than production, so use the id of the instance you actually want to reach. - Verification is slow the first time: Abacus.AI validates the connection against the SuiteTalk metadata catalog. On accounts with many custom records this can take up to a minute — wait for it to finish rather than retrying.
- HTTP 403 on a specific record type: Your NetSuite role is missing the record-level permission for that record. Add it under the Transactions, Lists, Reports or Custom Record subtab of the role.
- Connection stopped working after a while: The refresh token may have expired or the Integration Record's client secret was reset. Reconnect NetSuite from Profile → User Connectors.