User Connectors
User connectors let Abacus.AI access a data source under each end user's own identity, rather than through shared credentials. Every request runs with the user's own permissions and roles in the source system, so existing role-based access control (RBAC) is enforced automatically and every access is attributable to a specific person.
This eliminates credential sharing, follows the principle of least privilege, and produces per-user audit trails in the source system, with no extra configuration on the Abacus.AI side.
User connectors vs. organization connectors
| User connector (this section) | Organization connector | |
|---|---|---|
| Set up by | Each end user, for themselves | An admin or developer, once |
| Runs as | The signed-in user | Shared credentials or a service account |
| Data is read | Live, on every request | Ingested into datasets on a schedule or via realtime sync |
| Typical use | Asking ChatLLM about my mail, files, tickets, meetings or database rows | Training ML models and RAG chatbots on a shared document set or table |
If you are training a model or building a chatbot over a fixed set of documents, you want an organization connector instead. The Connectors overview has a fuller comparison.
For the Microsoft user connectors (OneDrive, SharePoint, Outlook, Microsoft Teams and Azure SQL), a Microsoft Entra admin must create the connector once and tick the "Consent on behalf of your organization" checkbox on Microsoft's Permissions requested screen. This is not the same as the Grant admin consent button in the Entra admin center. Until it is done, other users in the tenant are blocked by Microsoft with "Need admin approval"; afterwards they can each sign in and create their own connector freely. See Microsoft Entra Tenant Consent.
Two ways to use a user connector
-
Connect it in ChatLLM Teams and use it in chat (most connectors). Go to Profile → User Connectors, connect the service, and it is immediately available in chats with RouteLLM and to the Abacus AI Agent. No project or training is needed. See Using a user connector with RouteLLM below.
-
Attach it to a Custom Chatbot in the Developer Platform. While training a Custom Chatbot you can select a connector's tool under Advanced Options → Tool Use, or, for database connectors, choose the connector as an External Database. This gives you a purpose-built bot with its own instructions and a restricted set of tools. See the Custom Chatbots guide.
Available user connectors
Work directly in chat, no Custom Chatbot required
These connectors ship with a built-in chat tool. Connect them once from the User Connectors panel and they are immediately usable in ChatLLM Teams chats with RouteLLM and by the Abacus AI Agent. Connectors with a setup guide are linked.
| Collaboration and files | Productivity and business apps | Cloud and developer tools |
|---|---|---|
| Slack | Gmail | AWS SSO |
| Microsoft Teams | Outlook | Microsoft Azure |
| Confluence | Google Calendar | Google Cloud |
| Jira | Google Sheets | GitHub |
| SharePoint | Google Analytics, Google Ads, Google Search Console | GitLab |
| OneDrive | Smartsheet | Figma |
| Google Drive | Monday.com | |
| Box | HubSpot | |
| Dropbox | QuickBooks | |
| Zoom (coming soon) | DocuSign | |
| X (Twitter) | Tableau | |
| YouTube, Instagram, Meta Ads | NetSuite | |
| Oracle Fusion |
QuickBooks, Tableau, NetSuite and Oracle Fusion additionally require an organization-level config connector before end users can connect. See Scopes and config connectors.
Database user connectors
These connectors run queries under each user's own database role. They are used through a Custom Chatbot built on the connector and are not available as a direct chat tool with RouteLLM. Each guide covers the source-side setup; the chatbot steps are shared in Use a database connector in a Custom Chatbot.
- Snowflake
- Athena
- BigQuery
- Azure SQL
- Azure Databricks
- Salesforce
- MySQL
- MongoDB
Other user connectors
Autodesk, Reddit, Outreach, Mailchimp, Patreon, Google Chat, Shopify and Generic OAuth connect at the user level and are available to the Abacus AI Agent and agent workflows, but they do not expose a dedicated built-in chat tool.
Using a user connector with RouteLLM
This section walks you through connecting a user connector and then using it directly in chat with RouteLLM, Abacus.AI's automatic model router. The steps use Zoom as the example, but the same flow applies to every connector in the Work directly in chat list above. Each connector page repeats these steps for that connector.
Step 1 — Open the User Connectors panel
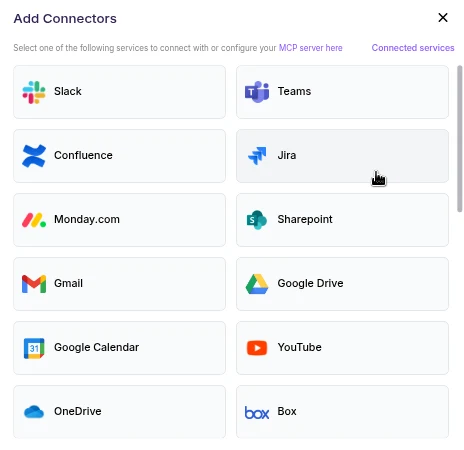
In ChatLLM Teams, click the Connectors link on the home page, or click your profile in the top right and navigate to Profile → User Connectors.
Step 2 — Select and connect the service
- Scroll the connector list and click Zoom.
- A browser pop-up opens asking you to sign in to Zoom and authorize Abacus.AI.
- Review the requested permissions and click Allow (or Authorize).
- After authorization completes, Zoom appears under your connected services and is ready to use.
User connectors are configured once per user and run under your own identity. After the connector is set up, every chatbot and the Abacus AI Agent in your workspace can query data from it.
Step 3 — Start a chat with RouteLLM
- Open a new chat in ChatLLM Teams.
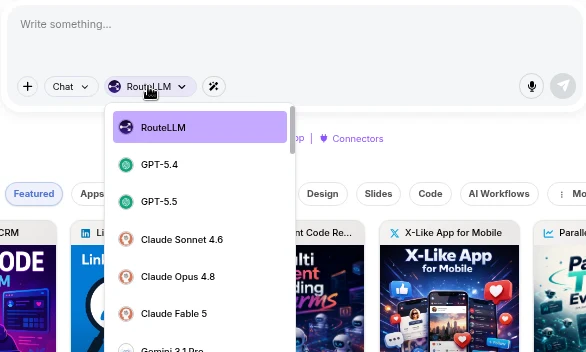
- From the model selector, choose RouteLLM (
route-llm). RouteLLM automatically routes each request to the most suitable underlying model, and is available for unlimited use to ChatLLM subscribers.
- Ask a question that references Zoom, for example "List my Zoom meetings scheduled for this week". RouteLLM invokes the Zoom tool, fetches the data under your identity, and responds in chat.
The first time you query a newly connected service in a chat, you may be prompted to authorize the connector. Complete the sign-in once and the request continues automatically; subsequent requests reuse the connection.
You don't need to train a Custom Chatbot to use Zoom with RouteLLM. Once the connector is configured in the User Connectors panel, it is immediately available across your workspace chats and to the Abacus AI Agent.
Scopes and config connectors
When you connect a user connector, Abacus.AI requests a set of OAuth scopes (permissions) from the service, and you approve them on the service's consent screen. For most connectors the scopes are fixed and read-oriented. Some connectors let an organization administrator adjust them, or require the administrator to register the organization's own OAuth application, through a config connector.
A config connector is an organization-level record created in the Connected Services Dashboard with the Config Only toggle turned on (a few connectors are config-only by nature and have no toggle). It does not ingest any data or create an organization-level connection. It only stores the settings that every user-level connection for that service inherits: which scopes to request, whether to use Abacus.AI's app or your own, and any per-organization identifiers such as a Tableau Connected App or a NetSuite Integration Record.
| Connector | Config connector | What it controls |
|---|---|---|
| Outlook | Optional | Which Microsoft Graph scopes are requested (read-only by default; add send and calendar-write scopes), or your own Entra app |
| OneDrive | Optional | Use your own Entra app instead of the Abacus.AI app |
| SharePoint | Optional | Authentication type: Basic (Read Only), Write Access or Custom OAuth |
| Smartsheet | Optional | Add write scopes (WRITE_SHEETS, CREATE_SHEETS, DELETE_SHEETS, SHARE_SHEETS) |
| HubSpot | Optional | Which CRM scopes are requested |
| DocuSign | Optional | Which eSignature, Click, Maestro and Web Forms scopes are requested |
| Salesforce | Optional | Custom login URL and sandbox environments |
| QuickBooks | Required | Company ID (Realm ID) and scopes |
| Tableau | Required | Tableau Connected App (Direct Trust) credentials |
| NetSuite | Required | NetSuite Integration Record (OAuth 2.0 application) credentials |
| Oracle Fusion | Required | OCI IAM identity domain URL, Fusion URL, confidential application credentials and the Fusion resource scope |
| All other connectors | Not applicable | Fixed scopes on the Abacus.AI app |
To create a config connector:
- Go to the Connected Services Dashboard (click your profile picture in the top right, then Manage Connectors).
- Click Add New Connector and choose the service.
- Turn the Config Only toggle on, where the form shows one.
- Select the scopes or authentication type, and enter any credentials the form asks for.
- Click Create.
Scopes are fixed at the moment a user authorizes a service. After you create or change a config connector, users who connected earlier must reconnect the service from Profile → User Connectors for the new scopes to take effect.
When you attach a connector to a Custom Chatbot, pick the config connector under Advanced Options → Tool Use → Config Connectors so the chatbot's users inherit the same settings.