Microsoft Teams User Connector
Connect your own Microsoft Teams account to Abacus.AI so that ChatLLM Teams chats with RouteLLM, the Abacus AI Agent and Custom Chatbots can work with your Microsoft Teams data under your own identity. The connector can only see what your Microsoft Teams account can see, and the activity is recorded against your account in Microsoft Teams.
Microsoft blocks ordinary users from consenting to the Abacus.AI app on their own. Before anyone else in your tenant can connect Microsoft Teams, a Microsoft Entra admin must create the connector once and tick the "Consent on behalf of your organization" checkbox on Microsoft's Permissions requested screen, then click Accept.
This is not the same as the Grant admin consent button in the Entra admin center. Once the admin has ticked the checkbox, every user in that tenant can sign in and create their own connector freely. Until then Microsoft stops them with "Need admin approval".
See Microsoft Entra Tenant Consent for the full walkthrough.
Prerequisites
- Access to ChatLLM Teams
- A Microsoft 365 account with Microsoft Teams
Scopes and permissions
The Microsoft Teams connector uses the Abacus.AI application and requests a fixed set of permissions (OAuth scopes) that the Microsoft Teams tool needs. You review and approve them on the Microsoft Teams consent screen when you connect, and you can only ever access data that your own Microsoft Teams account is allowed to see.
No configuration is needed on the Abacus.AI side, and there is no config connector for Microsoft Teams. To revoke access later, remove Microsoft Teams from Profile → User Connectors; you can also revoke the Abacus.AI app from your Microsoft Teams account settings.
Use Microsoft Teams in ChatLLM
Step 1 — Connect Microsoft Teams
In ChatLLM Teams, click the Connectors link on the home page, or click your profile in the top right and navigate to Profile → User Connectors.
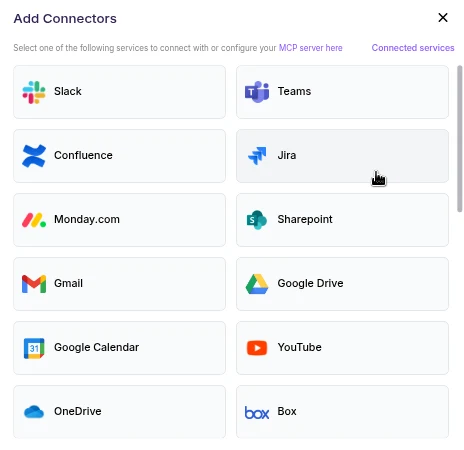
- Scroll the connector list and click Microsoft Teams.
- A browser pop-up opens asking you to sign in to Microsoft Teams and authorize Abacus.AI.
- Review the requested permissions and click Allow (or Authorize).
- After authorization completes, Microsoft Teams appears under your connected services and is ready to use.
User connectors are configured once per user and run under your own identity. After the connector is set up, every chatbot and the Abacus AI Agent in your workspace can query data from it.
Step 2 — Chat with RouteLLM
- Open a new chat in ChatLLM Teams.
- From the model selector, choose RouteLLM (
route-llm). RouteLLM automatically routes each request to the most suitable underlying model, and is available for unlimited use to ChatLLM subscribers.
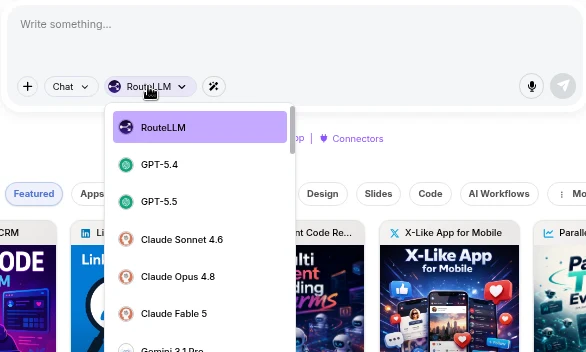
- Ask a question that references Microsoft Teams, for example "Summarize my recent Microsoft Teams messages". RouteLLM invokes the Microsoft Teams tool, fetches the data under your identity, and responds in chat.
The first time you query a newly connected service in a chat, you may be prompted to authorize the connector. Complete the sign-in once and the request continues automatically; subsequent requests reuse the connection.
You don't need to train a Custom Chatbot to use Microsoft Teams with RouteLLM. Once the connector is configured in the User Connectors panel, it is immediately available across your workspace chats and to the Abacus AI Agent.
If you want a dedicated bot with its own instructions and a restricted set of tools, train a Custom Chatbot in the Developer Platform and, under Advanced Options → Tool Use, select Teams_tool. End users of that chatbot are prompted to sign in to Microsoft Teams once, and the bot then acts under each user's own identity. See the Custom Chatbots guide for the full training and deployment walkthrough.
Troubleshooting
- The authorization pop-up does not appear: allow pop-ups for the Abacus.AI site in your browser and click Microsoft Teams in the User Connectors panel again.
- "Not authorized" or stale results: remove Microsoft Teams from Profile → User Connectors and connect it again to refresh the authorization.
- Some items are missing: the connector cannot see more than your own Microsoft Teams account can. Check your access in Microsoft Teams itself.