Outlook User Connector Setup Guide
This guide provides step-by-step instructions for creating and configuring a Outlook connector with Abacus.AI's.
Prerequisites
Before starting, ensure you have access to:
- Abacus.AI platform
- A valid Outlook account
- Administrative access to create connectors and projects
Custom OAuth (optional)
By default we request access using our app to read data. If you want to use your own app, please follow following steps to create the app.
- In the Abacus.AI interface, click on your profile picture in the top right corner.
- Select "Manage Connectors" from the dropdown menu.
- Click on "Add New Connector", choose "Outlook" from the list.
- Turn the 'Config Only' toggle on.
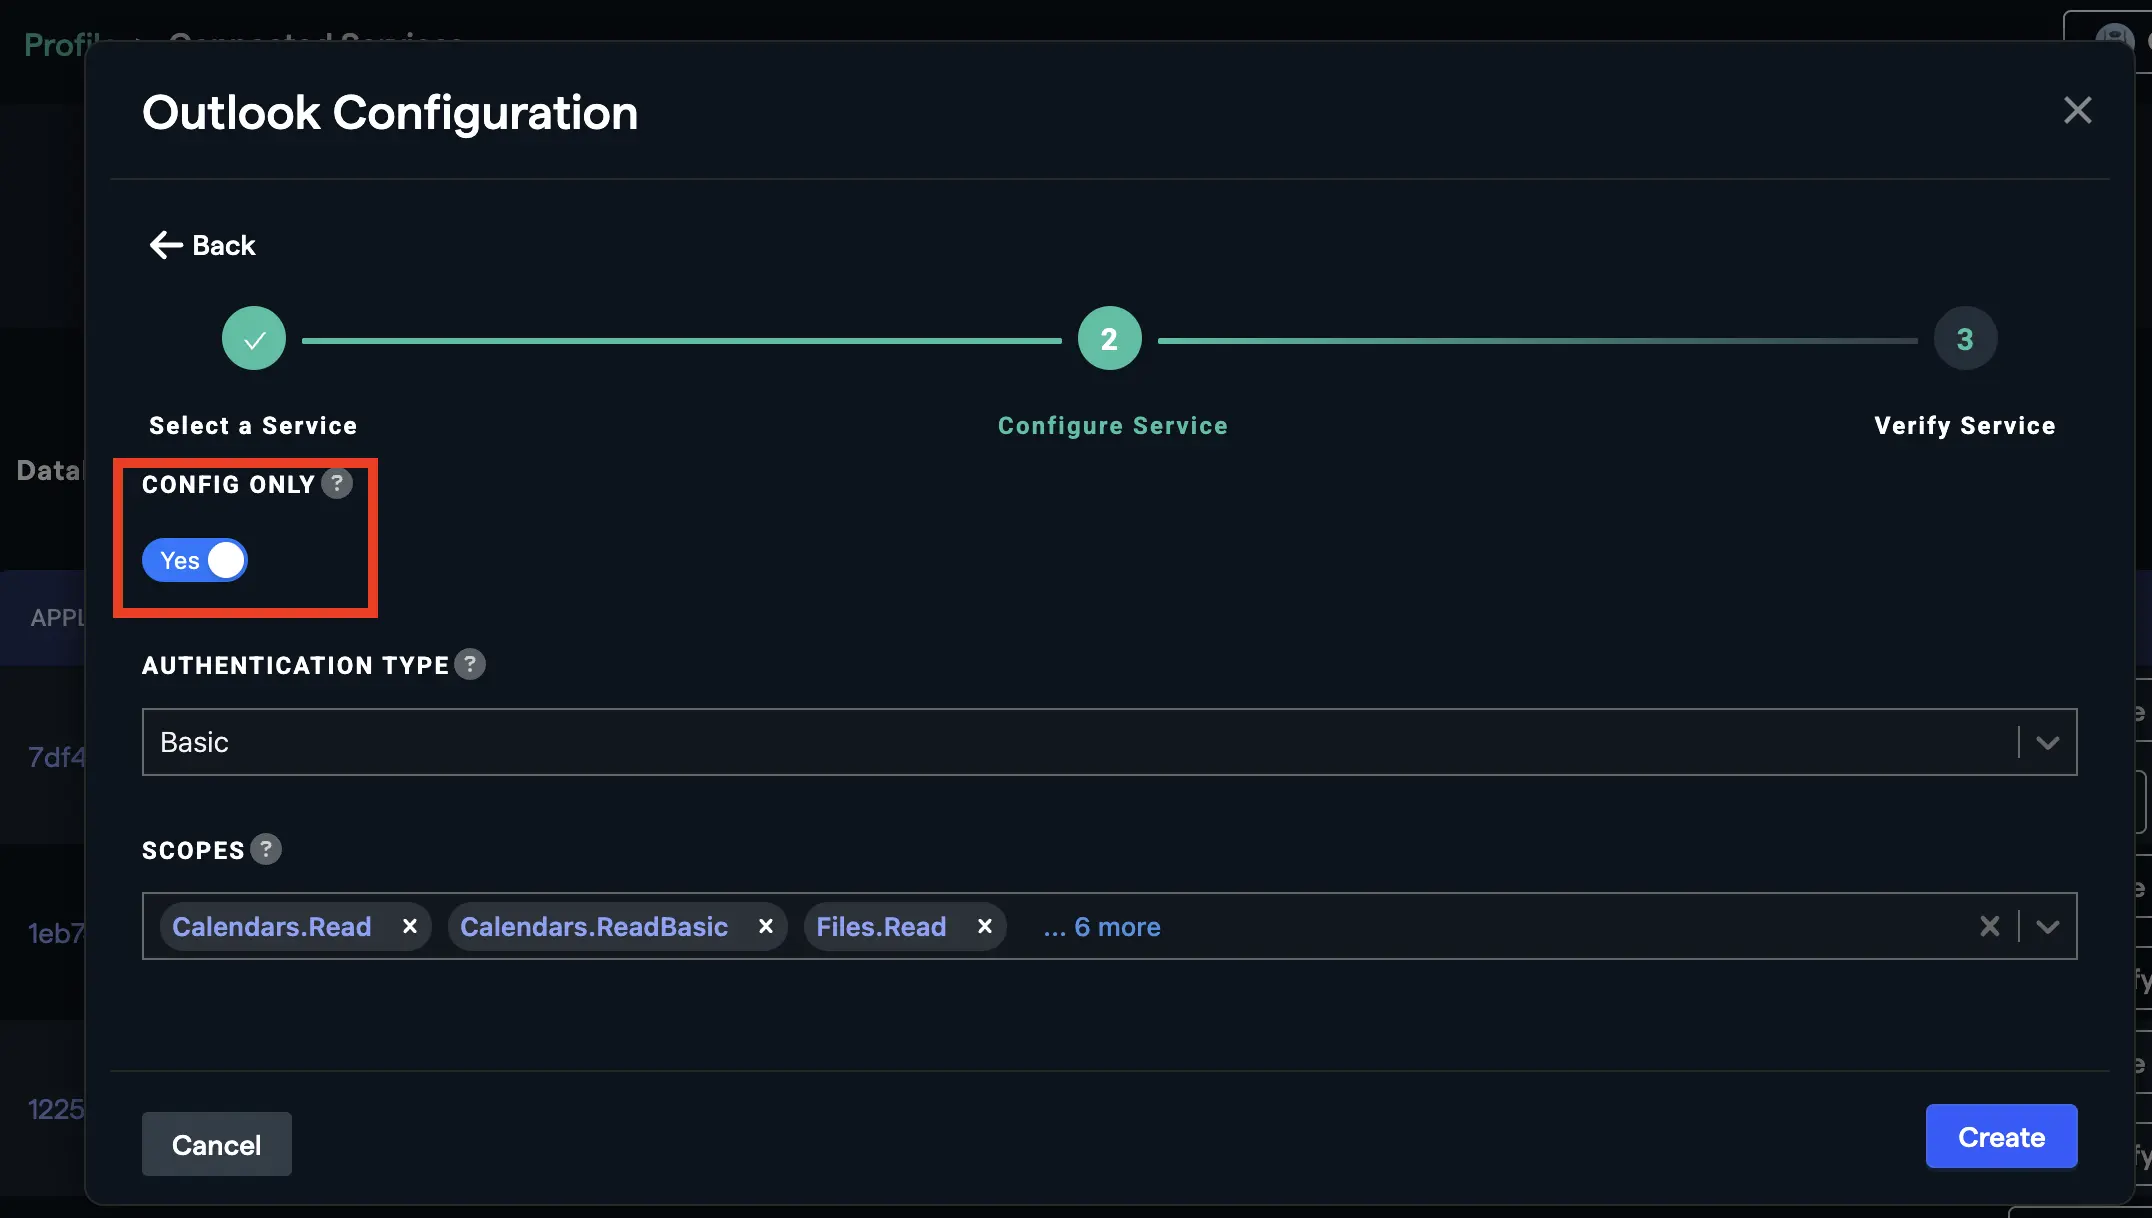
Note: Please enable the Config Only toggle; otherwise, users will end up gaining access to other users outlook account.
- Copy the app’s Client ID, Client Secret and Tenant ID, then enter them into the
CLIENT ID,CLIENT SECRETandTENANT IDfields respectively. Note: Please refer to microsft documentaiton to create the app and add necessary scopes to app. - Click
create. ** Note: The configuration process for the connector does not require a Outlook connection. If you are prompted to "Connect Outlook", please review the preceding steps to ensure the configuration is set up correctly.**
Basic (Default)
- In the Abacus.AI interface, click on your profile picture in the top right corner.
- Select "Manage Connectors" from the dropdown menu.
- Click on "Add New Connector", choose "Outlook" from the list.
- Turn the 'Config Only' toggle on.
Note: Please enable the Config Only toggle; otherwise, users will end up gaining access to other users outlook account.
- Select the appropriate scopes to grant us the necessary access.
- Click create. ** Note: The configuration process for the connector does not require a Outlook connection. If you are prompted to "Connect Outlook", please review the preceding steps to ensure the configuration is set up correctly.**
Step-by-Step Instructions
1. Navigate to Projects Page
Navigate to the projects page by clicking on the ABACUS.AI logo.
2. Create New Project
Click on "Create a new project" to begin setting up your ChatLLM project.
3. Select Project Type
Choose GenAI --> Custom Chatbot option from the available project types.
4. Configure Project Name
Enter a descriptive name for your project that reflects its purpose.
5. Skip to Dashboard
Select "Skip to project dashboard" to proceed directly to the project configuration.
6. Access Model Training
- Click on the Model option in the left toolbar
- Select "Train Model" in the top right corner of the page
7. Configure Advanced Options
Navigate through the following menu structure:
- Select Advanced Option
- Choose Tool Use
- Select Outlook_tool
- (Optional) When using your own app, navigate to Config Connectors and pick the connector configured in the Custom Auth step.
8. Initiate Model Training
Click on "Train Model" to begin the training process.
9. Access Trained Model
Once training is complete:
- Click on Models in the navigation
- Select your newly trained model
10. Create Deployment
Click on "Create a new deployment" to make your model available for use.
11. Configure Deployment Type
- Select "Offline Batch + Realtime" deployment option
- Click "Next" to proceed
12. Name Your Deployment
Enter a user-friendly name that your end users will see, then click "Deploy".
13. Monitor Deployment Status
- Return to your model by clicking Models → [Your Model Name]
- Wait for the deployment status to show as "Active"
- Click on the deployment name once active
14. Access Prediction Dashboard
Click on the "Prediction Dash" option under the Deployment section.
15. Test Your Bot
Click on "Go to Abacus.AI Chat" to access the testing interface.
16. Start Using the Chatbot
- Enter your questions or prompts in the chat interface
- Note: Each user will be prompted to log in to Outlook once for authentication
- First-time setup: The very first time anyone in your organization uses the Outlook connector, an Entra admin must grant admin consent to Abacus AI app. This one-time approval registers the Abacus Outlook app in your tenant. After this is done, all users can authenticate normally without needing admin approval again.
Permissions and Access
When setting up the connector, the following permissions are requested. Please note that all the permissions are delegated permissions:
- Calendars.Read: Read user calendars
- Calendars.Read.Shared: Read shared user calendars
- Calendars.ReadBasic: Read basic details of user calendars
- Calendars.ReadWrite: Have full access to user calendars
- Calendars.ReadWrite.Shared: Read and write shared user calendars
- Files.Read: Read user files
- Mail.Read: Read user mail
- Mail.Read.Shared: Read shared user mail
- Mail.ReadBasic: Read basic details of user mail
- Mail.ReadWrite: Read and write access to user mail
- Mail.ReadWrite.Shared: Read and write shared user mail
- Mail.Send: Send mail as a user
- Mail.Send.Shared: Send mail on behalf of others
- MailboxFolder.Read: Read a user's mailbox folders
- MailboxFolder.ReadWrite: Read and write a user's mailbox folders
- MailboxItem.Read: Read a user's mailbox items
- MailboxSettings.Read: Read user mailbox settings
- MailboxSettings.ReadWrite: Read and write user mailbox settings
- offline_access: Maintain access to data you have given it access to
- User.Read: Sign in and read user profile
- User.ReadBasic.All: Read all users' basic profiles
These permissions allow the connector to pull necessary data.
Important Notes
- Authentication: Users will need to authenticate with Outlook on their first interaction
- Permissions: Ensure Admin has registered our app by clicking on
Grant admin consent for Abacus.AIin App Registeration → API permissions. - Testing: Thoroughly test the connector with various Outlook operations before deploying to end users
Troubleshooting
If you encounter issues:
- Check deployment status is "Active"
- Ensure proper authentication credentials
- Error AADSTS50105: Your administrator has configured the application
abacus_outlook_user_connector(Application ID) to block users unless they are specifically granted ('assigned') access to the application.
- Go to Azure Portal → Microsoft Entra ID → Enterprise applications.
- Search for
abacus_outlook_user_connector. - Open the app → Users and groups → Add user/group.
- Select users/groups → (optional) choose role → Assign.