Generic OAUTH
Overview
The Generic OAuth connector enables you to establish secure OAuth 2.0 connections to any API that supports OAuth authentication, particularly when a dedicated built-in connector is not available in Abacus.AI. This connector provides flexibility to integrate with custom internal APIs, niche SaaS platforms, and emerging services.
The Generic OAuth connector implements the OAuth 2.0 Authorization Code Grant flow, the most common and secure OAuth pattern. Once configured, it handles the complete OAuth flow—from initial authorization through token exchange and refresh—allowing you to focus on leveraging your data rather than managing authentication infrastructure.
When to Use This Connector
Use the Generic OAuth connector when:
- No dedicated connector exists for your OAuth 2.0-enabled service (e.g., Smartsheet, Sprinklr, Outreach, or custom APIs)
- You need to connect to internal or proprietary APIs that implement OAuth 2.0
- You're integrating with emerging SaaS platforms that support OAuth but lack widespread connector support
- You require customized OAuth configurations with specific scopes, endpoints, or parameters
- You're prototyping integrations and need rapid OAuth connectivity without custom development
Consider a dedicated connector instead when:
- A built-in Abacus.AI connector exists for your service (e.g., Salesforce, Google Drive, Slack)
- You need pre-configured data schemas and automatic field mapping
- Your integration requires service-specific features beyond OAuth authentication
Prerequisites
Before configuring the Generic OAuth connector in Abacus.AI, you must complete the following setup in your target service:
1. Register an OAuth Application
Create an OAuth application (also called OAuth client, OAuth app, or API application) in your source system's developer portal or administration console.
Example for Smartsheet:
- Navigate to Developer Tools > Create Developer Profile > Create New App
- Choose "OAuth 2.0" as the authentication method
- Note your Client ID and Client Secret
2. Configure the Redirect URI
Where to configure:
- Look for fields labeled: "Redirect URI", "Callback URL", "Authorized Redirect URIs", or "OAuth Redirect URLs"
- Enter:
https://abacus.ai/oauth/callback - Some providers allow multiple redirect URIs; ensure this URL is included in the allowed list
3. Gather OAuth Configuration Details
Collect the following information from your API provider's OAuth documentation:
| Information Required | Description | Example |
|---|---|---|
| Authorization URL | OAuth 2.0 authorization endpoint | https://app.smartsheet.com/oauth/authorize |
| Token URL | OAuth 2.0 token endpoint | https://api.smartsheet.com/token |
| Scopes | Permissions your integration requires | READ_SHEETS,WRITE_SHEETS |
| Token Authentication Method | How credentials are sent to token endpoint | client_secret_basic or client_secret_post |
Creating a Generic OAuth Connector in Abacus.AI
Follow these steps to configure your Generic OAuth connection:
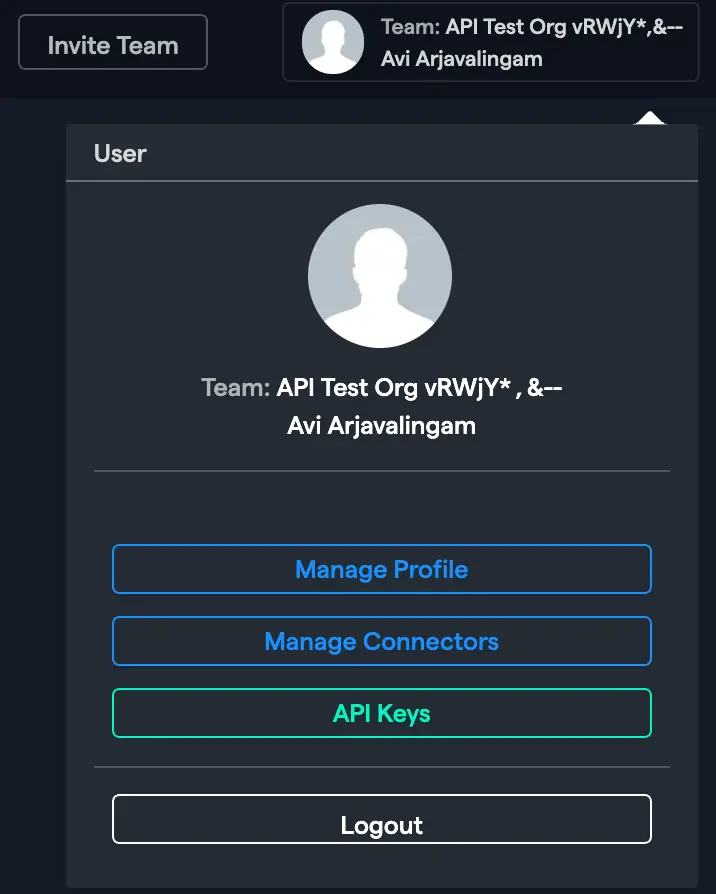
Step 1: Navigate to Connectors
-
In the Abacus.AI interface, click on your profile picture in the top right corner.

-
Select "Manage Connectors" from the dropdown menu.
Step 2: Select Generic OAuth
- Choose "Add New Connector",
- Click the Generic OAuth to proceed to configuration
Step 3: Configure OAuth Settings
You'll be presented with the Configure Service form. Complete all required fields:
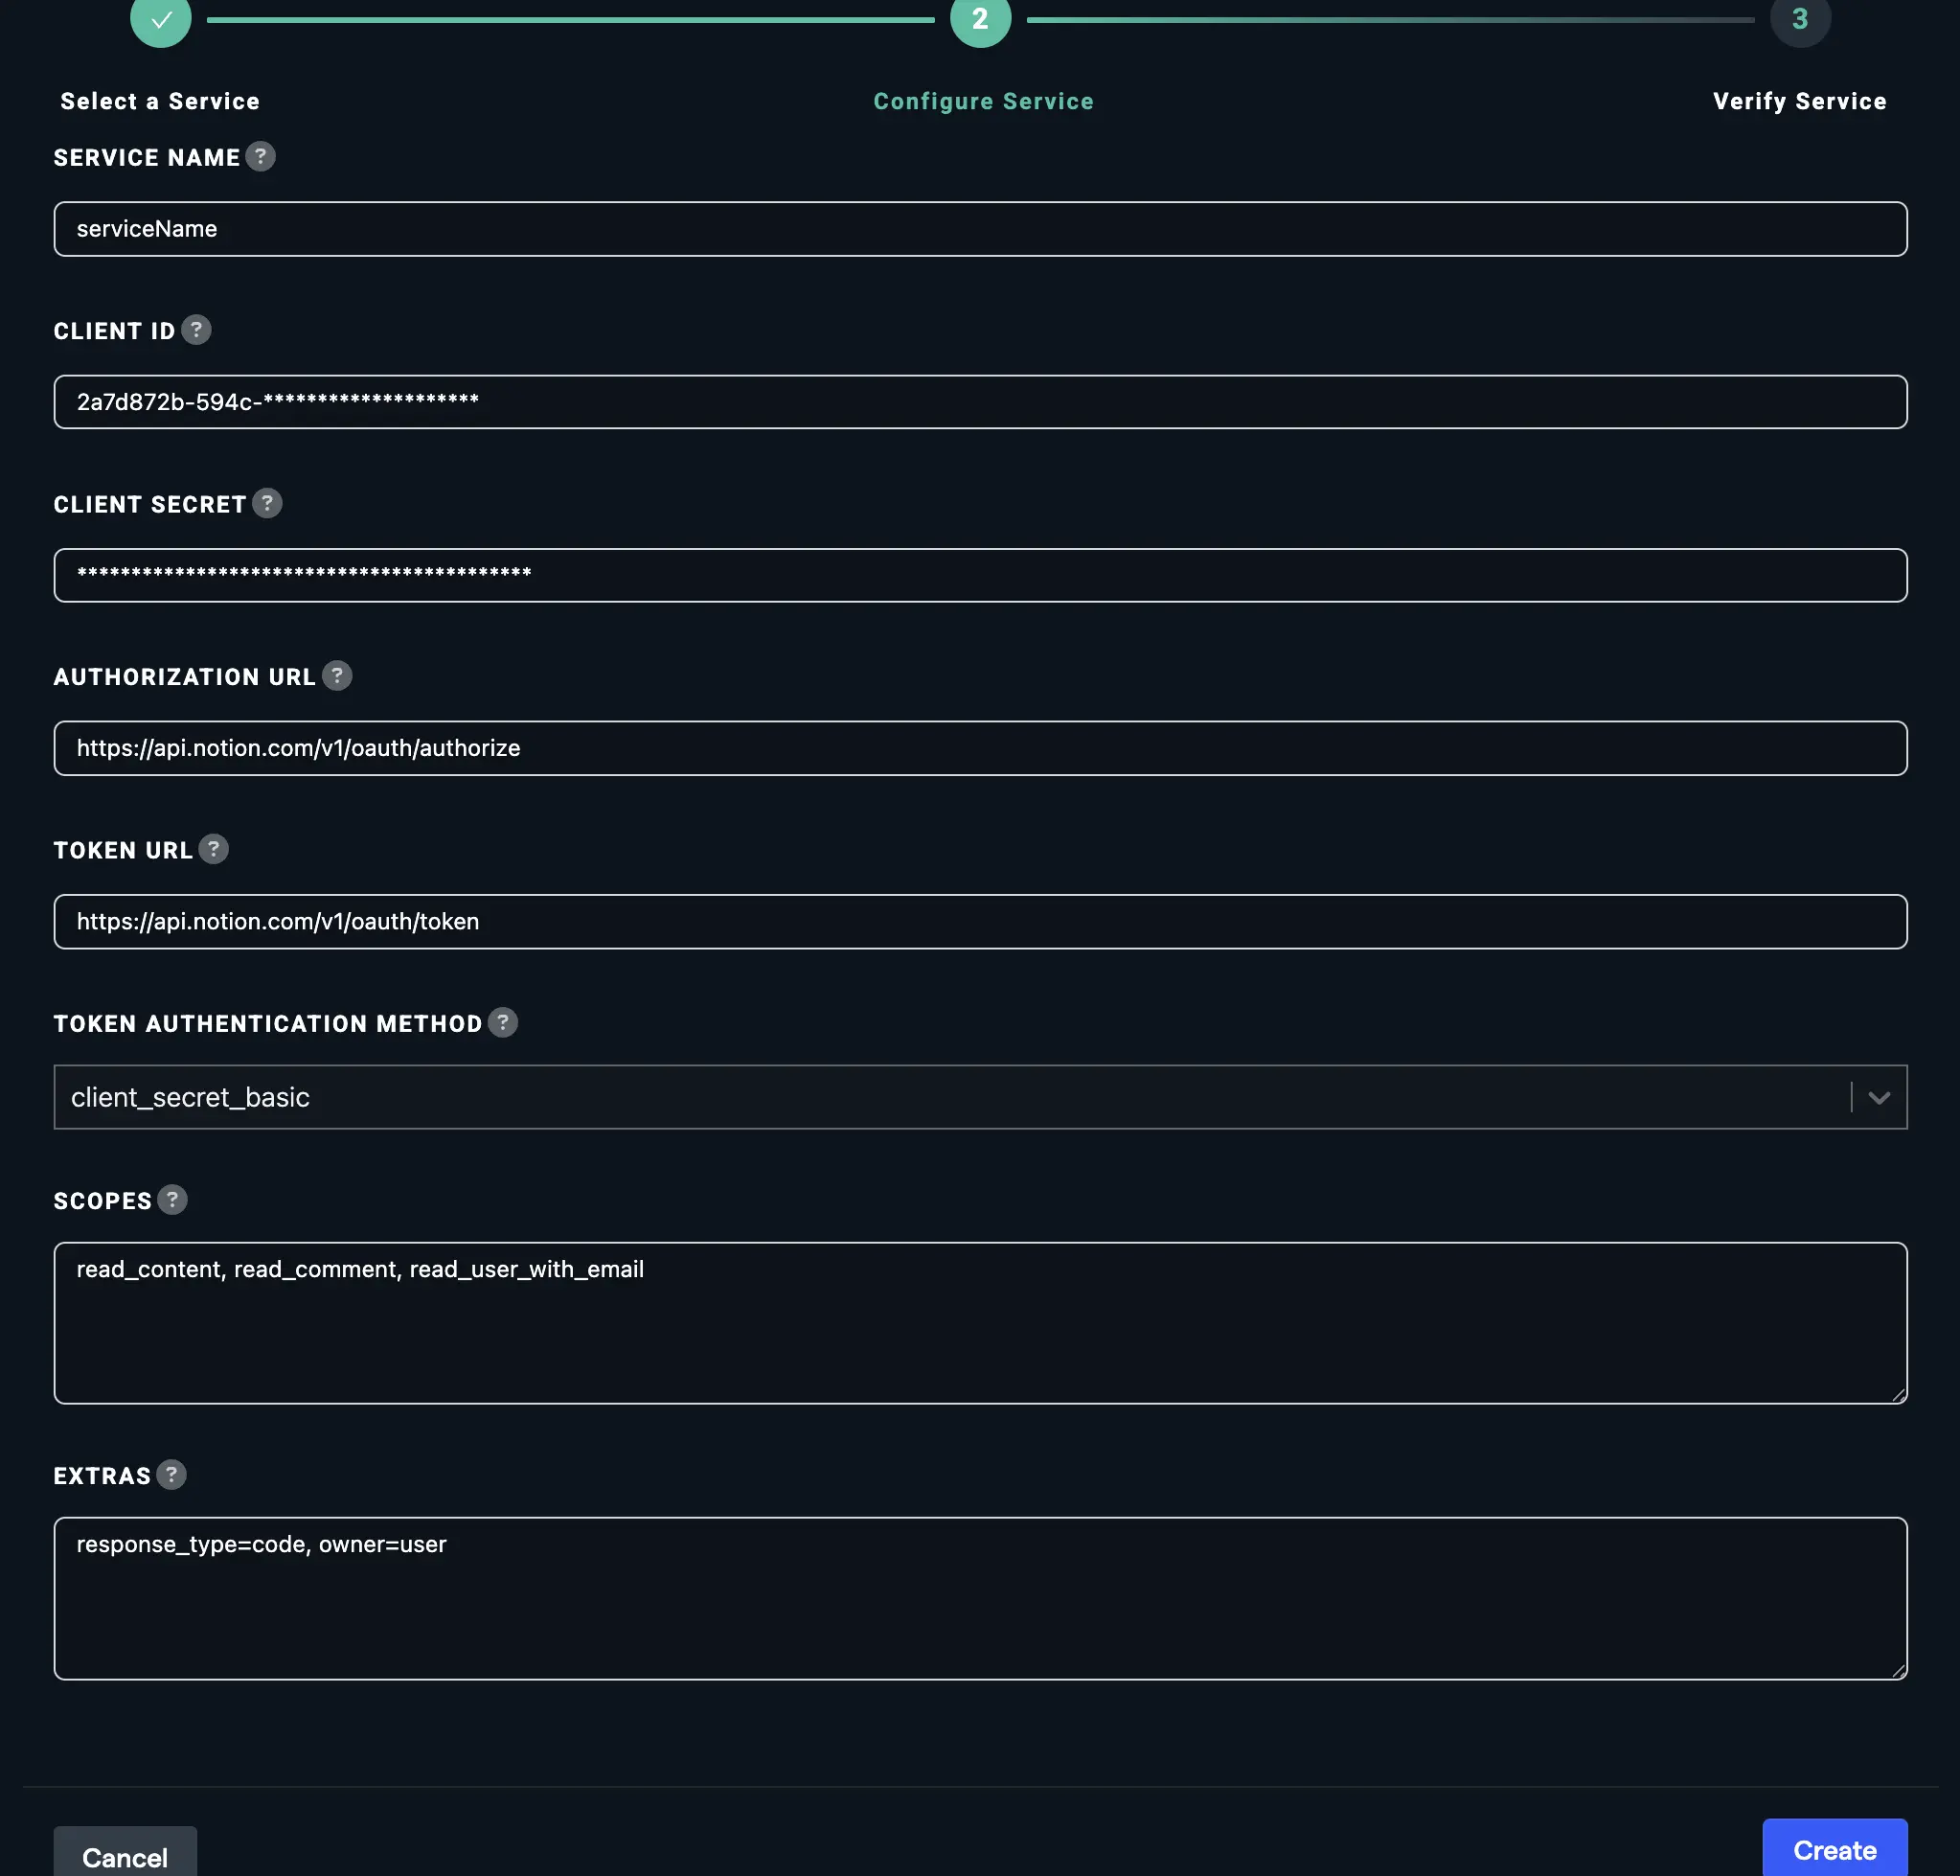
Service Name
- Description: A descriptive name for this connection to identify it within Abacus.AI
- Example:
Smartsheet Production,Sprinklr Marketing,Outreach Sales CRM - Required: Yes
Client ID
- Description: The public identifier for your OAuth application, obtained from your provider's developer console
- Example:
abc123def456ghi789(Smartsheet),cjsample1234567890abcdef(Sprinklr) - Required: Yes
- Security: This value is public and can be safely included in client-side code
Client Secret
- Description: The confidential secret issued by your provider for OAuth authentication
- Example:
sk_live_51A1b2C3d4E5f6G7h8I9j0K1l2M3n4O5(masked in UI) - Required: Yes
- Security: Store this securely; never commit to version control or expose in client-side code
Authorization URL
- Description: Your provider's OAuth 2.0 authorization endpoint where users grant permissions
- Format: Must be a valid HTTPS URL
- Required: Yes
Examples by Provider:
Smartsheet: https://app.smartsheet.com/oauth/authorize
Token URL
- Description: Your provider's OAuth 2.0 token endpoint used to exchange authorization codes for access tokens
- Format: Must be a valid HTTPS URL
- Required: Yes
Examples by Provider:
Smartsheet: https://api.smartsheet.com/token
Token Authentication Method
-
Description: Specifies how client credentials are transmitted when requesting tokens
-
Type: Dropdown selection
-
Required: Yes
-
Options:
client_secret_basic(Default)- Client ID and secret are sent via HTTP Basic Authentication
- Authorization header format:
Authorization: Basic <base64(client_id:client_secret)> - Use when: Your provider supports or requires HTTP Basic Authentication at the token endpoint
- Most common for: Enterprise APIs, standards-compliant OAuth implementations
- Example providers: Smartsheet, many corporate APIs
client_secret_post- Client ID and secret are sent as form parameters in the POST request body
- Body format:
client_id=...&client_secret=...&grant_type=authorization_code&code=... - Use when: Your provider does not accept Basic Authentication or explicitly requires POST parameters
- Example providers: Some modern SaaS platforms, specific API implementations
Scopes (Optional)
- Description: Comma-separated list of OAuth scopes defining the permissions your application requests
- Required: Depends on provider (some require explicit scopes; others use default scopes)
Examples by Provider:
Smartsheet:
READ_SHEETS,WRITE_SHEETS,SHARE_SHEETS,DELETE_SHEETS
Extras
- Description: Custom or additional parameters for OAuth authorization (Comma-separated parameters), Example: "response_type=code"
- Required: Yes
These are custom authentication parameters that are typically included in the OAuth authorization URL and are documented individually by each API provider. Examples include values such as response_type=code or prompt=login (as used for Outlook).
How to use Generic_OAuth connector
-
Click on Abacus.AI logo.
-
Click on
Custom Code>>Tools.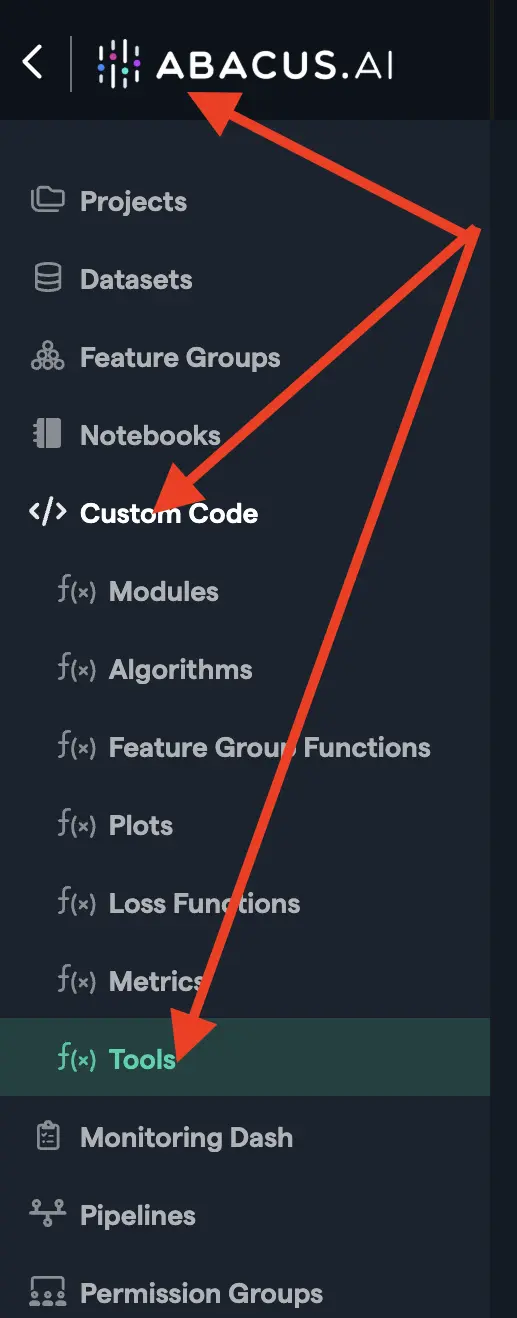
-
Enter a tool name.
-
In
Tool Type, selectConnector. -
In
Connector Type, selectUser Level Connector.
-
Click on
Use Python Notebook. -
Copy the sample code and update necessary code blocks.
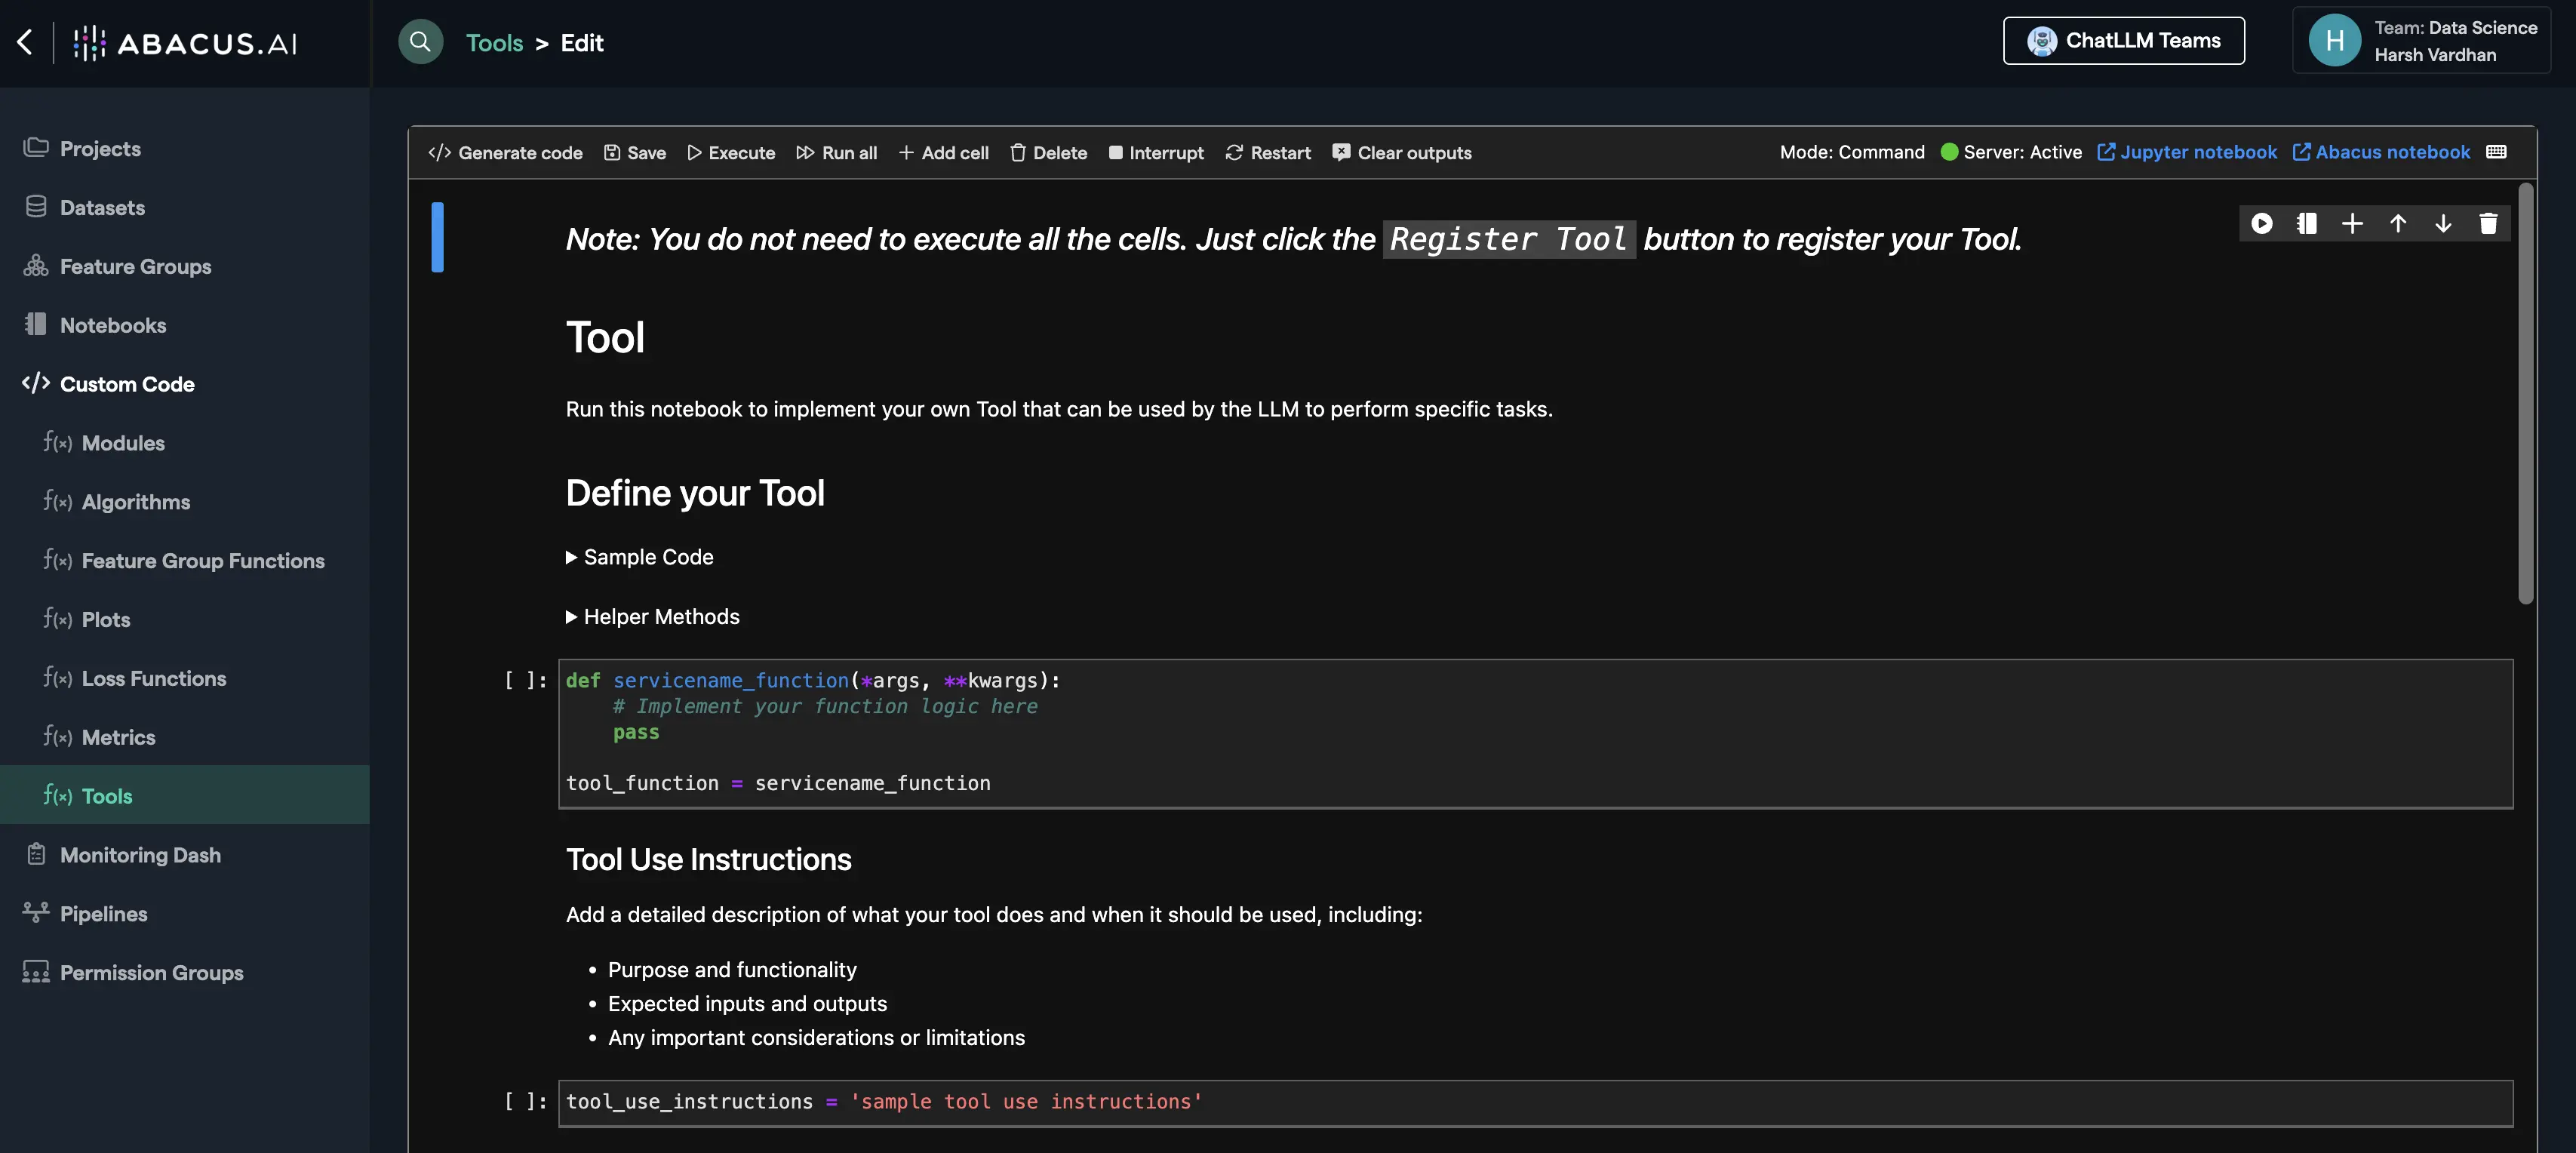
- Replace following code with
pass. - Enter the service name that you entered while creating connector.
- You can configure API calls and actions according to your requirements.
import requestsfrom abacusai import ApiClientimport jsonfrom typing import Dict, List, Anyfrom urllib.parse import quoteclient = ApiClient()auth = client.get_user_connector_auth(service="GENERIC_OAUTH", generic_oauth_service="{service}").authaccess_token = auth.get("access_token") or auth.get("accessToken")if not access_token:raise Exception("Missing access token in authentication details. Please check your connector configuration.")headers = {"Authorization": f"Bearer {access_token}","Content-Type": "application/json","Accept": "application/json",}BASE_URL = "https://api.outreach.io/api/v2"def make_request(endpoint: str, method: str = "GET", data: dict = None, params: dict = None) -> dict:"""Make a request to Autodesk APIArgs:endpoint: API endpoint (will be appended to BASE_URL)method: HTTP methoddata: Request payload for POST/PATCH requestsparams: Query parametersReturns:dict: API response"""url = f"{BASE_URL}{endpoint}"try:if method.upper() == "GET":response = requests.get(url, headers=headers, params=params)elif method.upper() == "POST":response = requests.post(url, headers=headers, json=data, params=params)else:raise Exception(f"Unsupported HTTP method: {method}")if response.status_code not in [200, 201, 202, 204]:error_msg = f"API request failed. Status Code: {response.status_code}"try:error_detail = response.json()error_msg += f". Error: {json.dumps(error_detail)}"except:error_msg += f". Response: {response.text}"raise Exception(error_msg)# Handle empty responsesif response.status_code in [202, 204] or not response.content:return {"success": True}return response.json()except requests.RequestException as e:raise Exception(f"Network error during API request: {str(e)}")except json.JSONDecodeError as e:raise Exception(f"Invalid JSON response from API: {str(e)}")def get_user() -> List[Dict[str, Any]]:"""Get all accessible hubs (accounts) for the authenticated userReturns:List of hub objects"""try:response = make_request("/users")return responseexcept Exception as e:raise Exception(f"Failed to get hubs: {str(e)}")# Parse parameters and execute actiontry:params_dict = json.loads(params) if params else {}if action == "get_user":result = get_user()else:raise Exception(f"Invalid action: {action}. Supported actions: get_user")return {"result": result}except json.JSONDecodeError as e:raise Exception(f"Invalid JSON in params: {str(e)}")except Exception as e:raise Exception(f"Error in autodesk_tool: {str(e)}")- Add this code snippet to tool_use_instructions as the prompt that explains the bot’s functionality.
tool_use_instructions = """get user details from notionaction:get_user: used to get user info"""- Enter the parameters for the tool configuration.(Input that bot will send to tool)
parameters = [{"name": "action","description": "1. get_user: get use info from notion.","is_required": True,"variable_type": "STRING",},{"name": "params","description": "JSON string of parameters for the action","is_required": True,"variable_type": "STRING",},]- Enter the outputs for the tool configuration.(Output that bot will receive)
outputs = [{"name": "result", "variable_type": "JSON"}] - Replace following code with
-
Click on
Register Tool.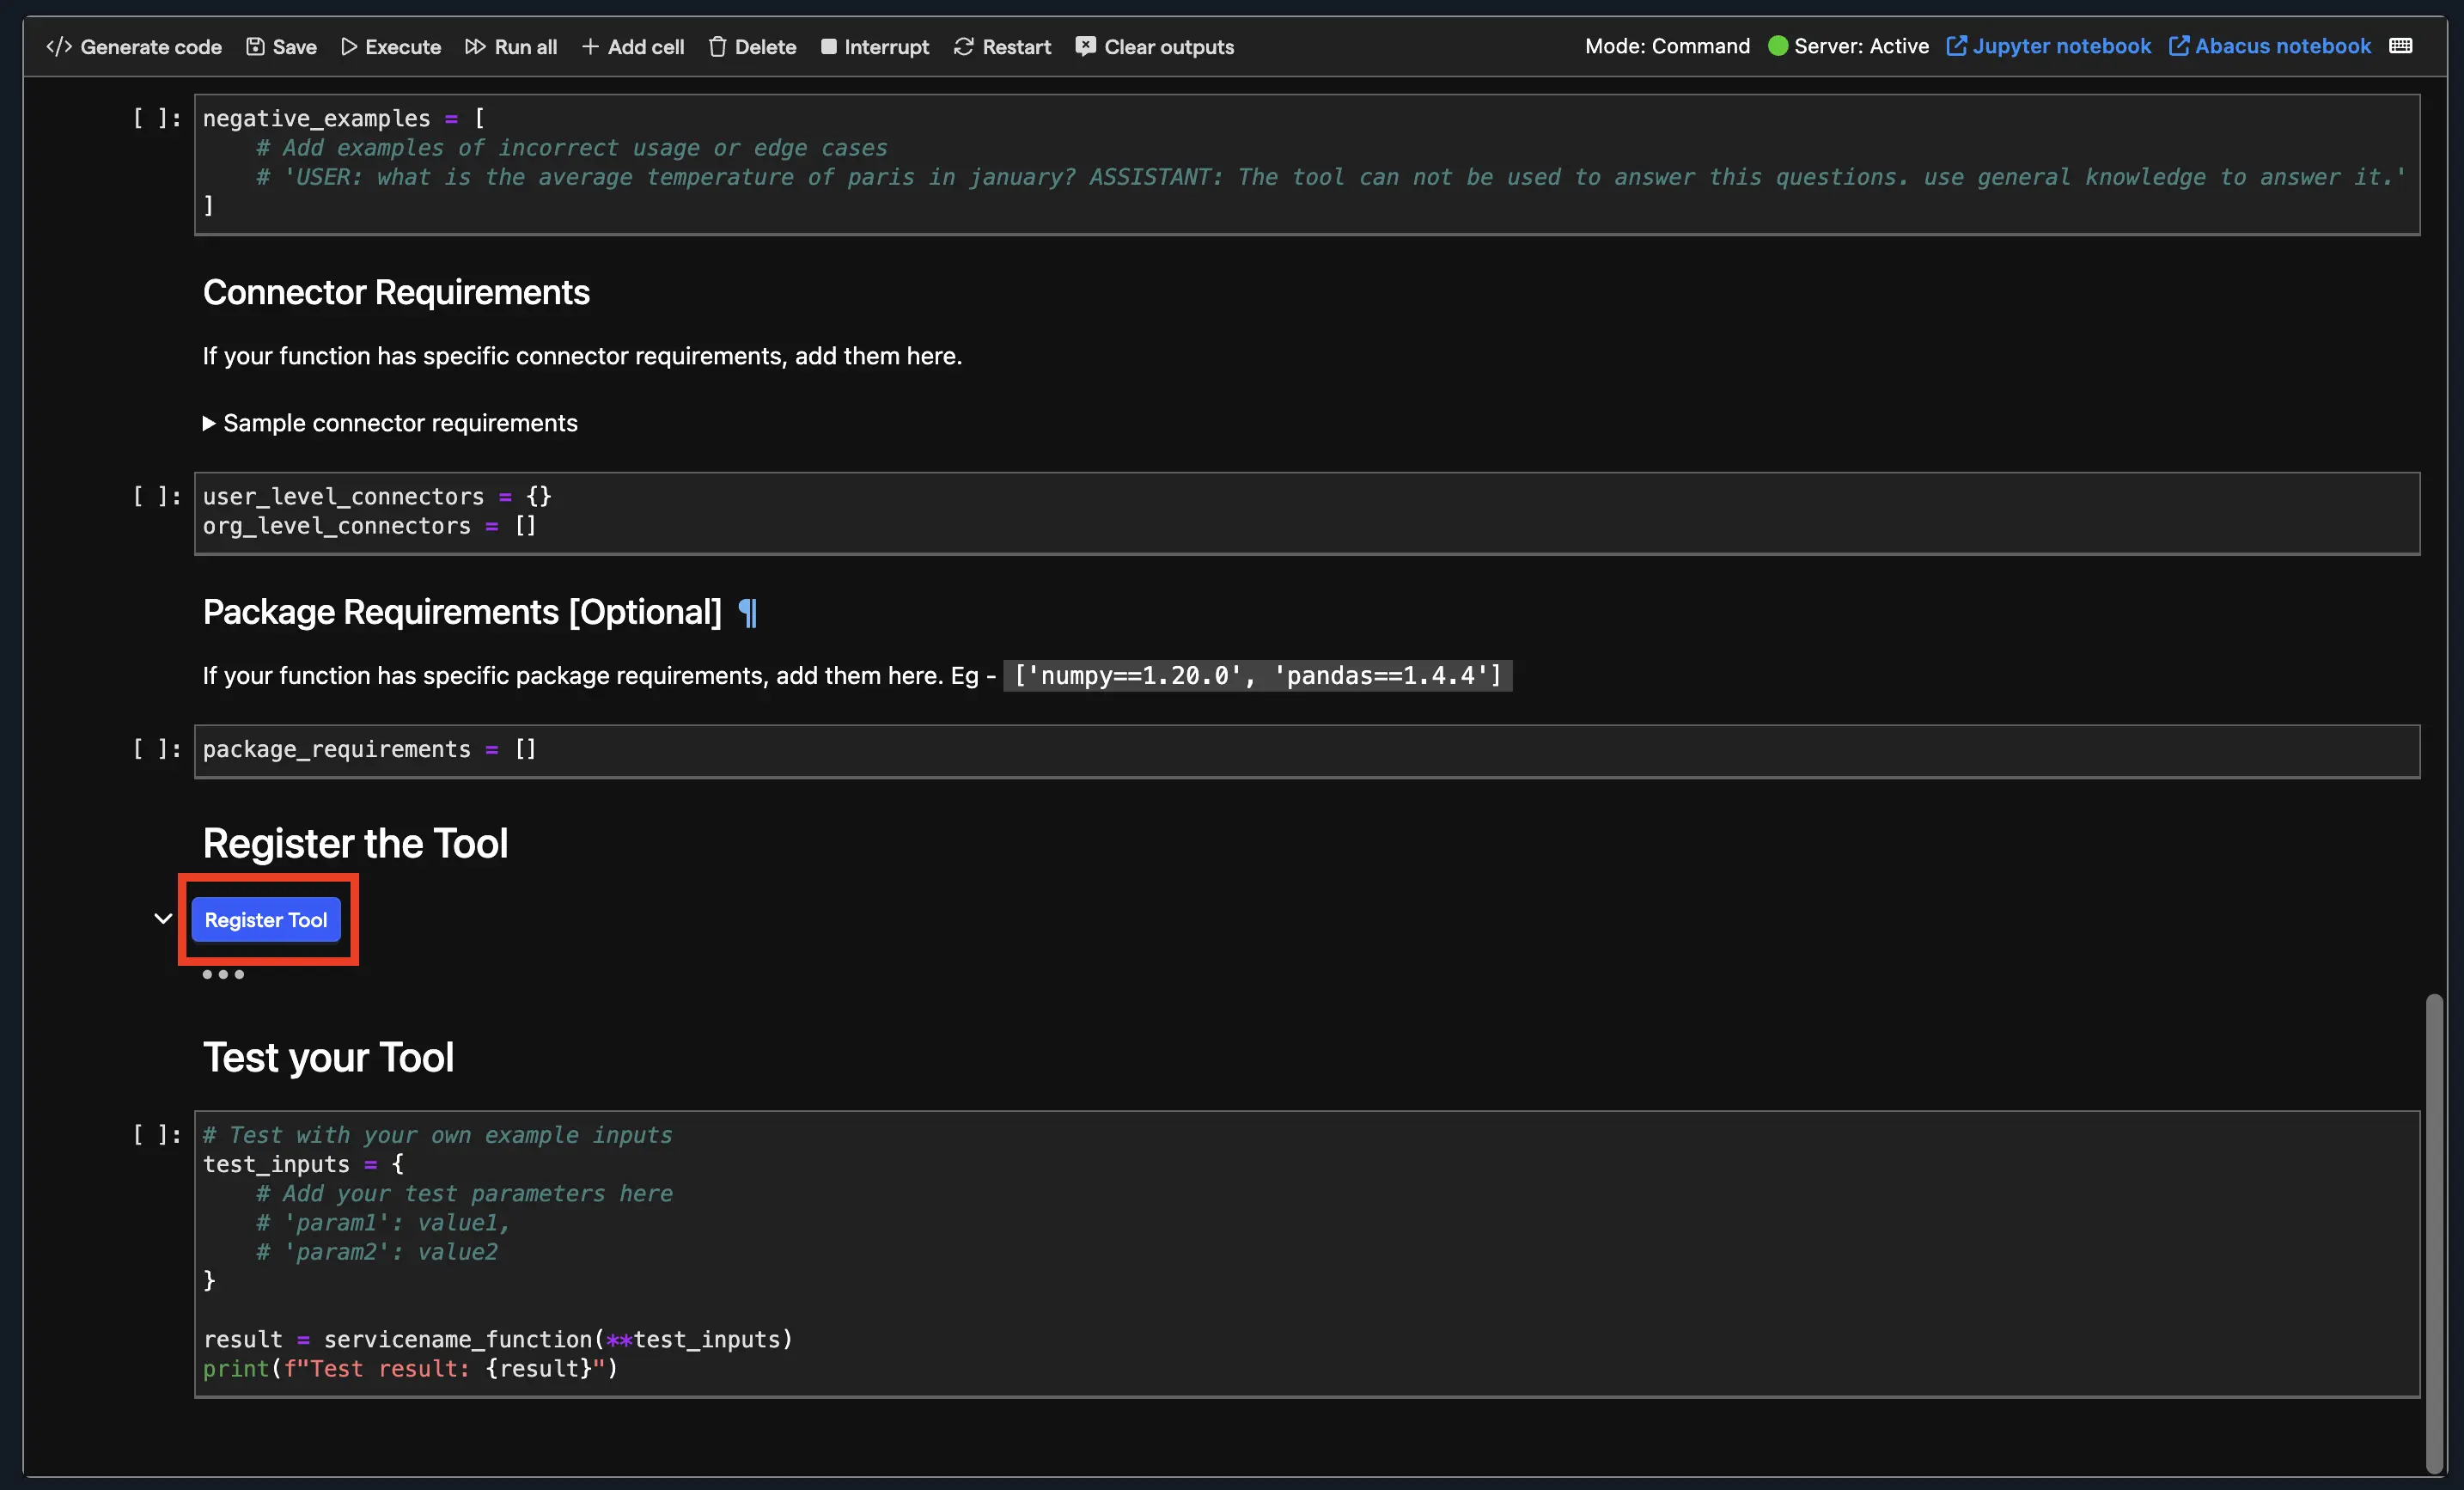
Build a ChatLLM project on your connector
- Navigate to the projects page by clicking on the ABACUS.AI logo.
- Click on "Create a new project" to begin setting up your ChatLLM project.
- Choose GenAI --> Custom Chatbot option from the available project types.
- Enter a descriptive name for your project that reflects its purpose.
- Select "Skip to project dashboard" to proceed directly to the project configuration.
- Click on the Model option in the left toolbar
- Select "Train Model" in the top right corner of the page
- Configure Advanced Options
Navigate through the following menu structure:
- Select Advanced Option
- Choose Custom Use
- Select the tool that you just created
- Choose Config Connector
- Select the config connector you created
- Click on "Train Model" to begin the training process.
- Access Trained Model
Once training is complete:
- Click on Models in the navigation
- Select your newly trained model
- Click on "Create a new deployment" to make your model available for use.
- Select "Offline Batch + Realtime" deployment option
- Click "Next" to proceed
- Enter a user-friendly name that your end users will see, then click "Deploy".
- Monitor Deployment Status
- Return to your model by clicking Models → [Your Model Name]
- Wait for the deployment status to show as "Active"
- Click on the deployment name once active
- Click on the "Prediction Dash" option under the Deployment section.
- Click on "Go to Abacus.AI Chat" to access the testing interface.
- Start Using the Connector
- Enter your questions or prompts in the chat interface
- Note: Each user will be prompted to log in to Generic OAuth connector once for authentication