Plug and Play Your TensorFlow Model with Embeddings
The plug and play use case provides an opportunity for you to train your own models using your own infrastructure and then leverage Abacus.AI infrastructure and abstractions to get your models hosted and running on our scalable service with easy to integrate APIs. The plug and play TensorFlow Model with Embeddings is designed to perform vector matching using your embeddings and models trained using TensorFlow uploaded by you on our system. This document covers how to create your model with embeddings in the correct format usable by our system, how to upload it to the system, and then how you could utilize our services using our APIs and user interface.
Plug and Play TensorFlow Model with Embeddings Artifacts
There are two required artifacts for this use case - model file and embedding file. This section will provide details on generating TensorFlow model file (.tgz) and embedding files (.csv) in the correct formats to upload to Abacus.AI. There are two optional artifacts as well - model verification file and default items file. We will cover them as well.
Overview
First we discuss the API considerations to host your model properly onto Abacus.AI platform. Next, we take an example to demonstrate the artifact generation process. We selected a random dataset (subword8k) from tensorflow_datasets to create a model that predicts similarity within embedding components. The result is computed as the minimum distance to elements of an embedding dataset with a configurable distance function. The resulting artifacts can be uploaded to the Abacus.AI platform where they can be hosted as a deployment. The artifacts produced will be:
- TensorFlow saved model
- Embedding dataset
- Verification samples (optional)
API Considerations to Host Model on Abacus.AI
- Input Parameter Here we have defined the model, taking special care to name the input. This is because when the model is hosted, our api accepts multiple types of inputs and it needs to be able to determine what gets passed on to the model. To resolve this, we inspect the model to discover its input tensor(s). Below, when defining the input, we have named it as tokens. As a result, the prediction api will - look for the "tokens" parameter, take its value, convert it into a tensor, and pass it on to the model:
curl --globoff "http://abacus.ai/api/v0/predict?deploymentToken=foobar&deploymentId=baz¬Sent=deadbeef&tokens=[[123,456]]"
Of all the query parameters, only tokens=[[123,456]] will be converted into a tensor to be passed into the model. The deploymentToken and deploymentId are required parameters for our API and the notSent=deadbeef will be dropped. If instead we wanted the query parameter to be abacusIsAmazing, we could name the InputLayer to be abacusIsAmazing and then the url will look like this (with the notSent removed):
curl --globoff "http://abacus.ai/api/v0/predict?deploymentToken=foobar&deploymentId=baz&abacusIsAmazing=[[123,456]]"
- Embedding DataFrame From the embedding layer that is part of the model we trained, we extract the weights and prepare it for saving it as a CSV. In particular, we will declare the index on the weights DataFrame and name it as "term". The name of the first column is important, since it defines the key that is used in the JSON output of the prediction api. So continuing with the example provided earlier and the first column of embedding_df being "term", we can expect the query and response to look like this:
> curl --globoff "http://abacus.ai/api/v0/predict?deploymentToken=foobar&deploymentId=baz¬Sent=deadbeef&tokens=[[123,456]]"
{"success": true, "result": [{"term": "foo", "score": 0.12345678}, {"term": "bar", "score": 1.234567}, ...]}
However, if instead we set the first column's name in the embeddings file to abacusai, we would get a different output:
> curl --globoff "http://abacus.ai/api/v0/predict?deploymentToken=foobar&deploymentId=baz¬Sent=deadbeef&tokens=[[123,456]]"
{"success": true, "result": [{"abacusai": "foo", "score": 0.12345678}, {"abacusai": "bar", "score": 1.234567}, ...]}
## Example Code and Steps to Train Model
Now that you know how the APIs are structured and what is expected by the system, you are ready to establish your training pipeline and restructure your TensorFlow model:
Example Steps to Generate Artifacts
- Imports and install TensorFlow datasets
import json
import tensorflow as tf
import tensorflow_datasets as tfds
import pandas as pd
import numpy as np
pip install tensorflow_datasets
- Dataset splitting and shuffle
(train_data, test_data), dataset_info = tfds.load(
    'imdb_reviews/subwords8k',
    split = (tfds.Split.TRAIN, tfds.Split.TEST),
    with_info=True, as_supervised=True)

train_batches = train_data.shuffle(1000).padded_batch(10)
test_batches = test_data.shuffle(1000).padded_batch(10)
- Example python code for getting model ready for training:
encoder = dataset_info.features['text'].encoder
embedding_dim=16

input_tokens = tf.keras.layers.Input(shape=(None,), name='tokens')
embedding_layer = tf.keras.layers.Embedding(encoder.vocab_size, embedding_dim, name='embedding')
embedding_output = embedding_layer(input_tokens)
global_avg_output = tf.keras.layers.GlobalAveragePooling1D(name='avg_pooling')(embedding_output)
relu_output = tf.keras.layers.Dense(16, activation='relu')(global_avg_output)
dense_output = tf.keras.layers.Dense(1)(relu_output)
model = tf.keras.Model(inputs=[input_tokens], outputs=[dense_output], name='word2vec')

model.summary()
    Model: "word2vec"
    _________________________________________________________________
    Layer (type)                 Output Shape              Param #
    =================================================================
    tokens (InputLayer)          [(None, None)]            0
    _________________________________________________________________
    embedding (Embedding)        (None, None, 16)          130960
    _________________________________________________________________
    avg_pooling (GlobalAveragePo (None, 16)                0
    _________________________________________________________________
    dense (Dense)                (None, 16)                272
    _________________________________________________________________
    dense_1 (Dense)              (None, 1)                 17
    =================================================================
    Total params: 131,249
    Trainable params: 131,249
    Non-trainable params: 0
    _________________________________________________________________
- kicking off the training:
model.compile(optimizer='adam',
              loss=tf.keras.losses.BinaryCrossentropy(from_logits=True),
              metrics=['accuracy'])

history = model.fit(
    train_batches,
    epochs=10,
    validation_data=test_batches, validation_steps=20)
    Epoch 1/10
    2500/2500 [==============================] - 6s 2ms/step - loss: 0.6146 - accuracy: 0.5768 - val_loss: 0.4048 - val_accuracy: 0.8450

    Epoch 2/10
      81/2500 [..............................] - ETA: 4s - loss: 0.3472 - accuracy: 0.8780
    2500/2500 [==============================] - 5s 2ms/step - loss: 0.3007 - accuracy: 0.8765 - val_loss: 0.3441 - val_accuracy: 0.8550

    Epoch 3/10
      83/2500 [..............................] - ETA: 4s - loss: 0.2309 - accuracy: 0.9097
    2500/2500 [==============================] - 5s 2ms/step - loss: 0.2342 - accuracy: 0.9087 - val_loss: 0.3046 - val_accuracy: 0.8750

    Epoch 4/10
      87/2500 [>.............................] - ETA: 4s - loss: 0.2161 - accuracy: 0.9153
    2500/2500 [==============================] - 5s 2ms/step - loss: 0.2060 - accuracy: 0.9209 - val_loss: 0.4342 - val_accuracy: 0.8100

    Epoch 5/10
      80/2500 [..............................] - ETA: 4s - loss: 0.2128 - accuracy: 0.9120
    2500/2500 [==============================] - 5s 2ms/step - loss: 0.1824 - accuracy: 0.9317 - val_loss: 0.3153 - val_accuracy: 0.8900

    Epoch 6/10
      83/2500 [..............................] - ETA: 4s - loss: 0.1804 - accuracy: 0.9349
    2500/2500 [==============================] - 5s 2ms/step - loss: 0.1614 - accuracy: 0.9406 - val_loss: 0.4056 - val_accuracy: 0.8600

    Epoch 7/10
      84/2500 [>.............................] - ETA: 4s - loss: 0.1407 - accuracy: 0.9486
    2500/2500 [==============================] - 5s 2ms/step - loss: 0.1471 - accuracy: 0.9461 - val_loss: 0.5771 - val_accuracy: 0.8400

    Epoch 8/10
      82/2500 [..............................] - ETA: 4s - loss: 0.1513 - accuracy: 0.9374
    2500/2500 [==============================] - 5s 2ms/step - loss: 0.1333 - accuracy: 0.9509 - val_loss: 0.5178 - val_accuracy: 0.8400

    Epoch 9/10
      83/2500 [..............................] - ETA: 4s - loss: 0.1686 - accuracy: 0.9348
    2500/2500 [==============================] - 5s 2ms/step - loss: 0.1207 - accuracy: 0.9551 - val_loss: 0.4819 - val_accuracy: 0.8600

    Epoch 10/10
      82/2500 [..............................] - ETA: 4s - loss: 0.1106 - accuracy: 0.9612
    2500/2500 [==============================] - 5s 2ms/step - loss: 0.1110 - accuracy: 0.9601 - val_loss: 0.3420 - val_accuracy: 0.8800
- Restructuring the Model for our use-case
Now that we have a trained model, let's make some model structure changes in preparation for use in Abacus.AI. We would like this model to output a vector, in this case of size 16, to match the embedding size, that can then be used with the embeddings we extract later in this notebook to get a list of synonymous words. To do so, we'll create a new model, but instead route the output from the existing GlobalAveragePooling1D layer into a Lambda layer to reshape the output into a vector of 16 numbers:
global_avg_output = model.get_layer('avg_pooling').output
reduced_output = tf.keras.layers.Lambda(lambda x: tf.reduce_mean(x, axis=0))(global_avg_output)
model_to_save = tf.keras.Model(inputs=[input_tokens], outputs=[reduced_output], name='word2vec_for_abacus')
model_to_save.summary()
    Model: "word2vec_for_abacus"
    _________________________________________________________________
    Layer (type)                 Output Shape              Param #
    =================================================================
    tokens (InputLayer)          [(None, None)]            0
    _________________________________________________________________
    embedding (Embedding)        (None, None, 16)          130960
    _________________________________________________________________
    avg_pooling (GlobalAveragePo (None, 16)                0
    _________________________________________________________________
    lambda (Lambda)              (16,)                     0
    =================================================================
    Total params: 130,960
    Trainable params: 130,960
    Non-trainable params: 0
    _________________________________________________________________
- Generating embeddings
For this example, we have chosen to stick with term:
item_column_name = 'term'  # This dictates the key used in the output.

embedding_weights = model.get_layer(name='embedding').get_weights()[0][1:,:]
print(f'Embedding weights: {embedding_weights.shape}')

embeddings_df = pd.DataFrame(
    embedding_weights,
    index=pd.Index(
        [encoder.decode([i]).rstrip() for i in range(1, encoder.vocab_size)],
        name=item_column_name)
)
Embedding weights: (8184, 16)
- Writing out the artifacts
Now it's time to generate the required artifacts. We would use the TensorFlow SavedModel format and compress that into a tarball. Then, for the embeddings, we use pandas to write it out as a CSV file. In the end we have 2 artifacts and the folder where the model is saved:
!mkdir -p /tmp/word2vec/model
saved_model_dir = '/tmp/word2vec/model'
model_to_save.save(saved_model_dir)

!tar -cvzf /tmp/word2vec/model.tgz -C /tmp/word2vec/model .

embeddings_df.to_csv('/tmp/word2vec/embedding.csv')

!ls -l /tmp/word2vec
    ./
    ./assets/
    ./saved_model.pb
    ./variables/
    ./variables/variables.data-00000-of-00001
    ./variables/variables.index
    total 2000
    -rw-r--r-- 1 ubuntu ubuntu 1545481 Nov 12 19:41 embedding.csv
    drwxr-xr-x 4 ubuntu ubuntu    4096 Nov 12 19:41 model
    -rw-r--r-- 1 ubuntu ubuntu  494822 Nov 12 19:41 model.tgz
Now, you are ready to either upload embedding.csv and model.tgz files to your project either directly or through your cloud storage buckets. You can also create refresh schedules for your files to automatically pick them them whenever the data changes.
Generate verification data from model and embeddings [OPTIONAL]
An optional artifact supported by Abacus.AI is a verification file. This file contains inputs and the corresponding expected outputs for the model. This file can be used to confirm the correctness of the model served by Abacus.AI. For this example, we will be using the cosine distance.
An extra optimization made here is the restructuring of the model. Earlier we truncated the model by creating a new model that outputs from the GlobalAveragePooling1D layer and added a new lambda to reshape the output into a format expected by Abacus.AI. But for the creation of the verifications file, it can be faster to let the model handle batch inputs and preserve the batch output. So we create a new model, this time only using the output from the GlobalAveragePooling1D layer:
prediction_model = tf.keras.Model(inputs=[input_tokens], outputs=[model.get_layer('avg_pooling').output], name='word2vec_batch')
prediction_model.summary()  # "new" model to let TF do batch predictions

verification_input = test_batches.unbatch().batch(1).take(10)
num_results = 5
requests = [{
    'input': [[int(x) for x in e[0][0]]],
    'num': num_results,
    'distance': 'cosine'
} for e in list(verification_input.as_numpy_iterator())]

prediction_output = prediction_model.predict(verification_input)

def norm(m):
    return m / np.sqrt(np.sum(m * m, axis=-1, keepdims=1))

scores = norm(prediction_output) @ norm(embedding_weights).T

examples = prediction_output.shape[0]
scored_ix = np.arange(examples).reshape(-1, 1)
top_k = scores.argpartition(-num_results)[:,-num_results:]
sorted_k = top_k[scored_ix, (scores[scored_ix, top_k]).argsort()]
scores_k = scores[scored_ix, sorted_k]

# In generating the output shape, note we are re-using the item_column_name variable defined earlier
# This is because the key is taken from the name of the first column of the embeddings file.
responses = [
    {'result': [{item_column_name: encoder.decode([i + 1]).rstrip(), 'score': float(s)}
                for i, s in zip(terms, scores)]}
    for terms, scores in zip(top_k, scores_k)]

# Creating the optional verification file
with open('/tmp/word2vec/verification.jsonl', 'wt') as f:
    for req, resp in zip(requests, responses):
        json.dump({'request': req, 'response': resp}, f)
        f.write('\n')

!ls -l /tmp/word2vec
    Model: "word2vec_batch"
    _________________________________________________________________
    Layer (type)                 Output Shape              Param #
    =================================================================
    tokens (InputLayer)          [(None, None)]            0
    _________________________________________________________________
    embedding (Embedding)        (None, None, 16)          130960
    _________________________________________________________________
    avg_pooling (GlobalAveragePo (None, 16)                0
    =================================================================
    Total params: 130,960
    Trainable params: 130,960
    Non-trainable params: 0
    _________________________________________________________________

    total 2032
    -rw-r--r-- 1 ubuntu ubuntu 1545481 Nov 12 19:41 embedding.csv
    drwxr-xr-x 4 ubuntu ubuntu    4096 Nov 12 19:41 model
    -rw-r--r-- 1 ubuntu ubuntu  494822 Nov 12 19:41 model.tgz
    -rw-r--r-- 1 ubuntu ubuntu   32358 Nov 12 19:41 verification.jsonl
Verify saved model [RECOMMENDED]
Abacus.AI currently does not support defining custom objects. There is a possibility to encounter problems when loading the model. A good check is to load the model that was created earlier from the disk:
model_from_disk = tf.keras.models.load_model(saved_model_dir)
model_from_disk.summary()
    Model: "word2vec_for_abacus"
    _________________________________________________________________
    Layer (type)                 Output Shape              Param #
    =================================================================
    tokens (InputLayer)          [(None, None)]            0
    _________________________________________________________________
    embedding (Embedding)        (None, None, 16)          130960
    _________________________________________________________________
    avg_pooling (GlobalAveragePo (None, 16)                0
    _________________________________________________________________
    lambda (Lambda)              (16,)                     0
    =================================================================
    Total params: 130,960
    Trainable params: 130,960
    Non-trainable params: 0
    _________________________________________________________________
Upon loading the model, we can also inspect the structure of the input tensor. It is useful to confirm that the InputLayer was correctly set in the model that was saved. The following is the code similar to that used within Abacus.AI to discover the name of the input tensor:
print('Input Tensors: ', [tensor for tensor in model_from_disk.signatures['serving_default'].structured_input_signature if tensor]) # Cleanup empty inputs
Input Tensors: [{'tokens': TensorSpec(shape=(None, None), dtype=tf.float32, name='tokens')}]
Deploy TensorFlow Plug and Play Model with Embeddings
The section focuses on how you can leverage Abacus.AI infrastructure and abstractions to create, manage, and utilize the deployment(s) of the model(s) trained on your infrastructure.
Uploading Artifacts
In the previous section, we have discussed the process of creating the artifacts required for the use case. You could upload the files directly to our platform using the interface as follows:
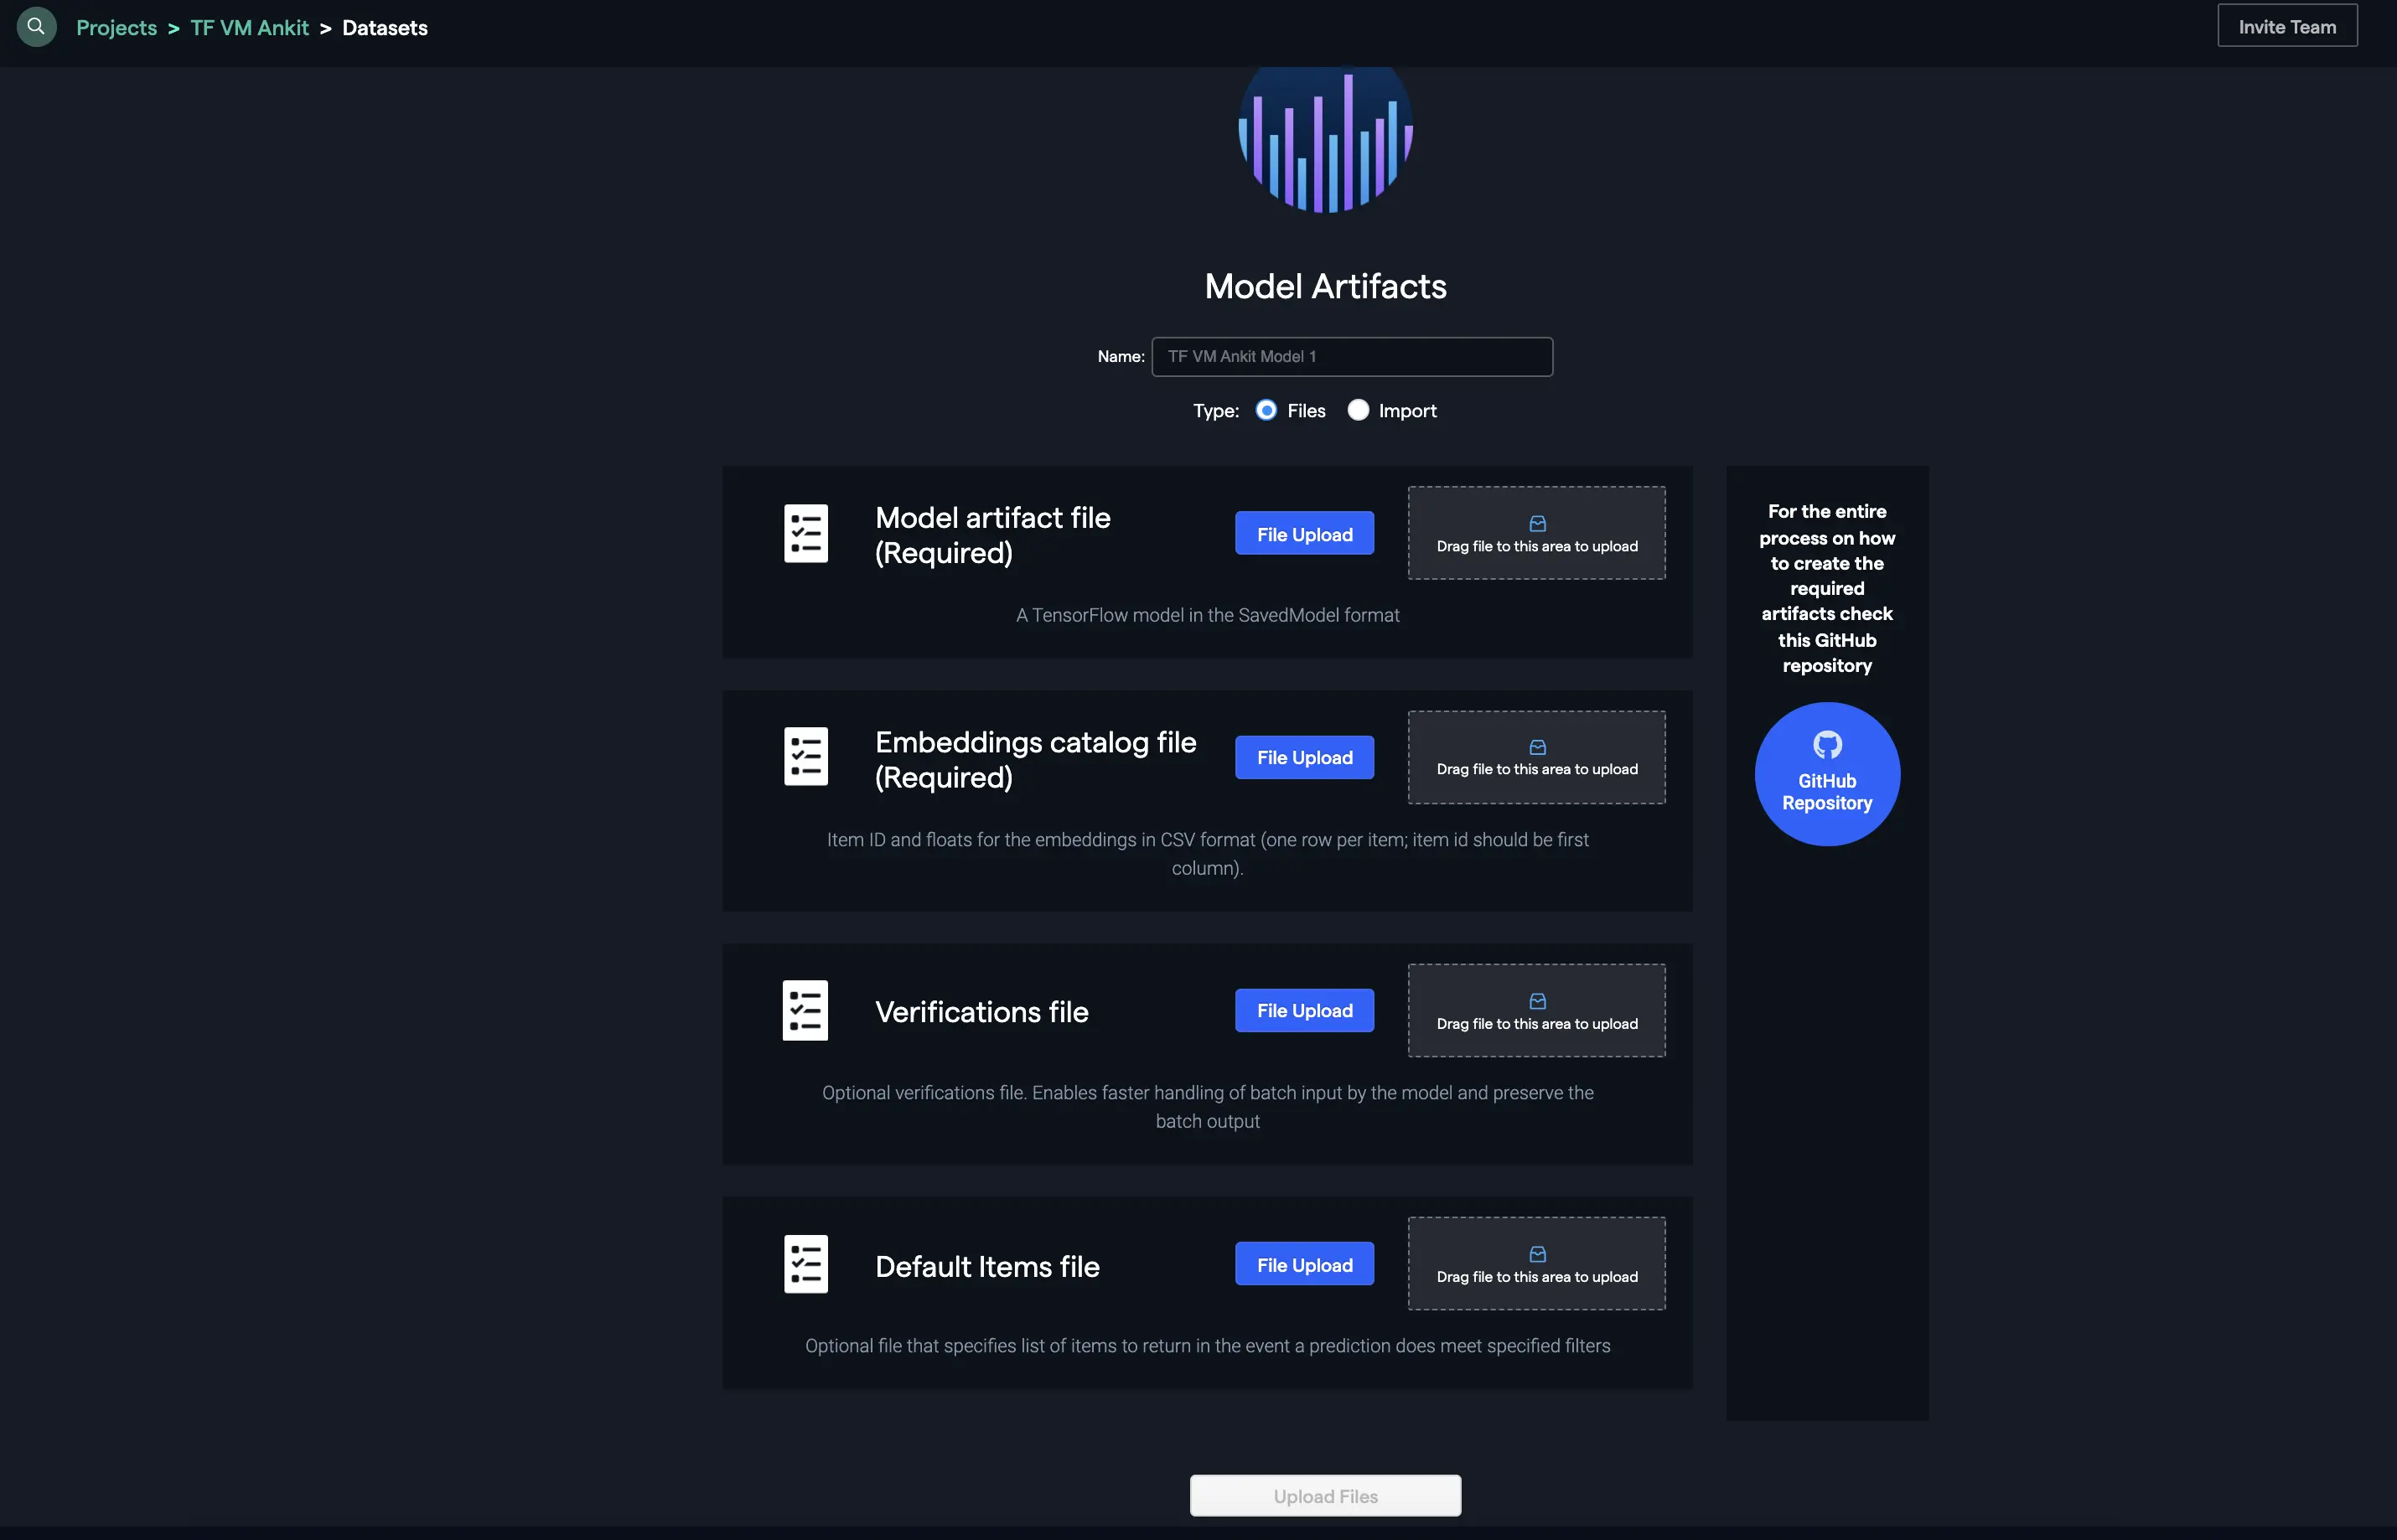
Another way to upload the artifacts is to add them from your cloud storage bucket by providing the location and other details as follows:

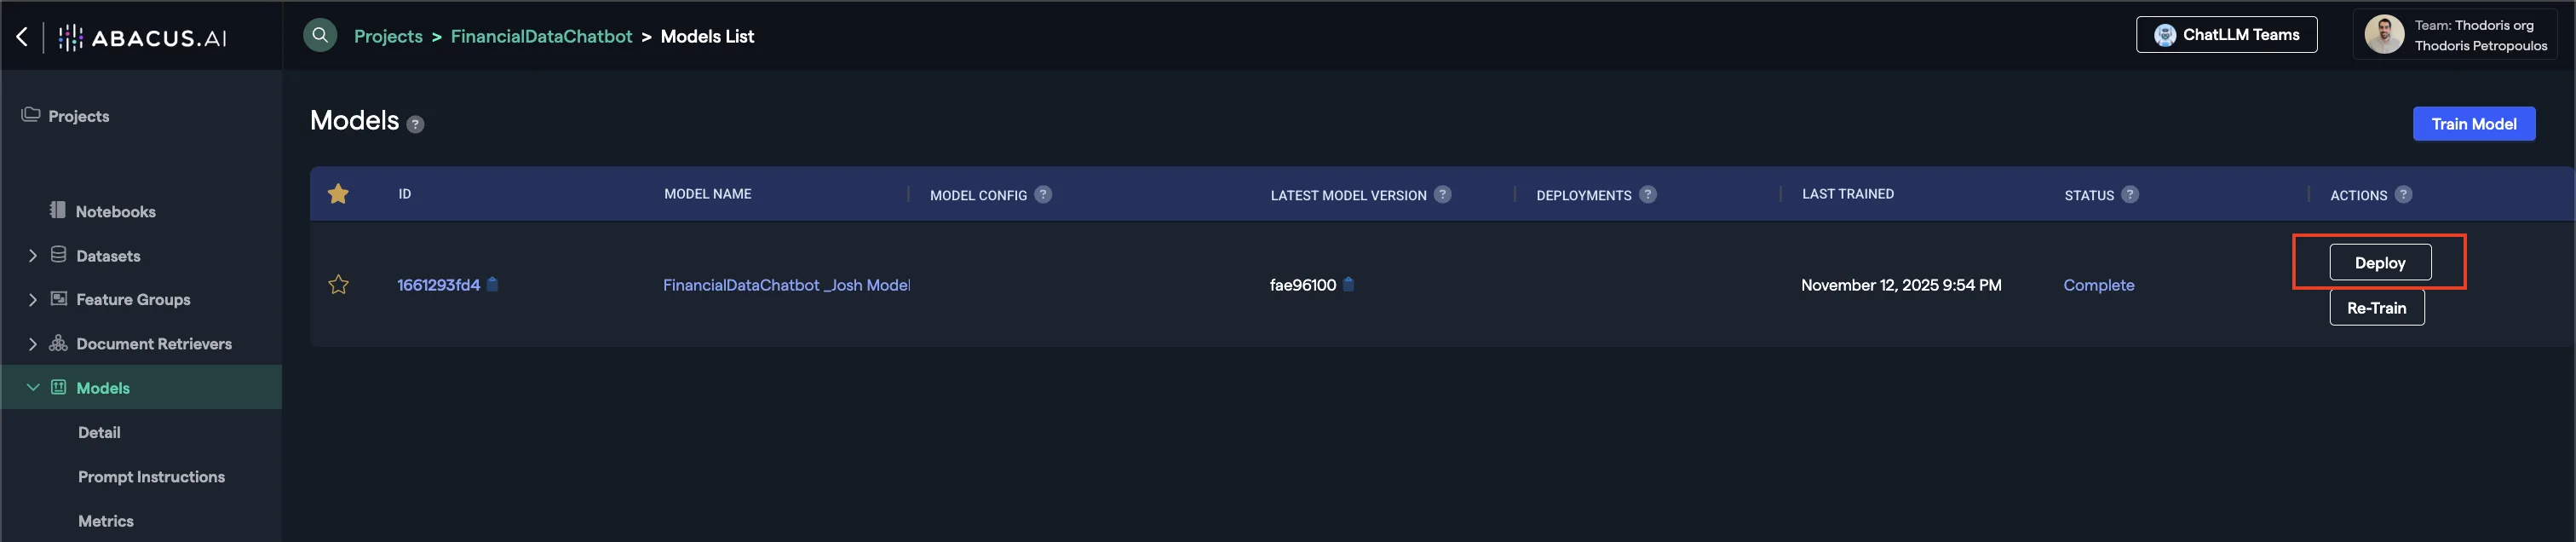
Deploying your model
Once the model is ready, click on the Deploy button within the model's page.
- Offline Deployment Mode: Select this option when you want the model to be available for batch processing.
- Online Deployment Mode: Select this option when you want the model to be available to use via the API

Here are some of the important options you will be able to see within the Deployment page of a model:
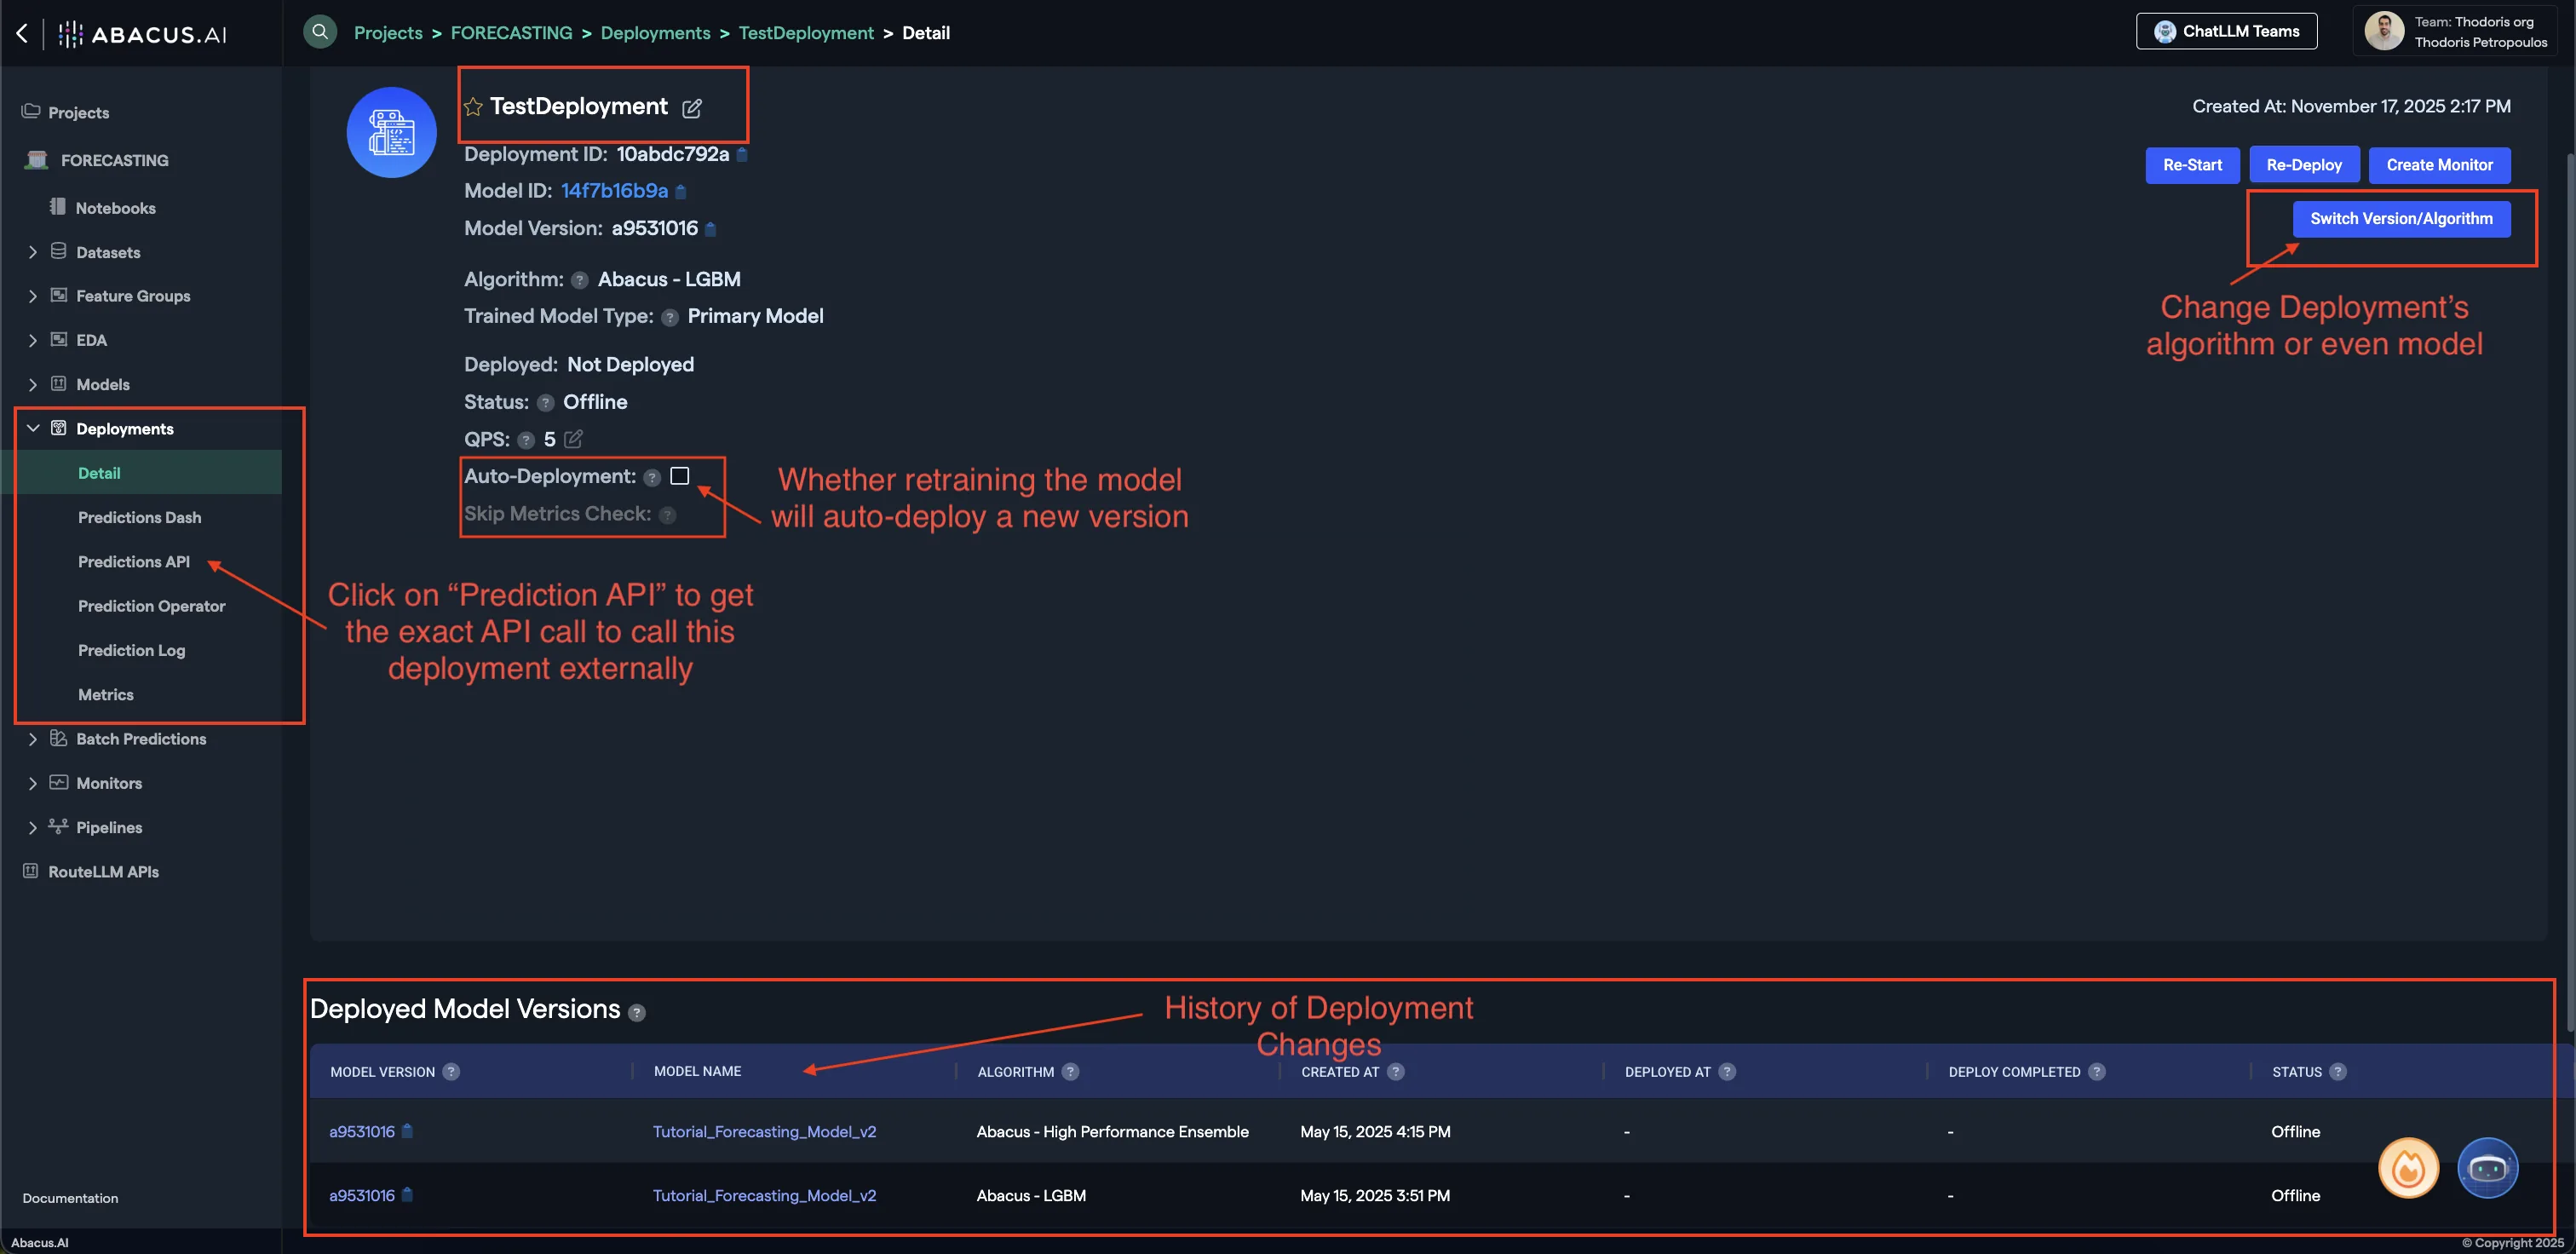
- Prediction API: Clicking on this button will provide you with a sample API request to call this model externally.
- Switch Version/Algorithm: This option allows you to change the model version or algorithm used for predictions.
- Auto Deployment: Whether model retrains will also auto-deploy the newest version of the model.
To learn more about Deployments, visit our Deployments Guide
Your model is now ready to use!
Predictions
Our deployments expose the prediction API that can be used to generate predictions from the model:
curl -X POST "https://abacus.ai/api/predict?deploymentToken=YOUR_TOKEN&deploymentId=YOUR_ID"
-d '{
"distance": "dot",
"num": 20,
"data": ""
}'
-H "Content-Type: application/json"