Connect to Abacus.AI Using JDBC/ODBC
The Abacus.AI platform provides an JDBC/ODBC connector as one of the options for you to attach datasets to your project from your own databases.
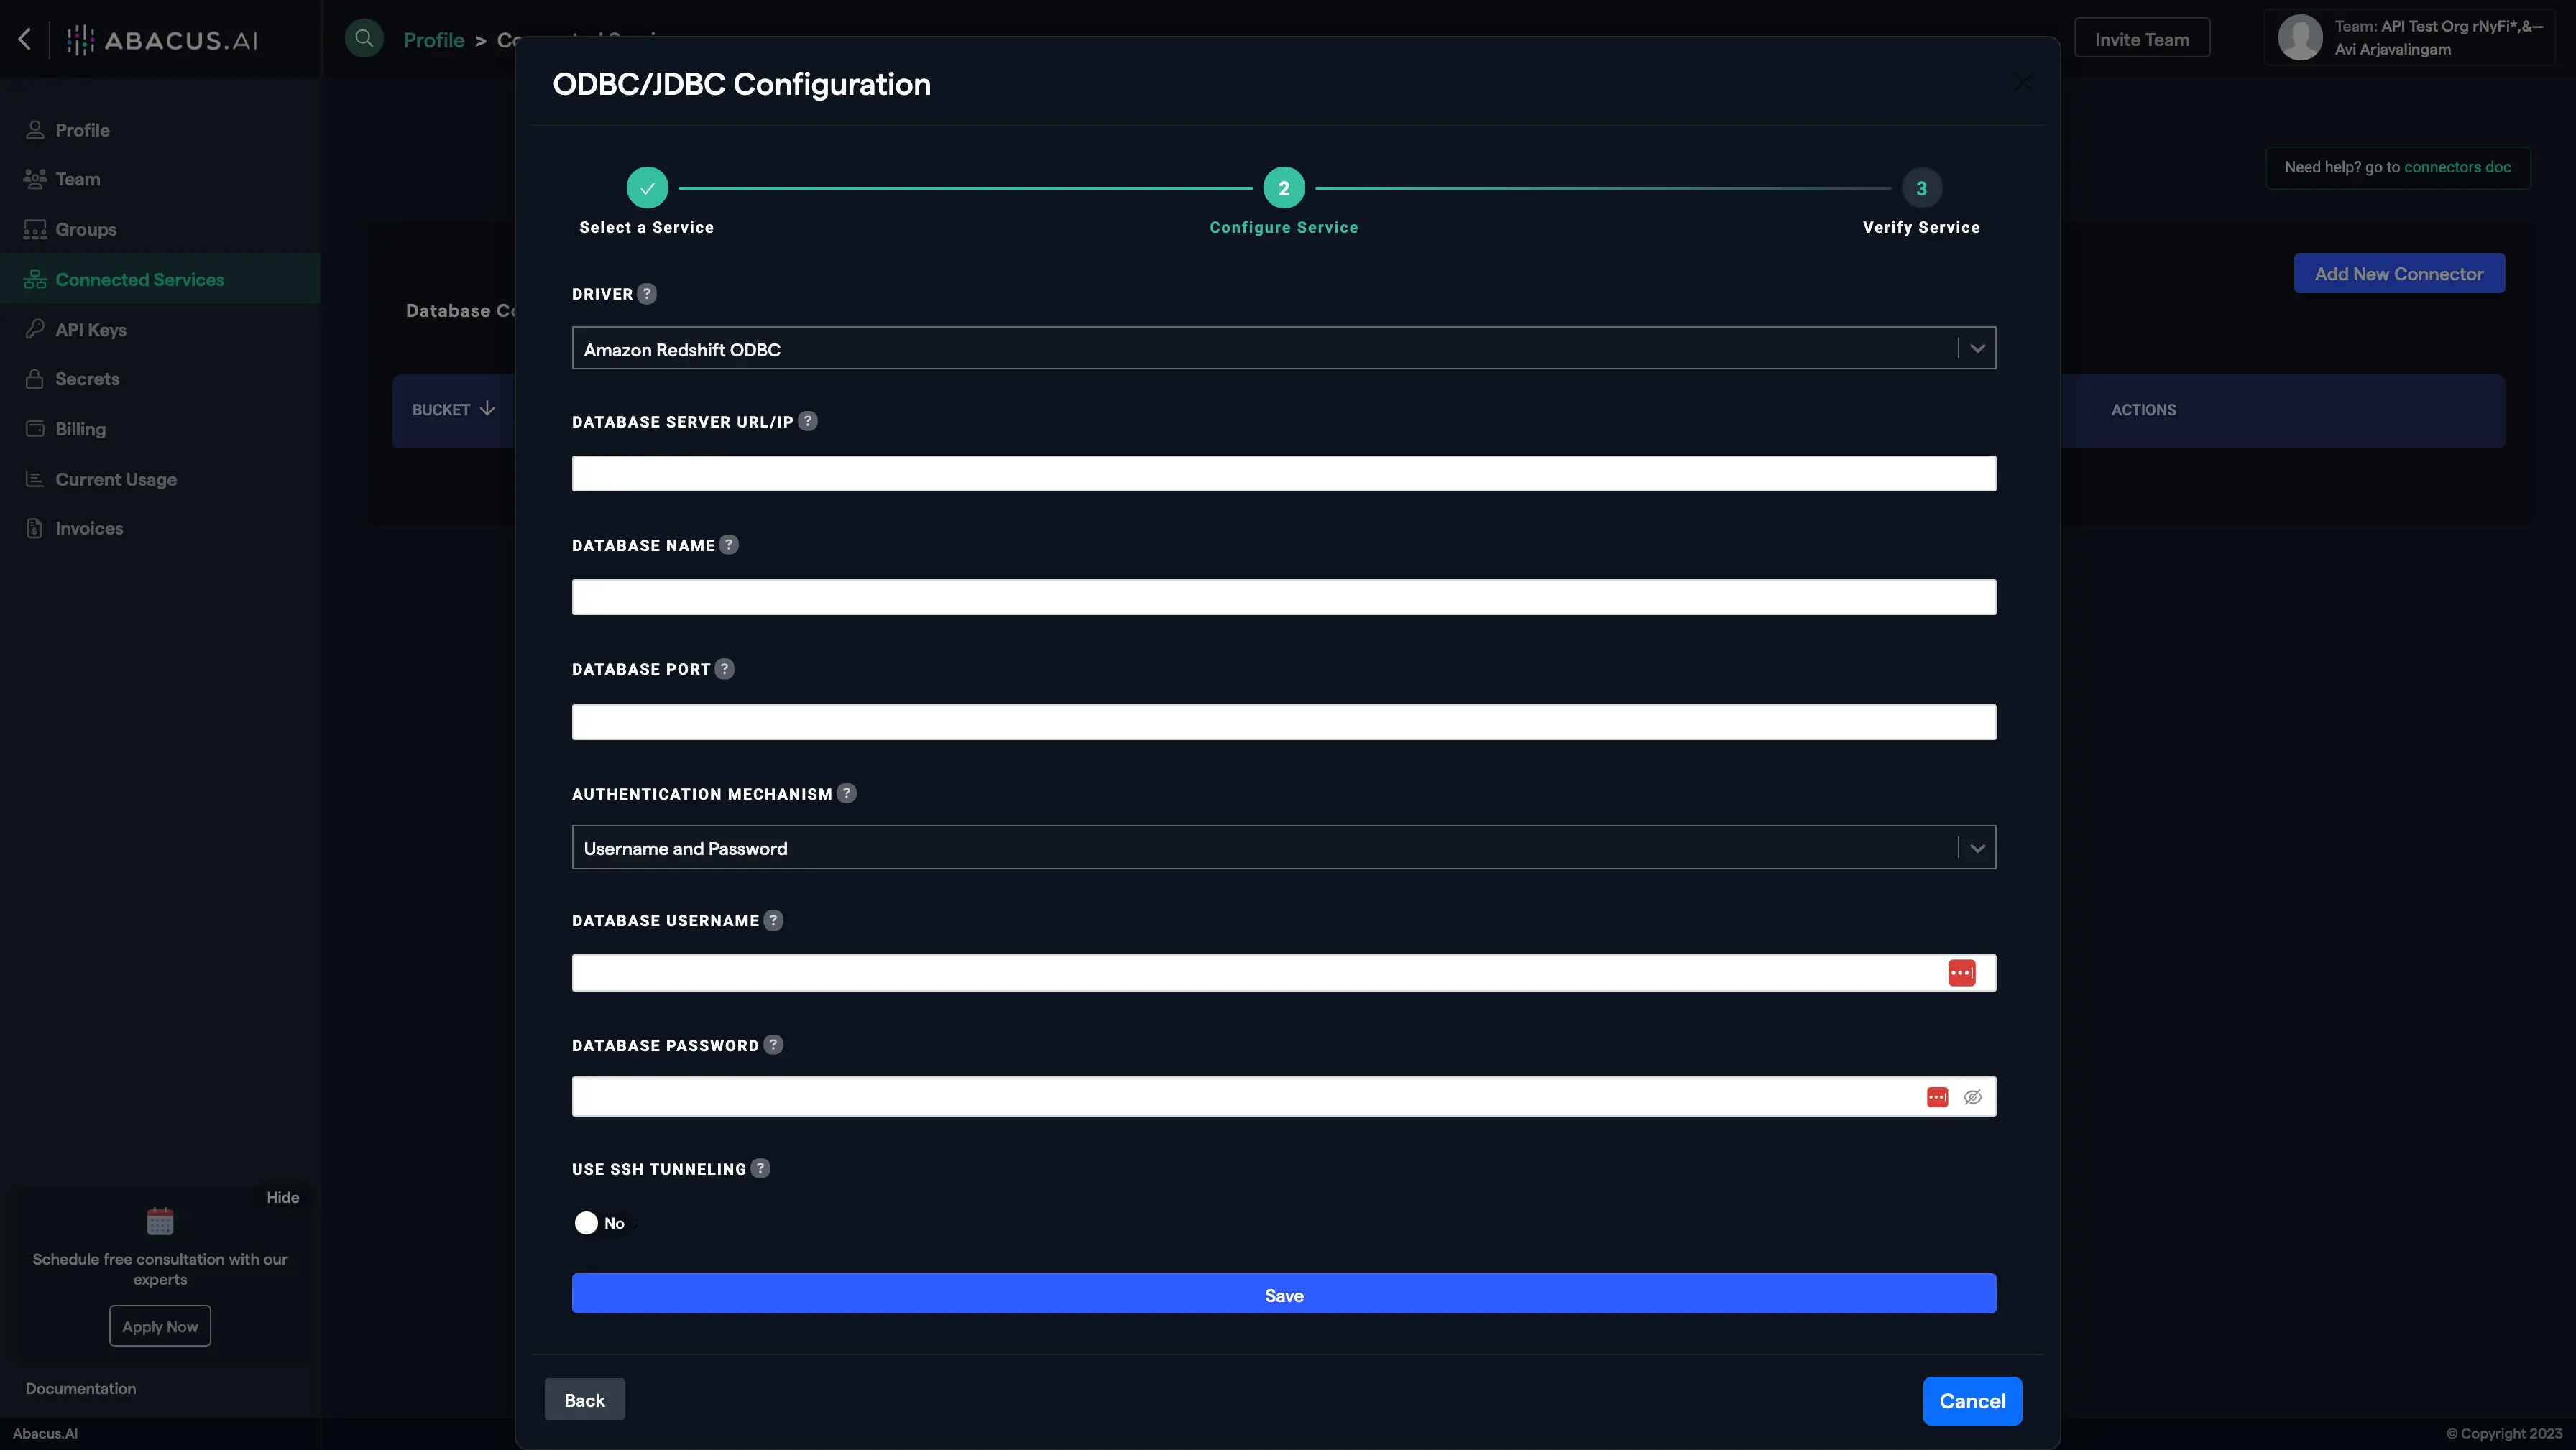
Connector Setup
In order to connect to your database, the following information regarding the database is required:
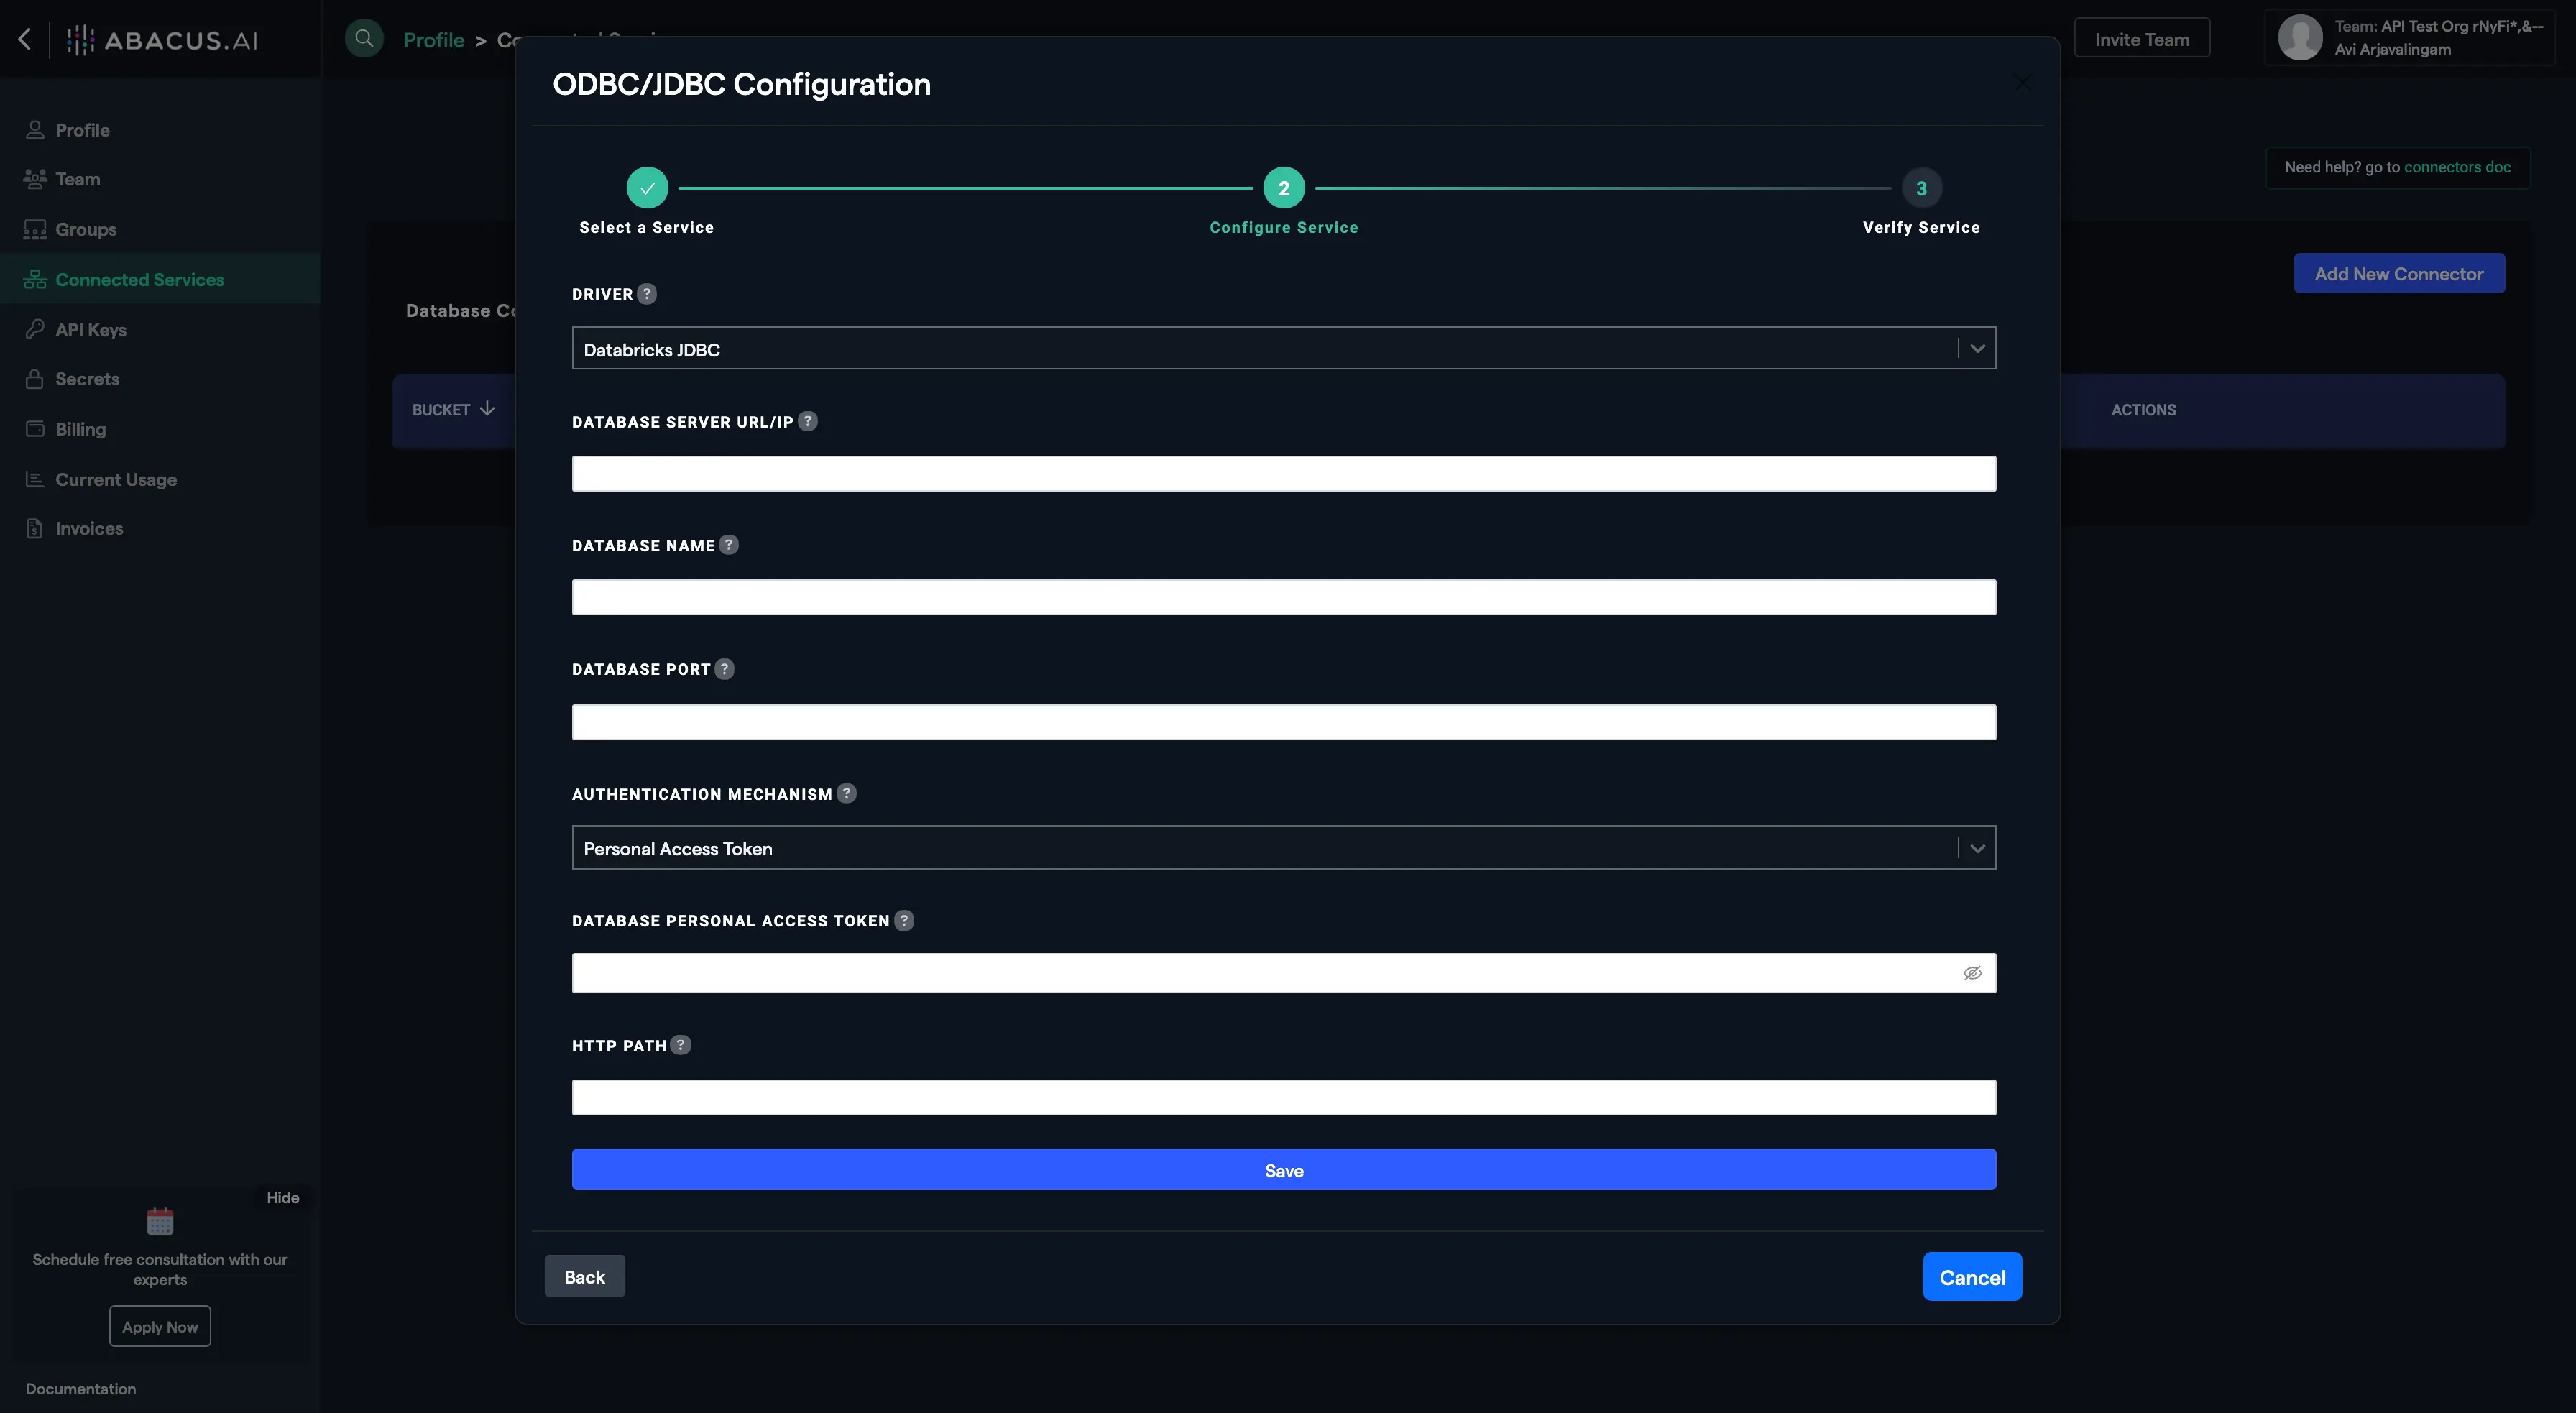
- Driver: The specific driver required to connect to the database depending upon the type of database.
- Authentication Mechanism: Based on the authentication method associated with the database, authentication information might be required for configuration. It can be a personal access token, username and password, or no authentication at all. In this example, we'll be using a personal access token.
- Database Server URL/IP: The server hostname's IP address or URL.
- Database Name: The name of the specific database.
- Database Port: The port at which the database server is running.
- HTTP Path: The HTTP path to the specific cluster the database belongs to.
- Authentication Methods: The method by which the server requires user authentication. We support the following methods based on the specific driver:
- Username and Password
- Database Username: The username assigned to access the database. If a personal access token or no authentication is being used, then this can be disregarded.
- Database Password: The password used to access the database. If no authentication method is being used, then this can be disregarded. If a personal access token is being used, then that will act as the password for configuration.
- Personal Access Token
- The personal access token to be used in database authentication if required by the selected authentication mechanism.
- Client ID and Secret (Microsoft Service Principal) (for MS SQL ODBC Driver 17 and 18)
- Client ID: The client ID of the service principal, if required to connect to the Azure SQL database.
- Client Secret: The client secret of the service principal.
- Username and Password
Steps to connect to Azure Databricks (JDBC)
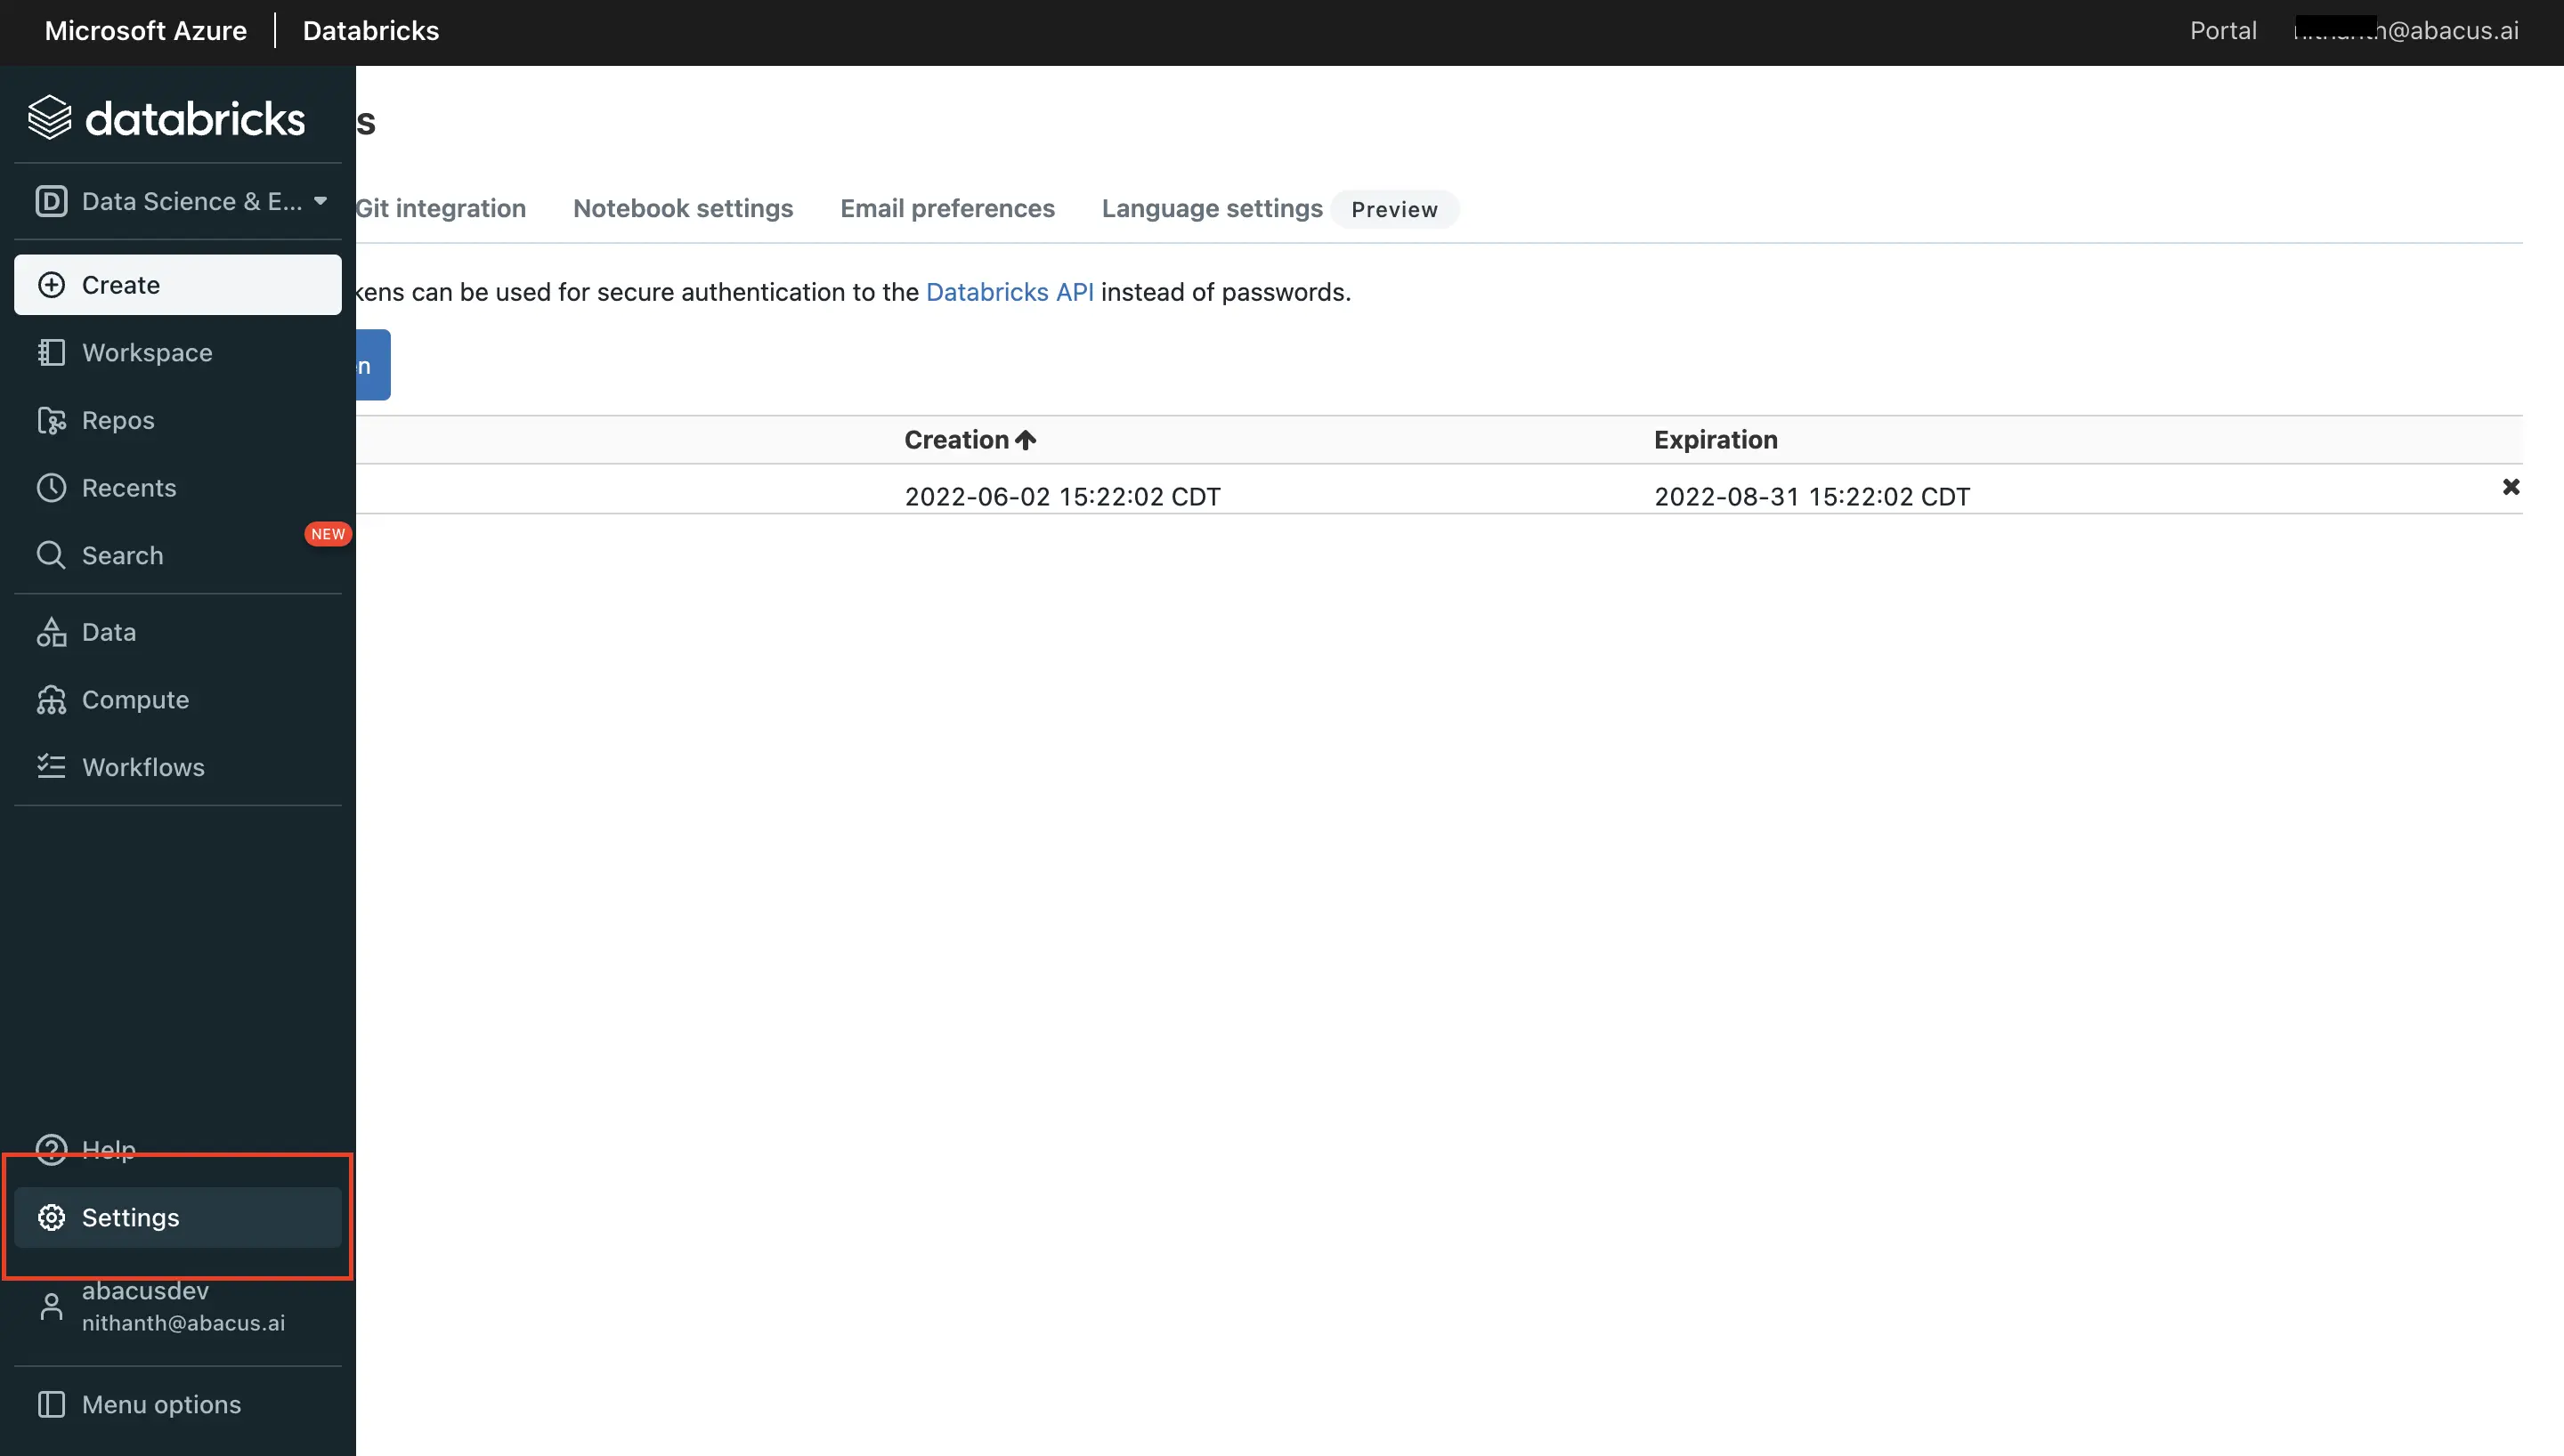
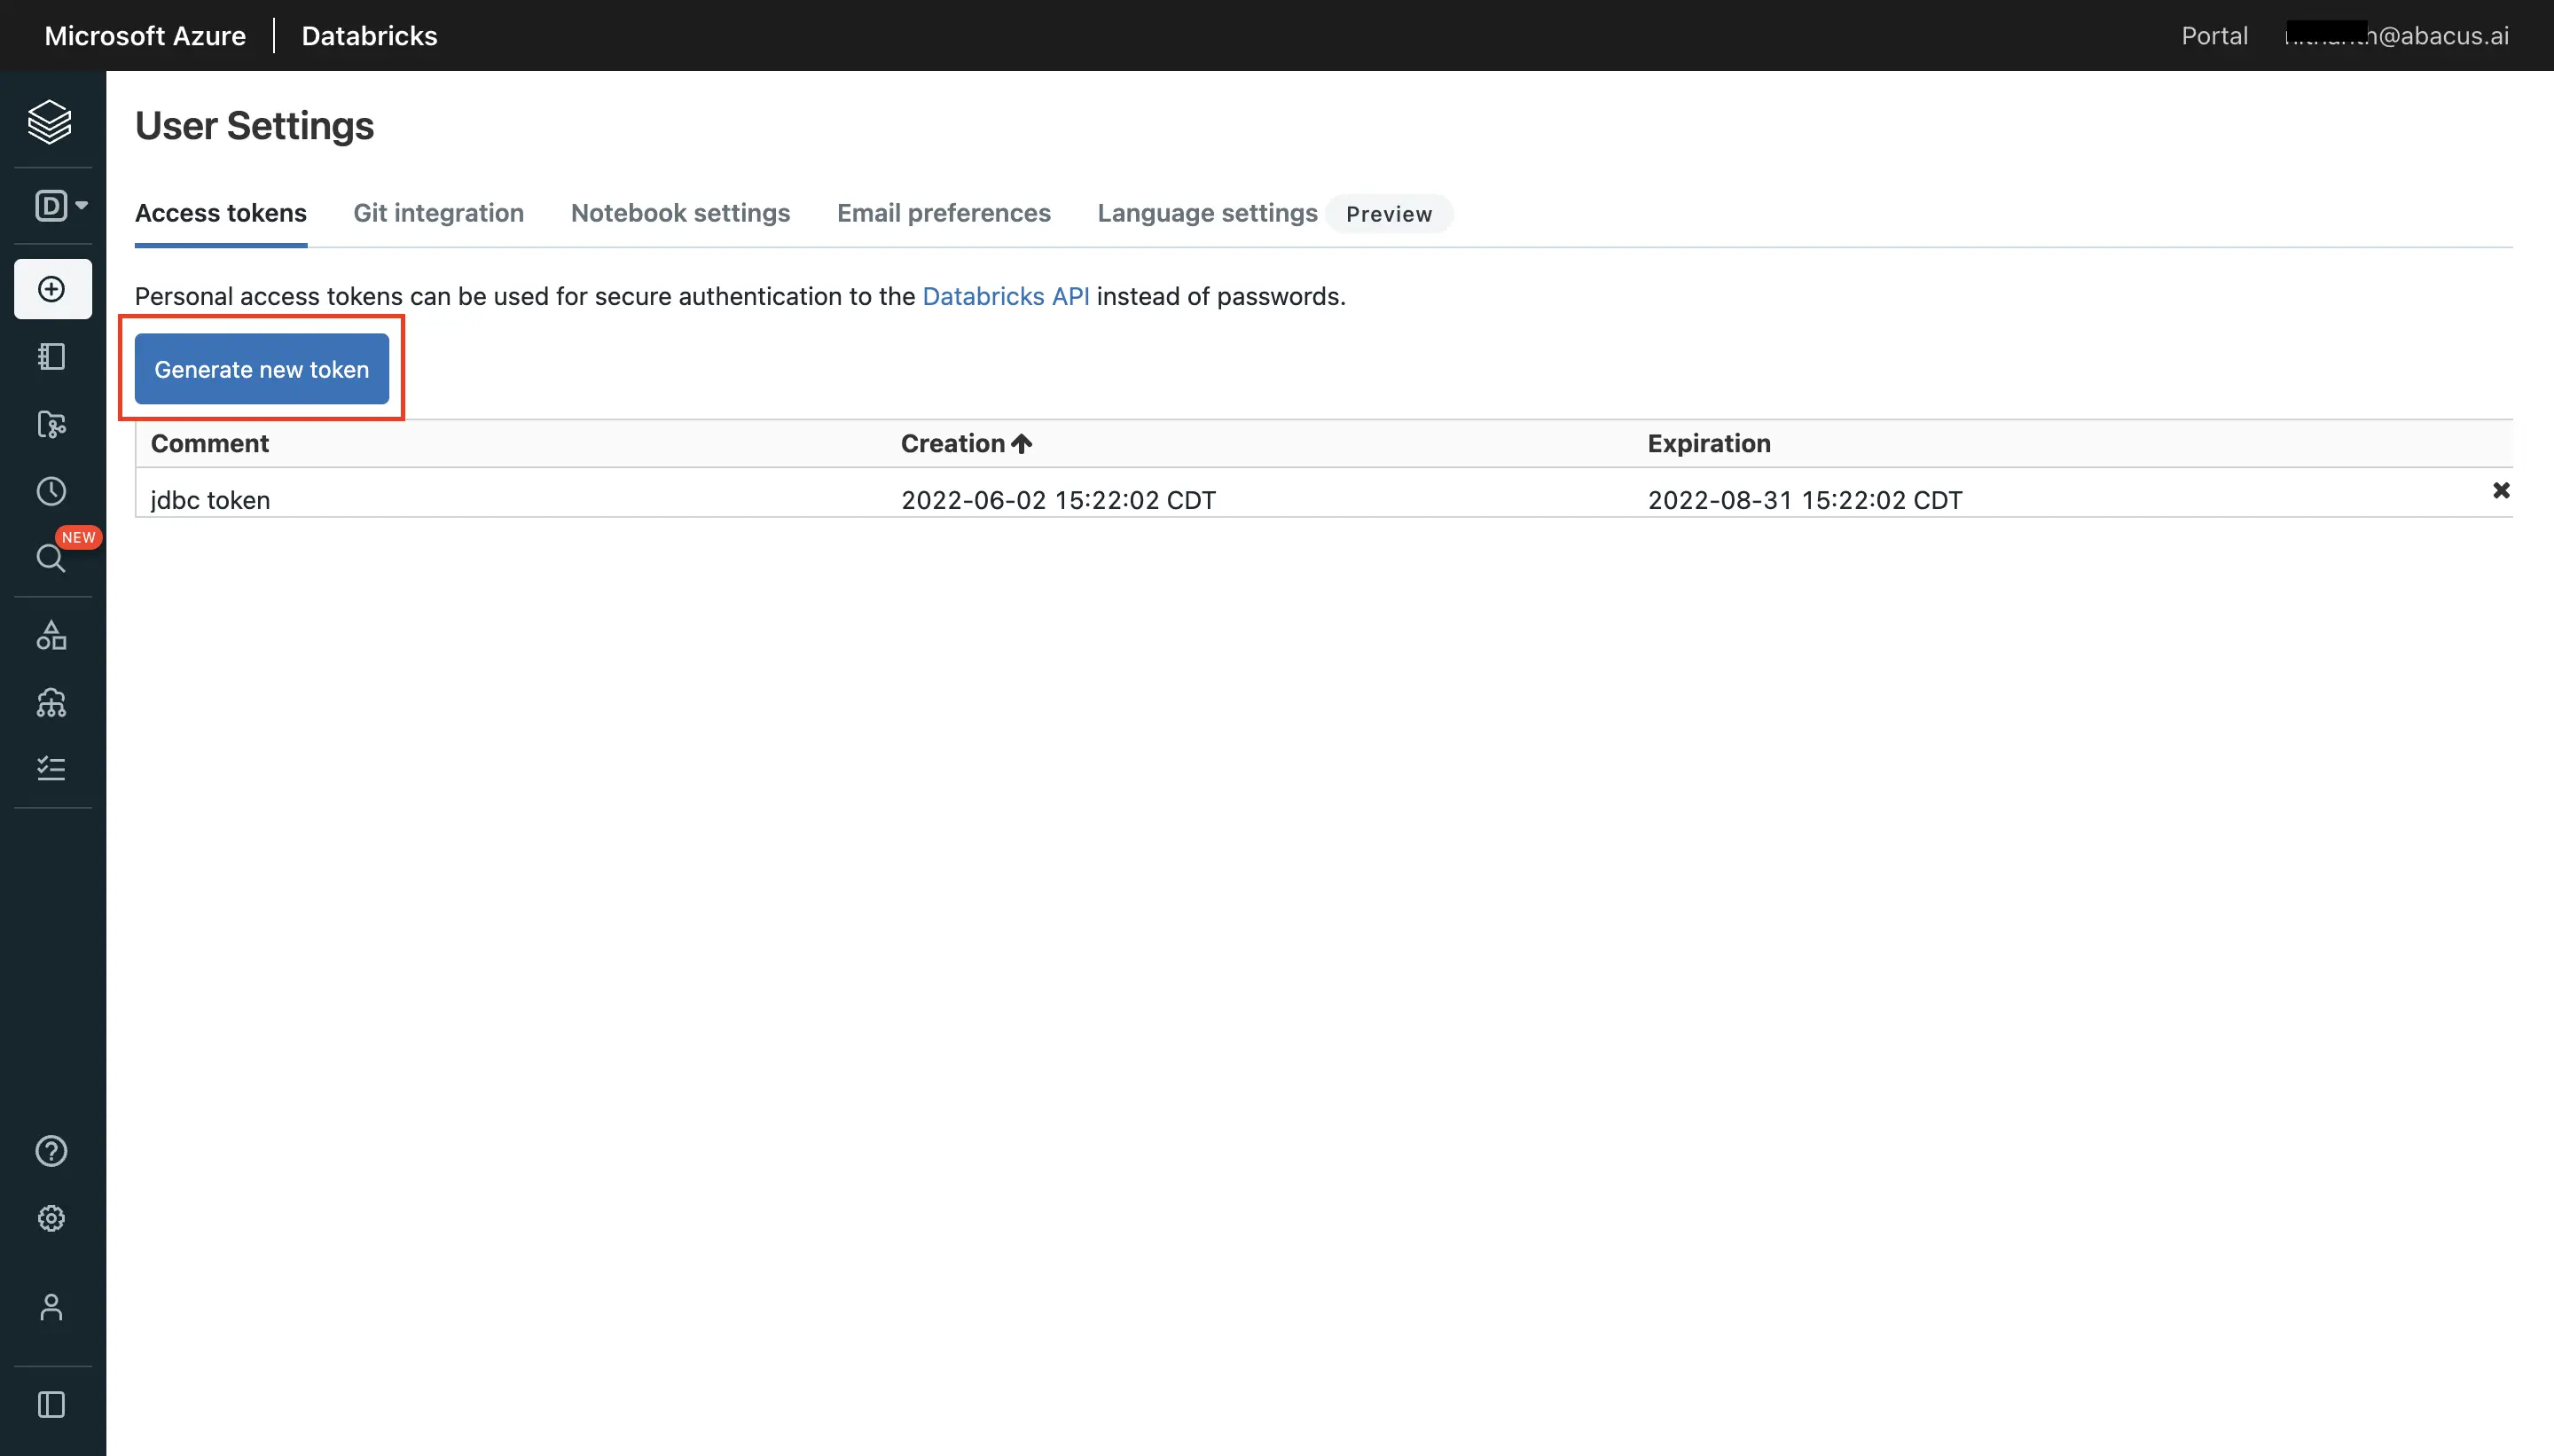
- Here's how to configure a connection to data hosted on the Azure Databricks platform. The first step is to set up authentication for the database. For this, navigate to "User Settings" and follow instructions to generate a personal access token within the Databricks platform:
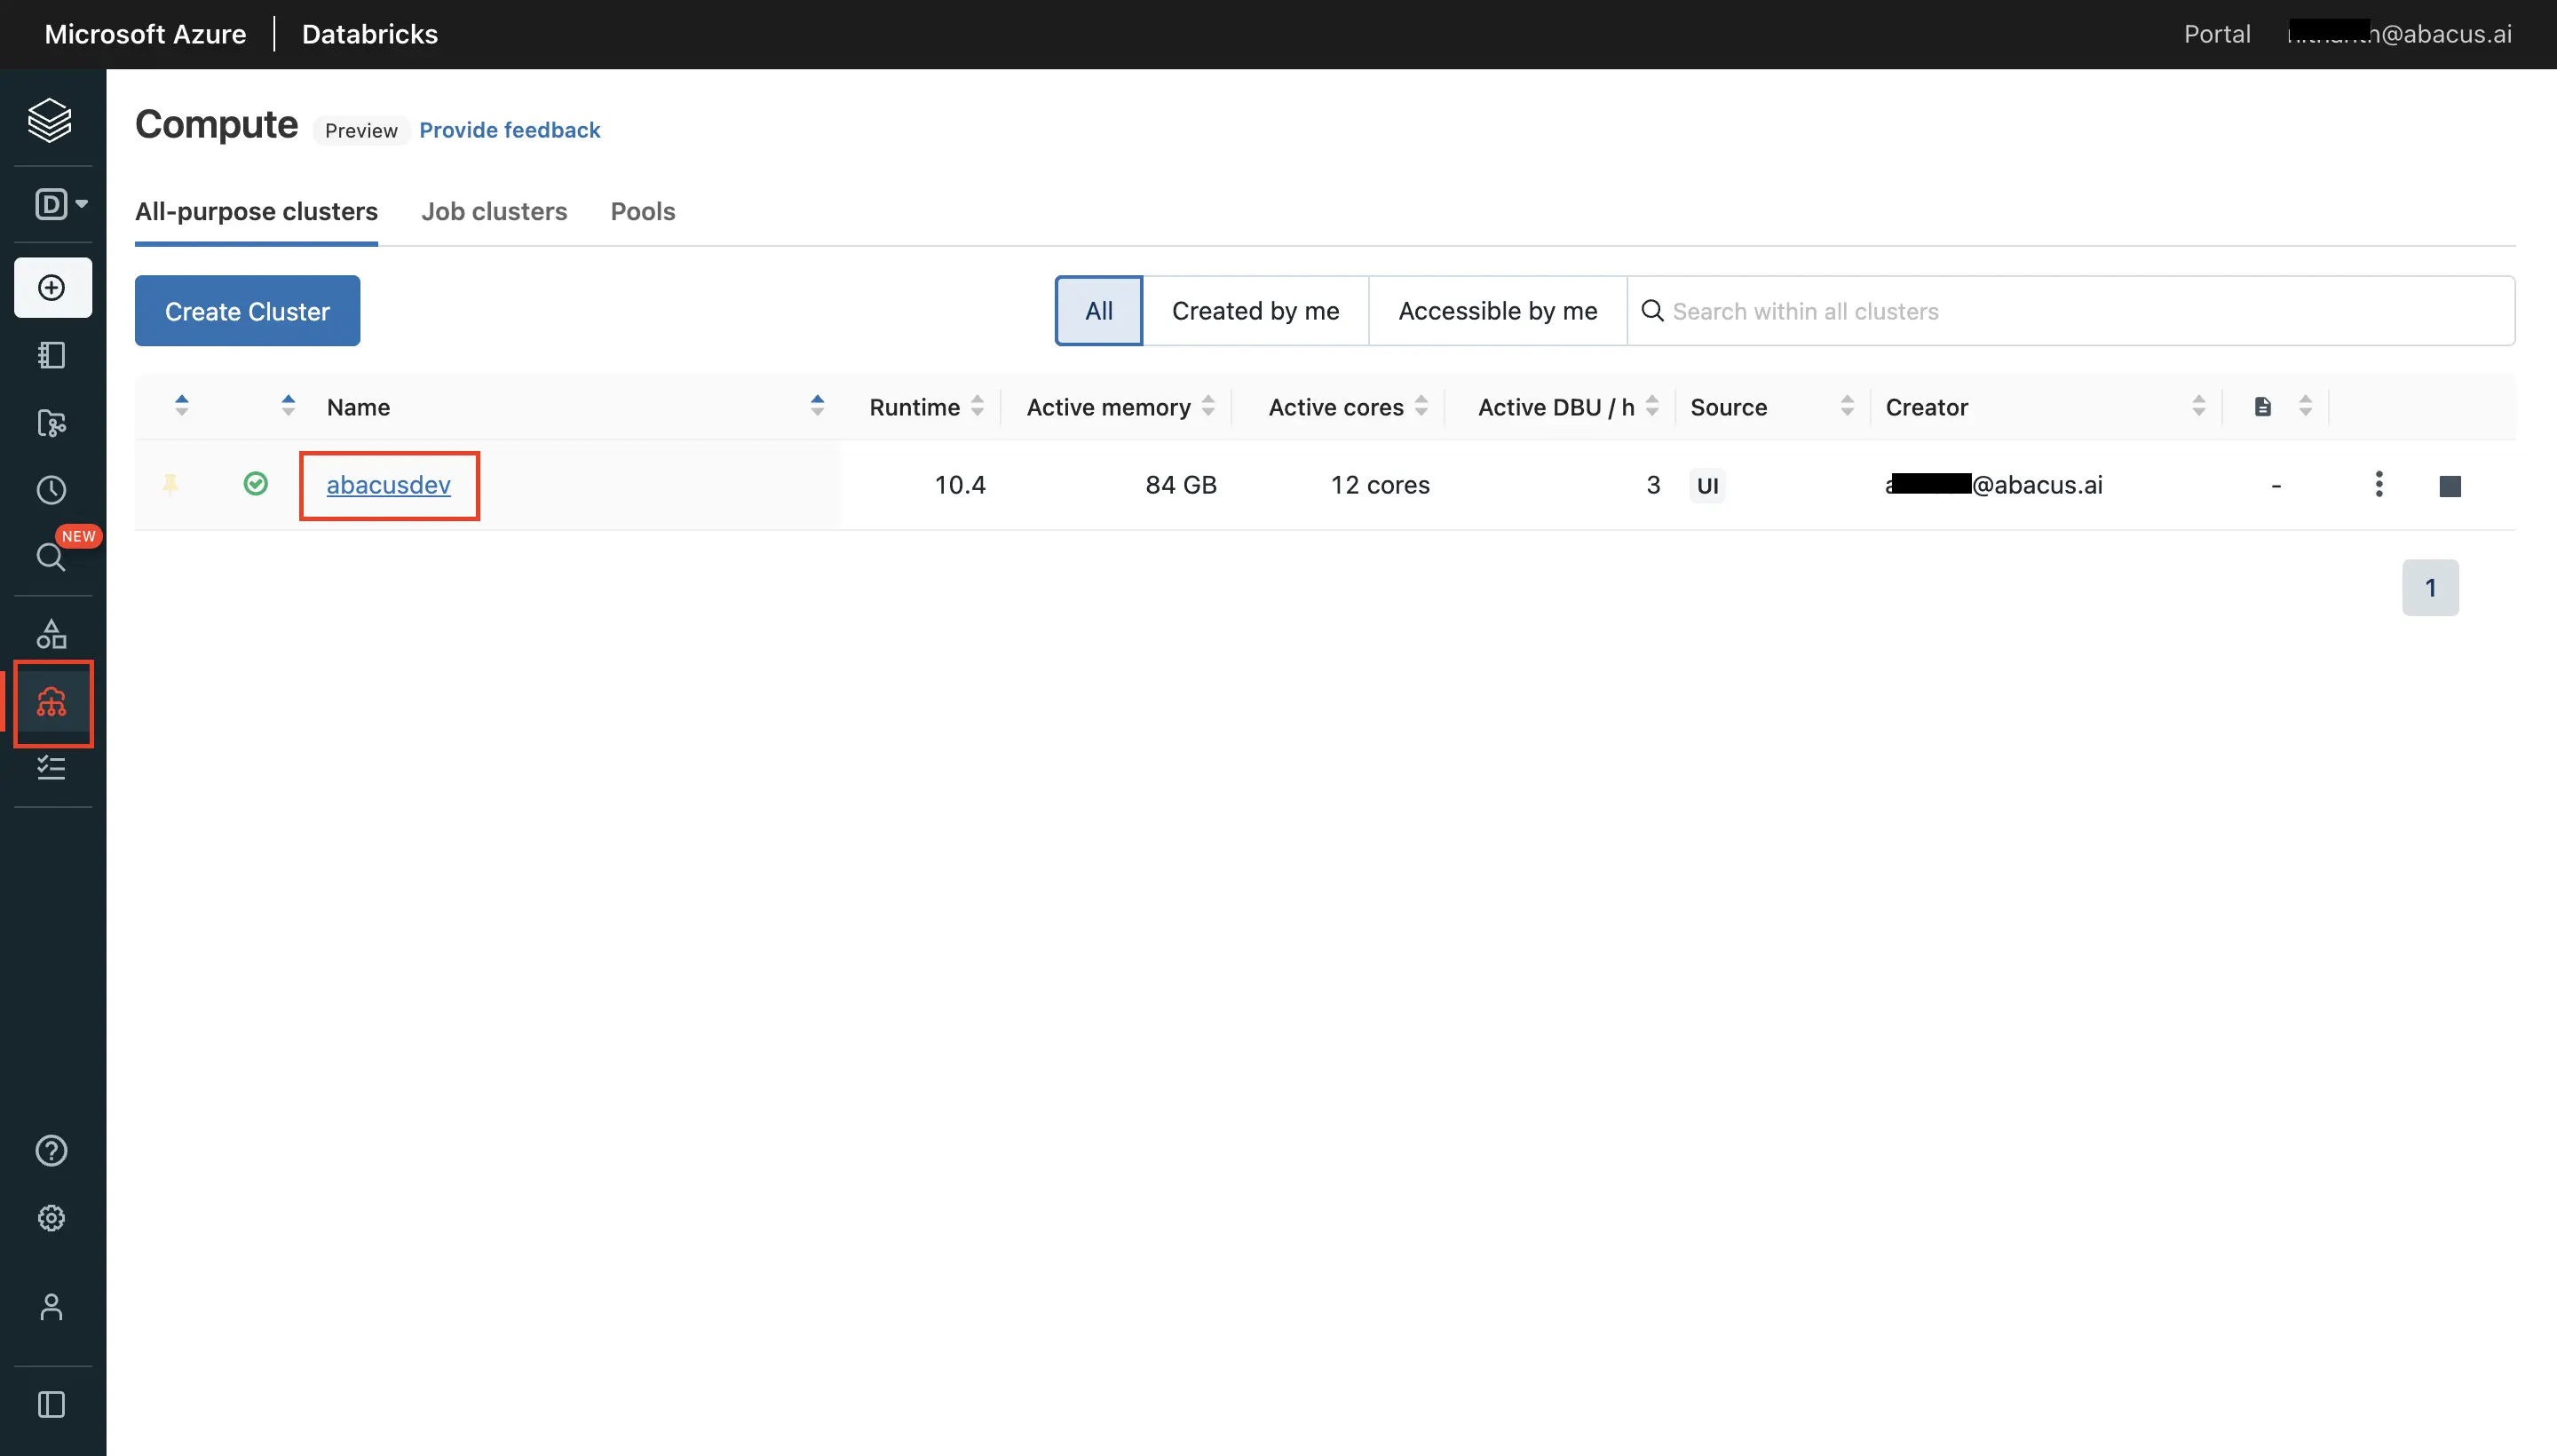
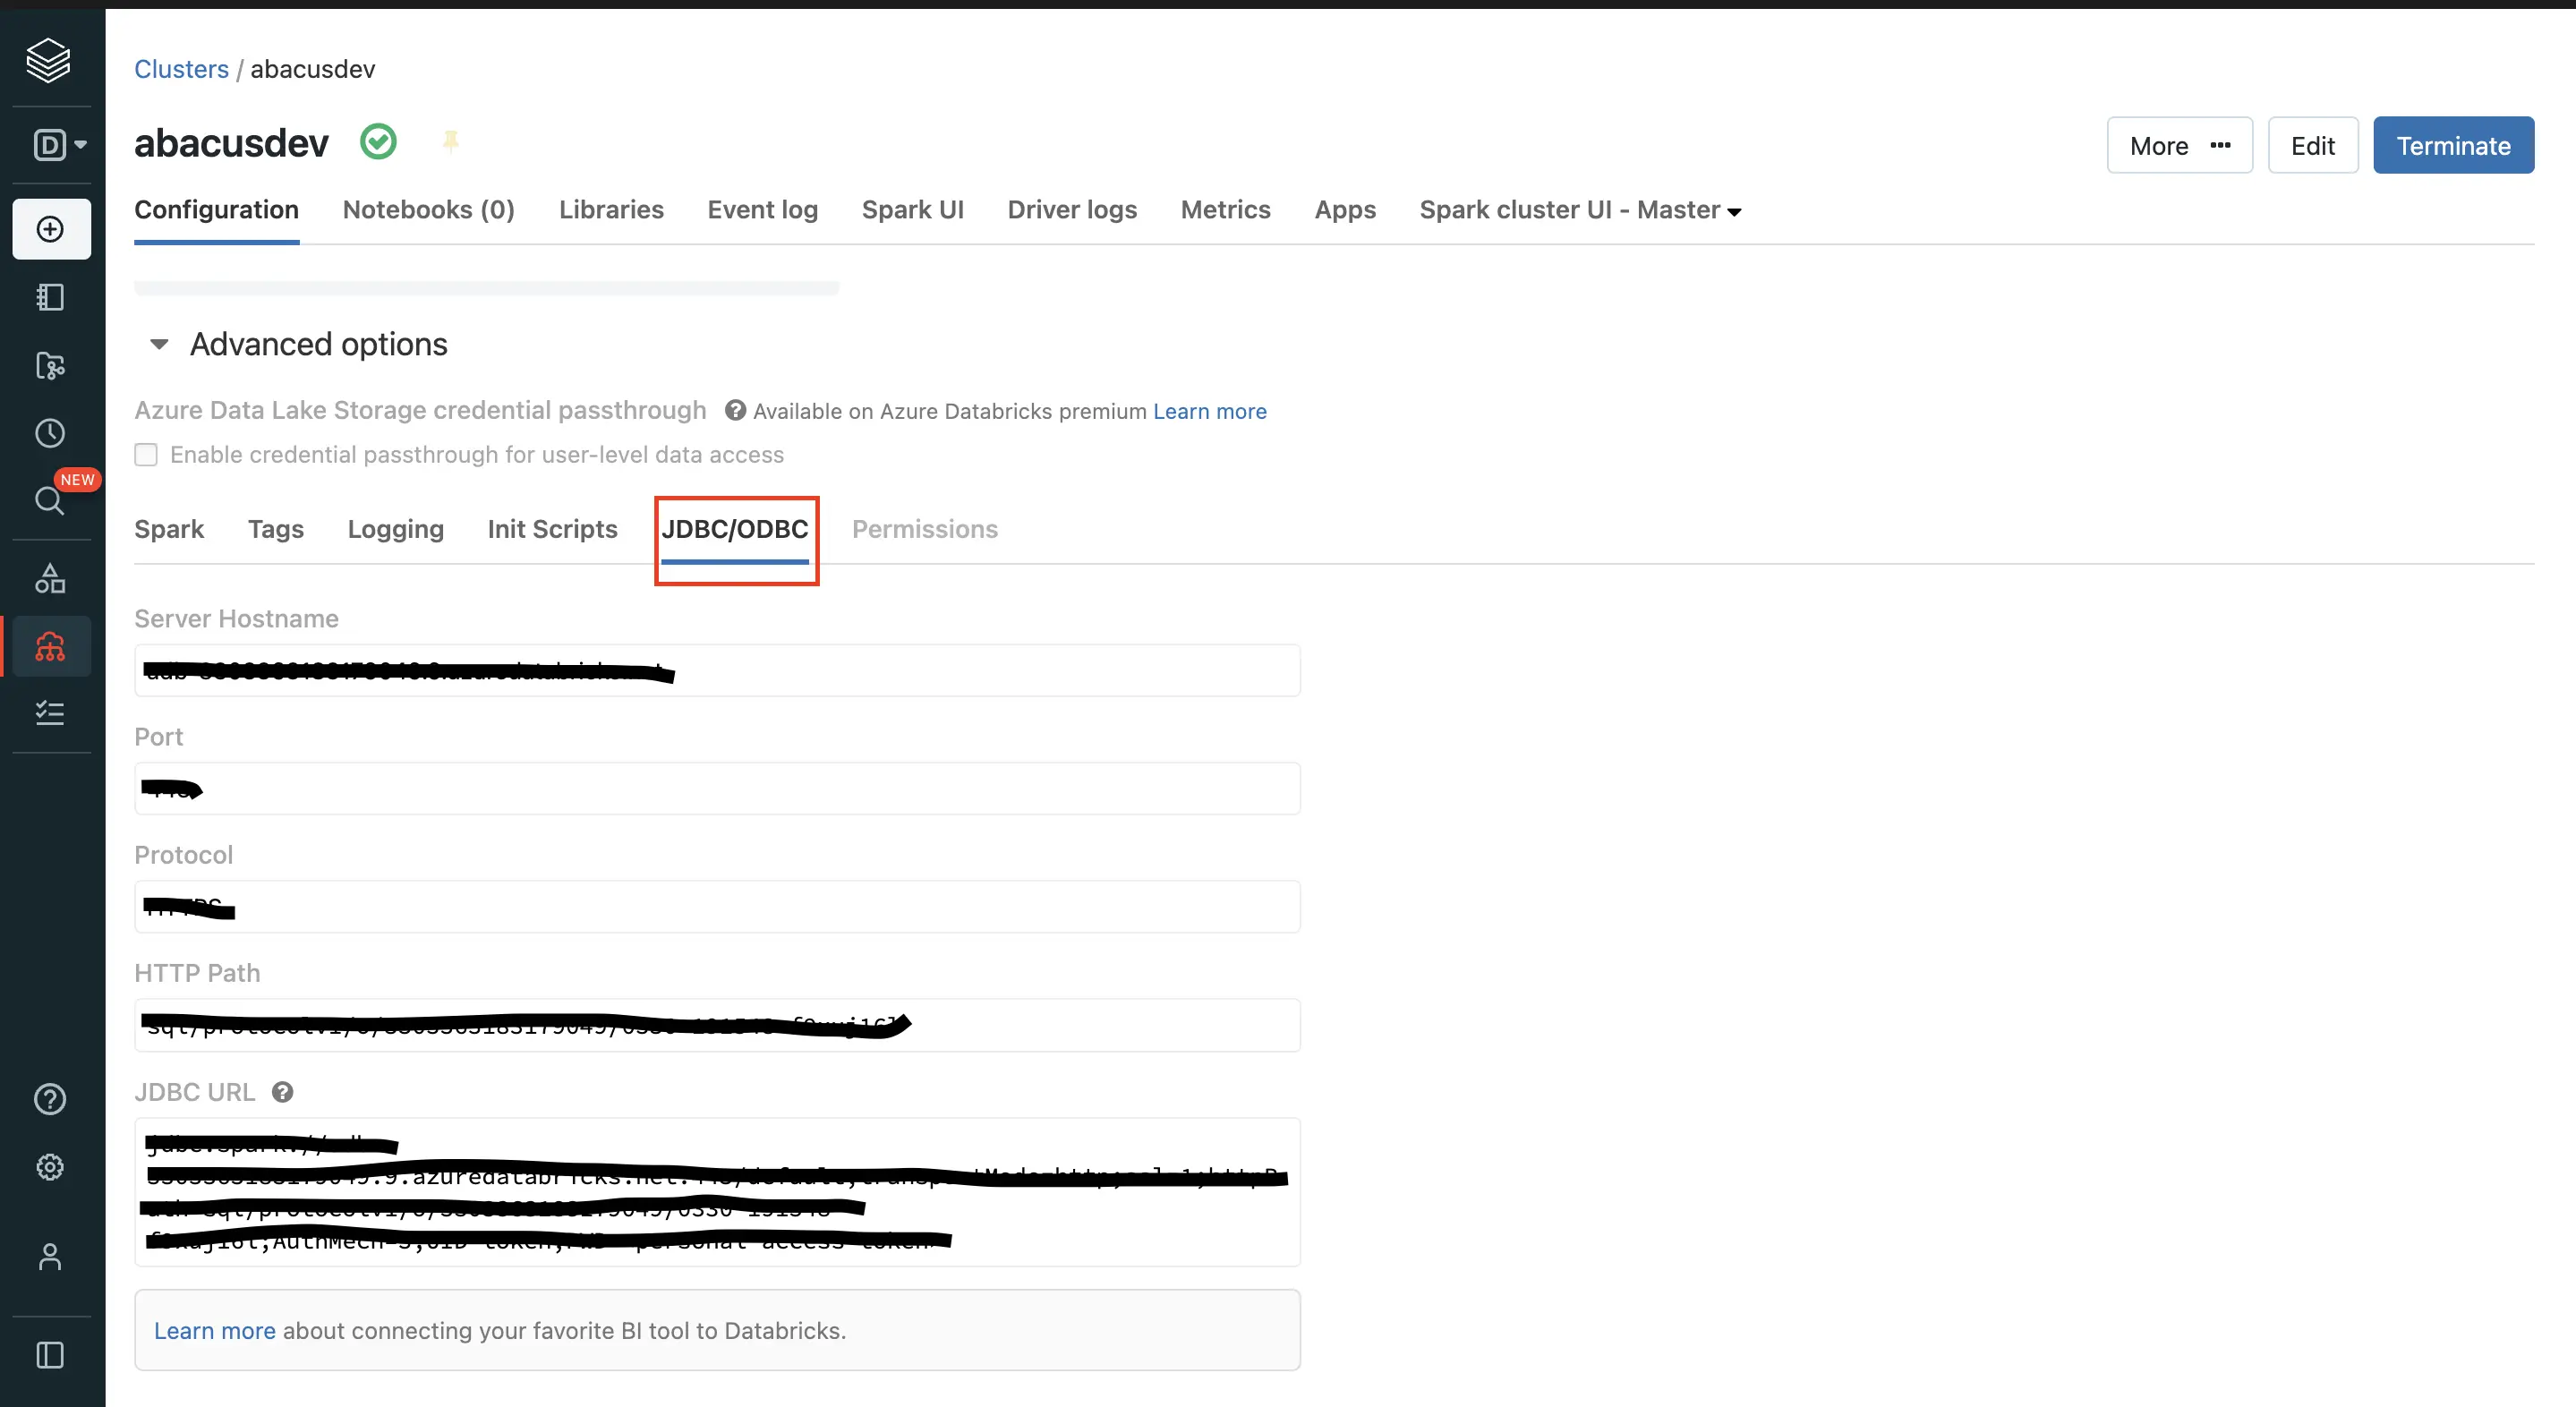
- Navigate to the "Compute" tab in order to extract the required information from the respective cluster. Click on "Advanced options" and "JDBC" to get the information.
Note: Your Database Server URL/IP should not include 'https://'. Only the server hostname or address.
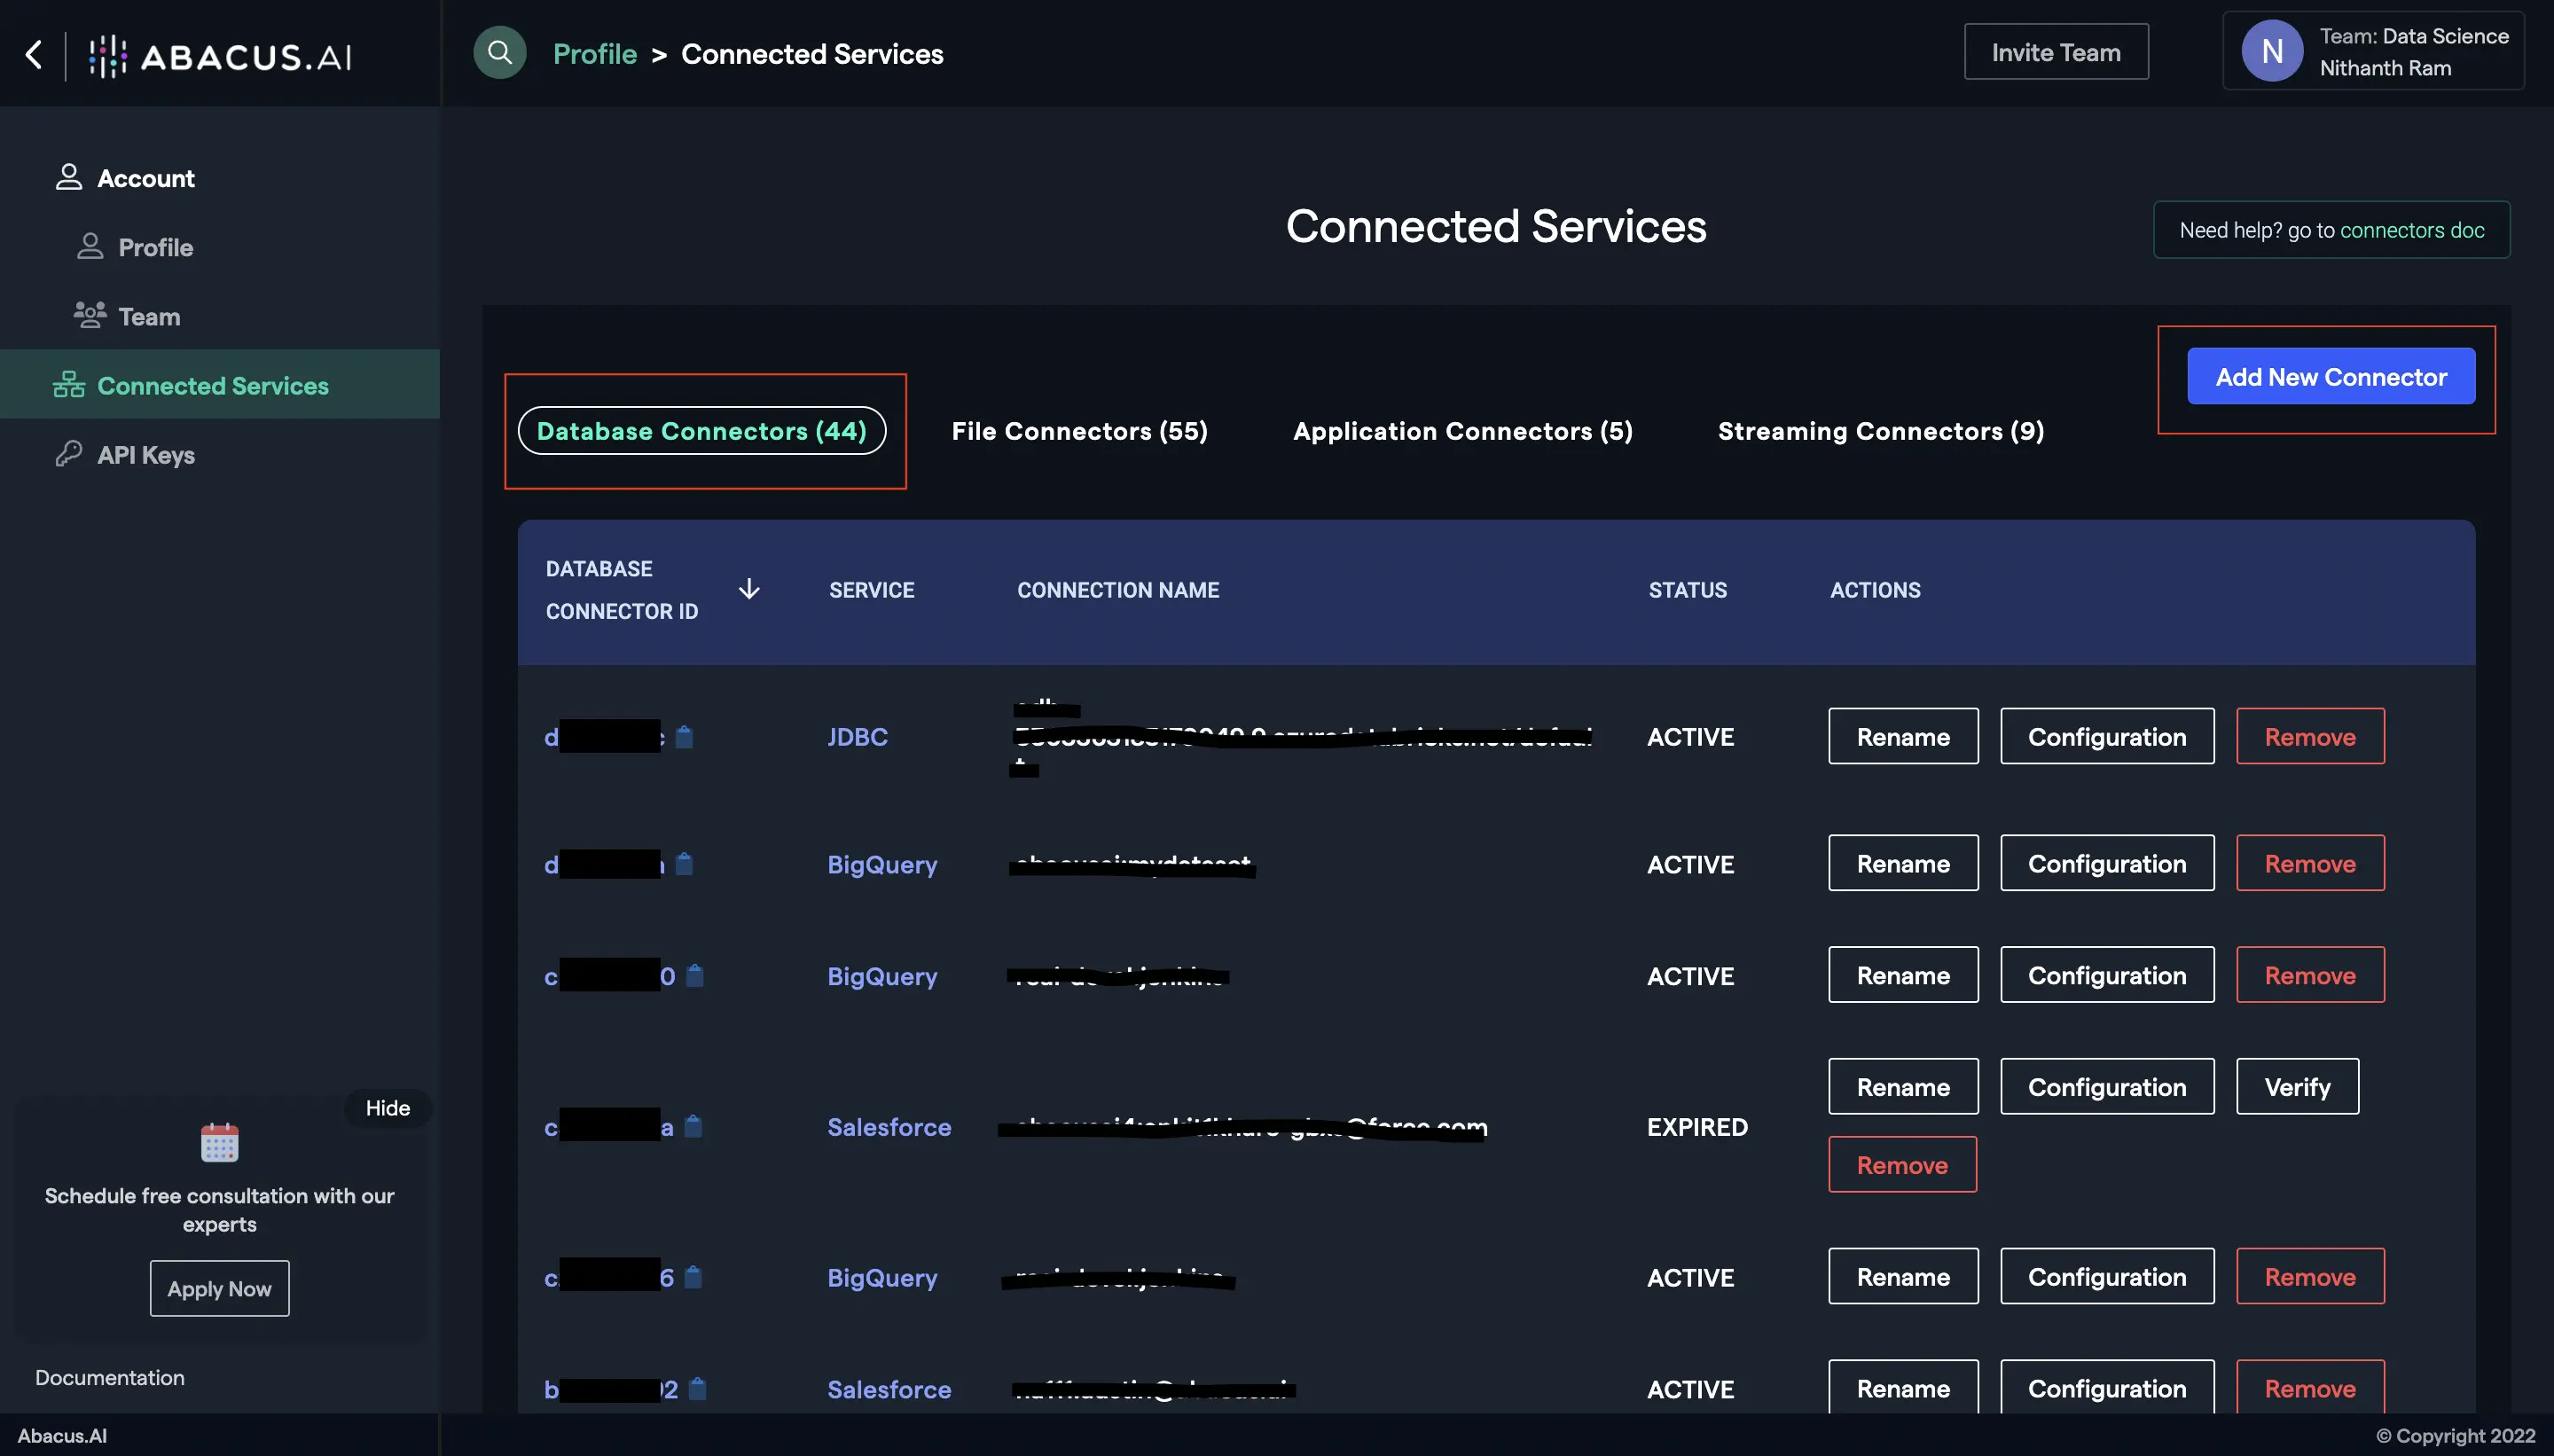
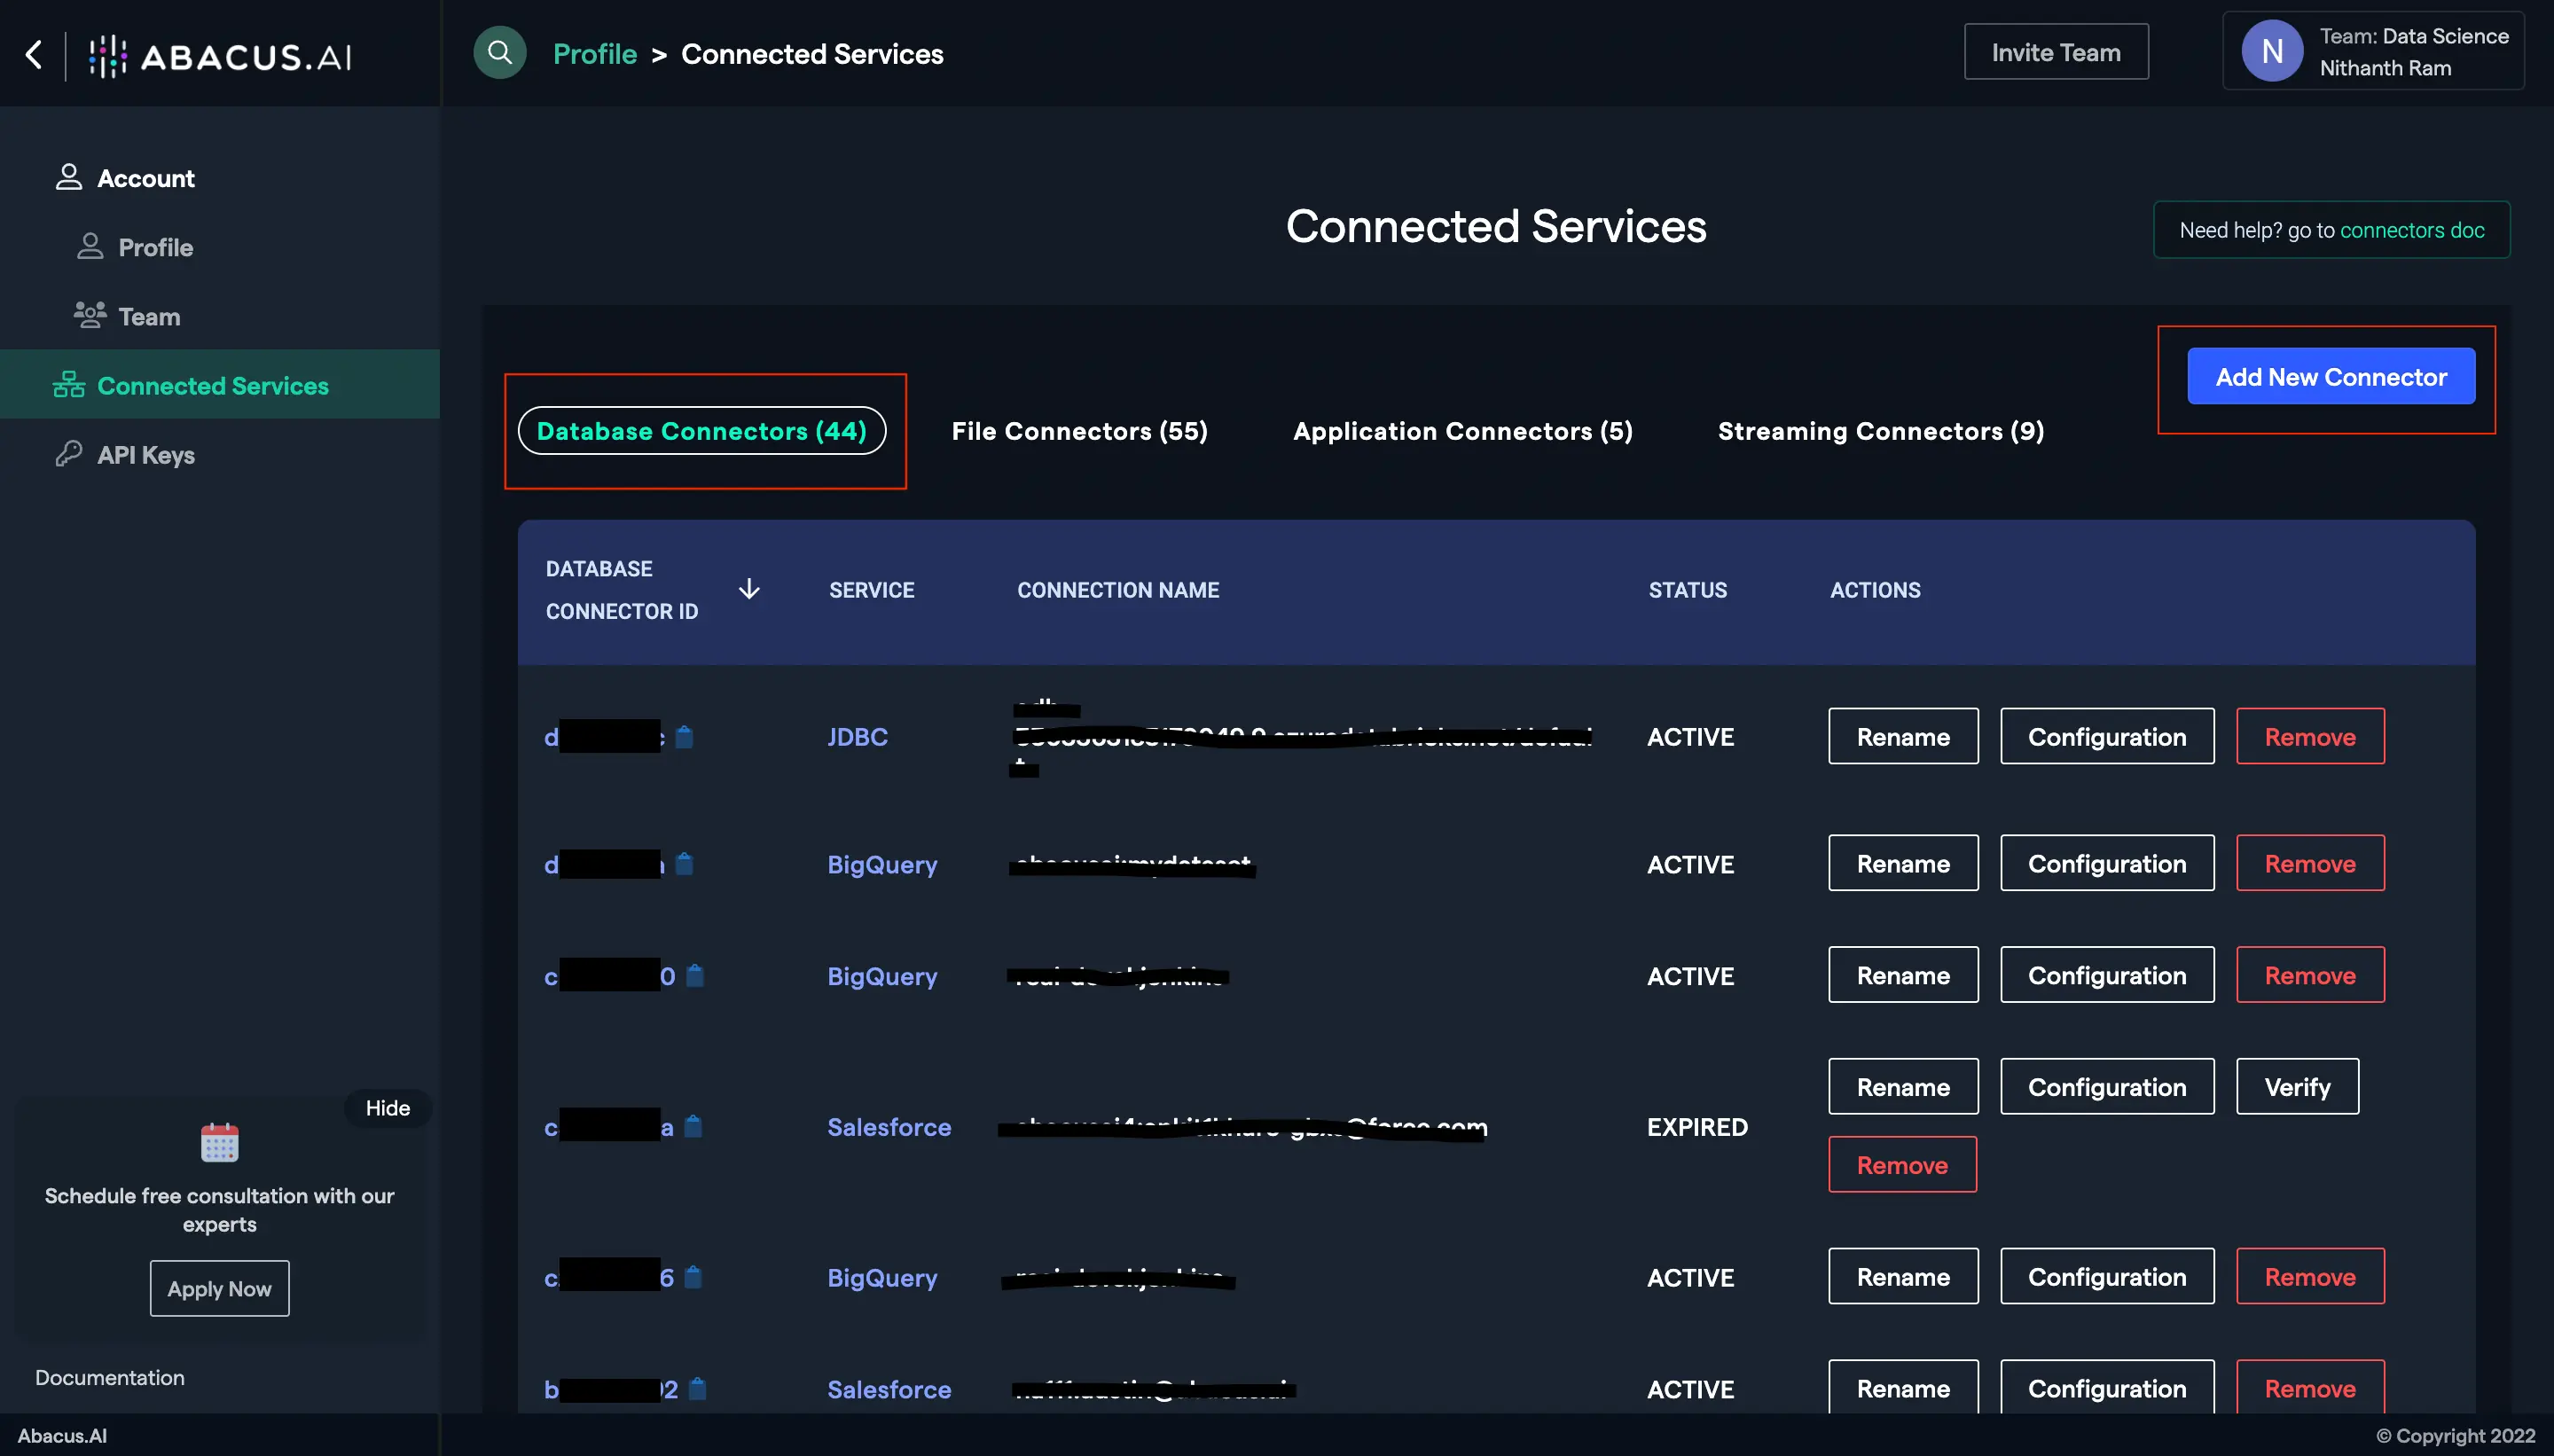
- Go to the Abacus.AI Connected Services Dashboard. Click on the "Add New Connector" button at the top right corner of the page.
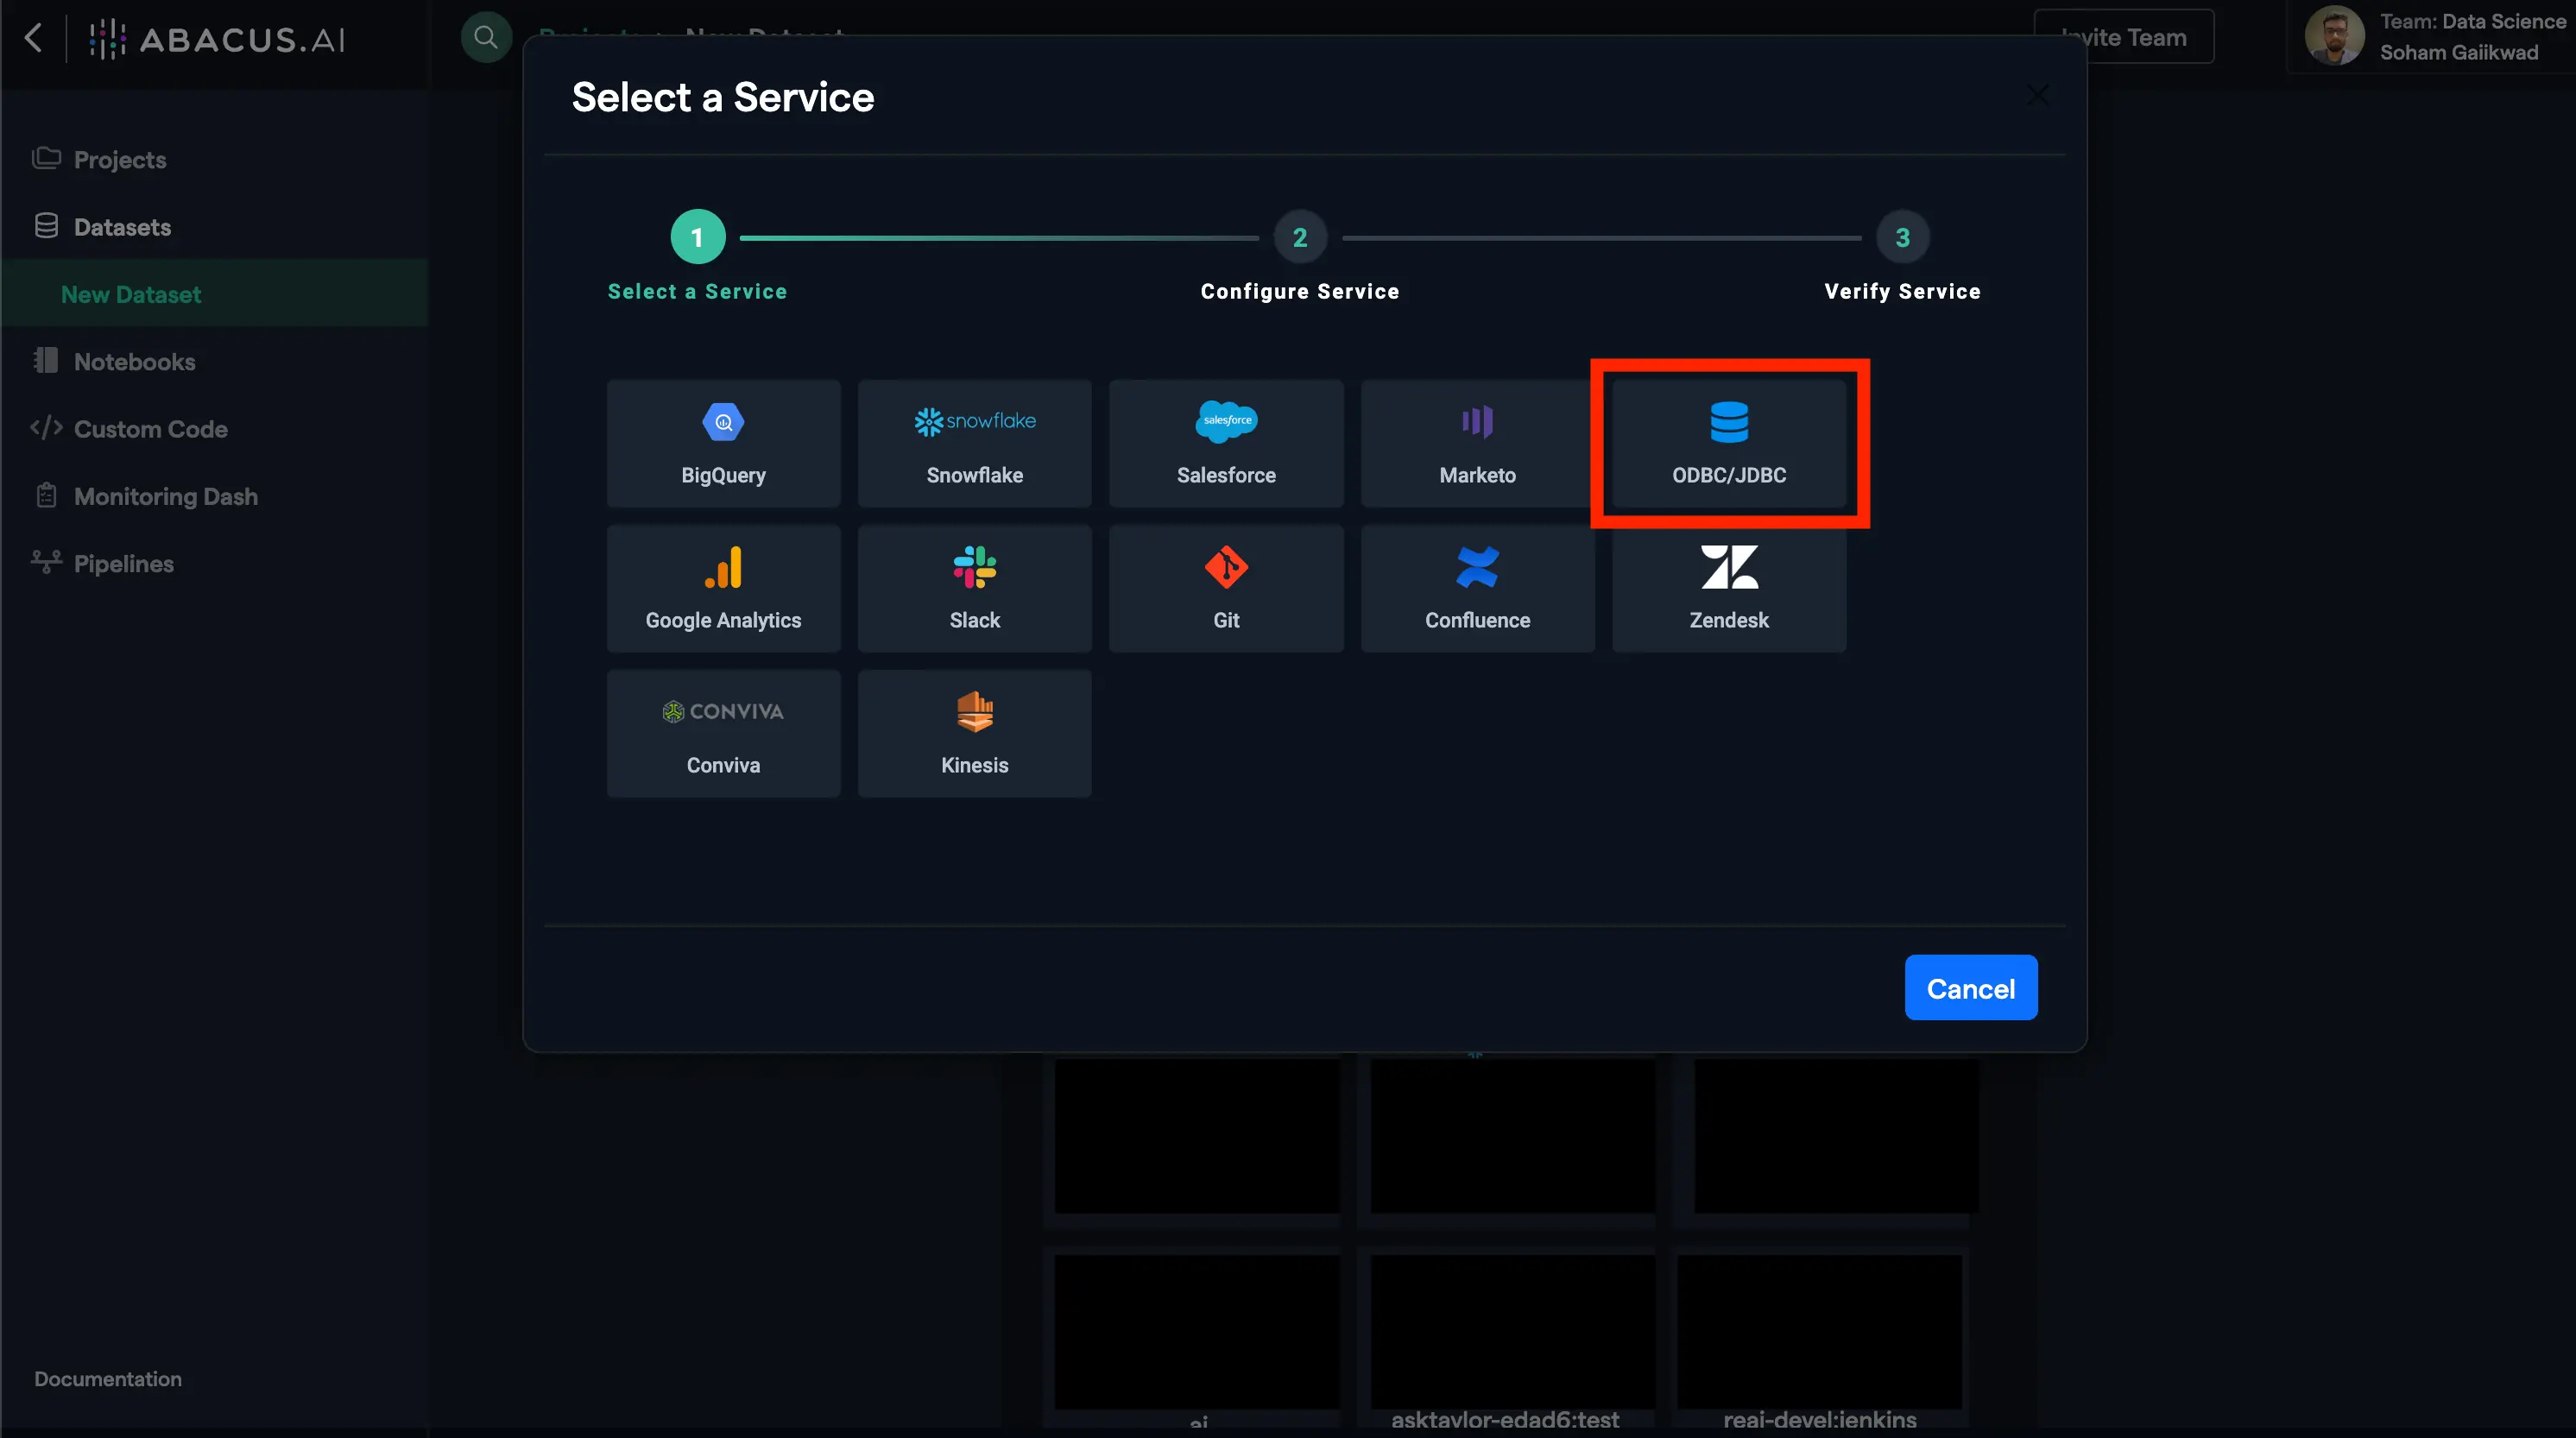
- To set up a new JDBC connector, click on the ODBC/JDBC option.
- Fill out all the configuration information described above in this document and hit save, making sure to select the Databricks JDBC driver.
- Click on the "Verify" button and wait for the connector to get verified. If there are any errors or exceptions, follow the message to troubleshoot your configuration.
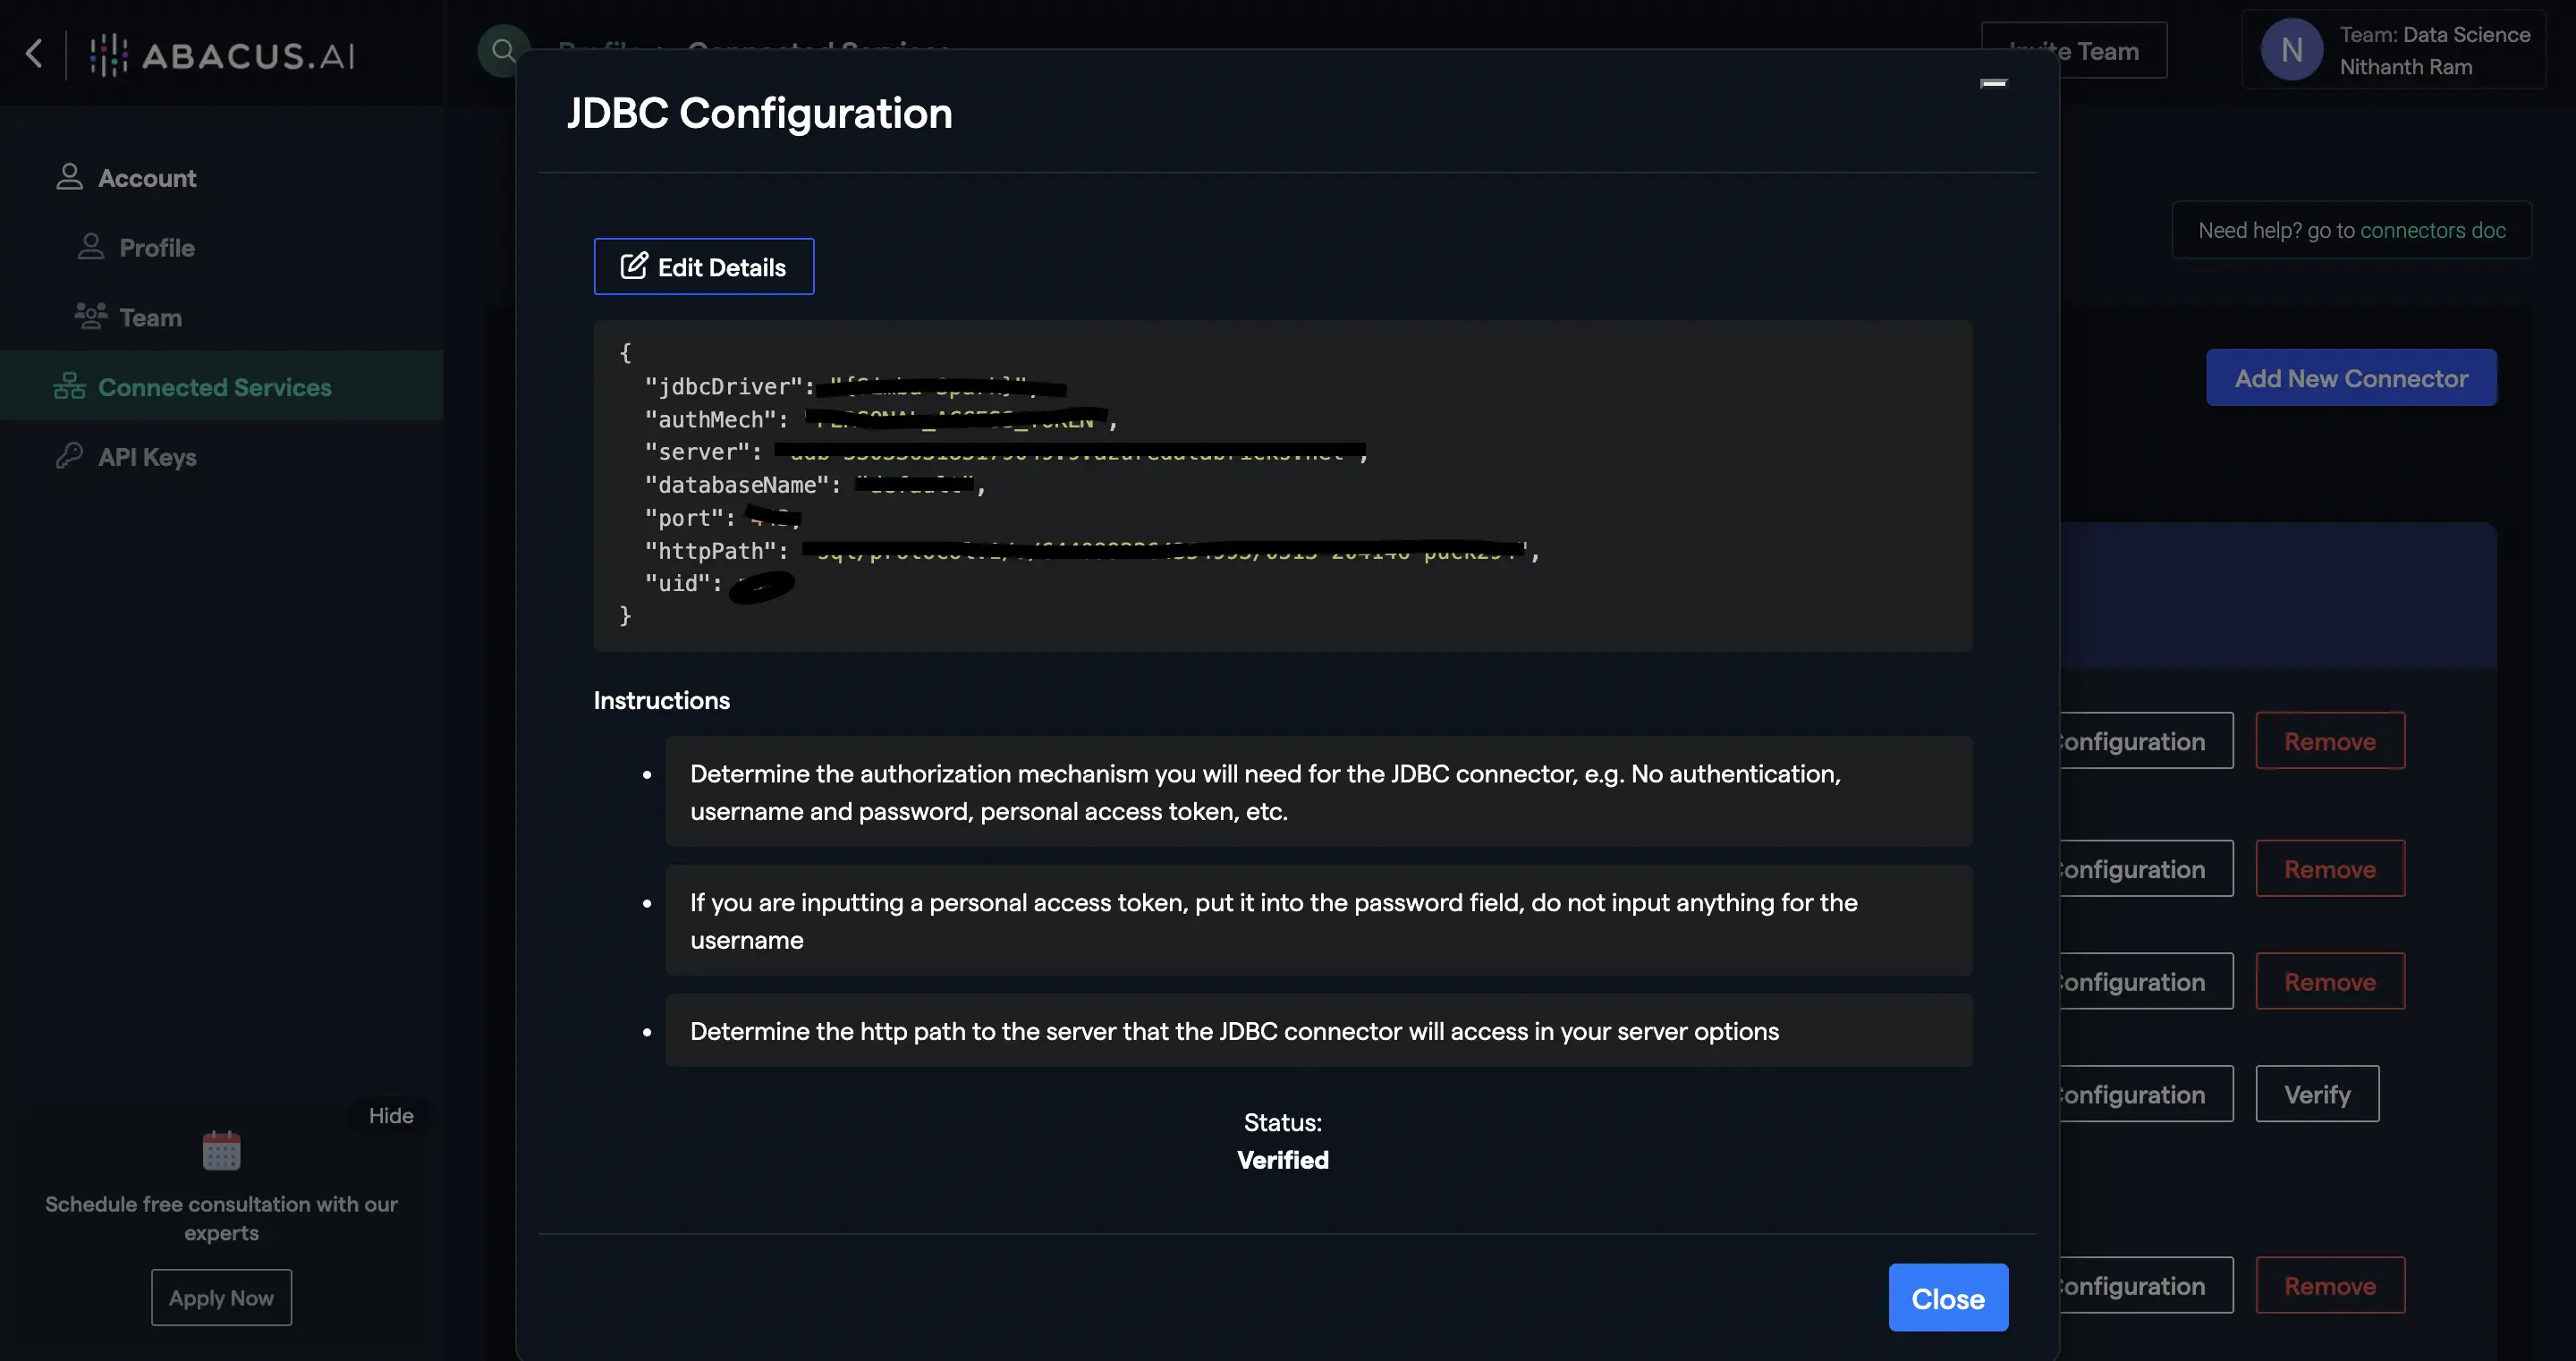
- Rename, edit configuration, or delete your connector(s) as you see fit from the Abacus.AI Connected Services Dashboard by clicking on the respective buttons.
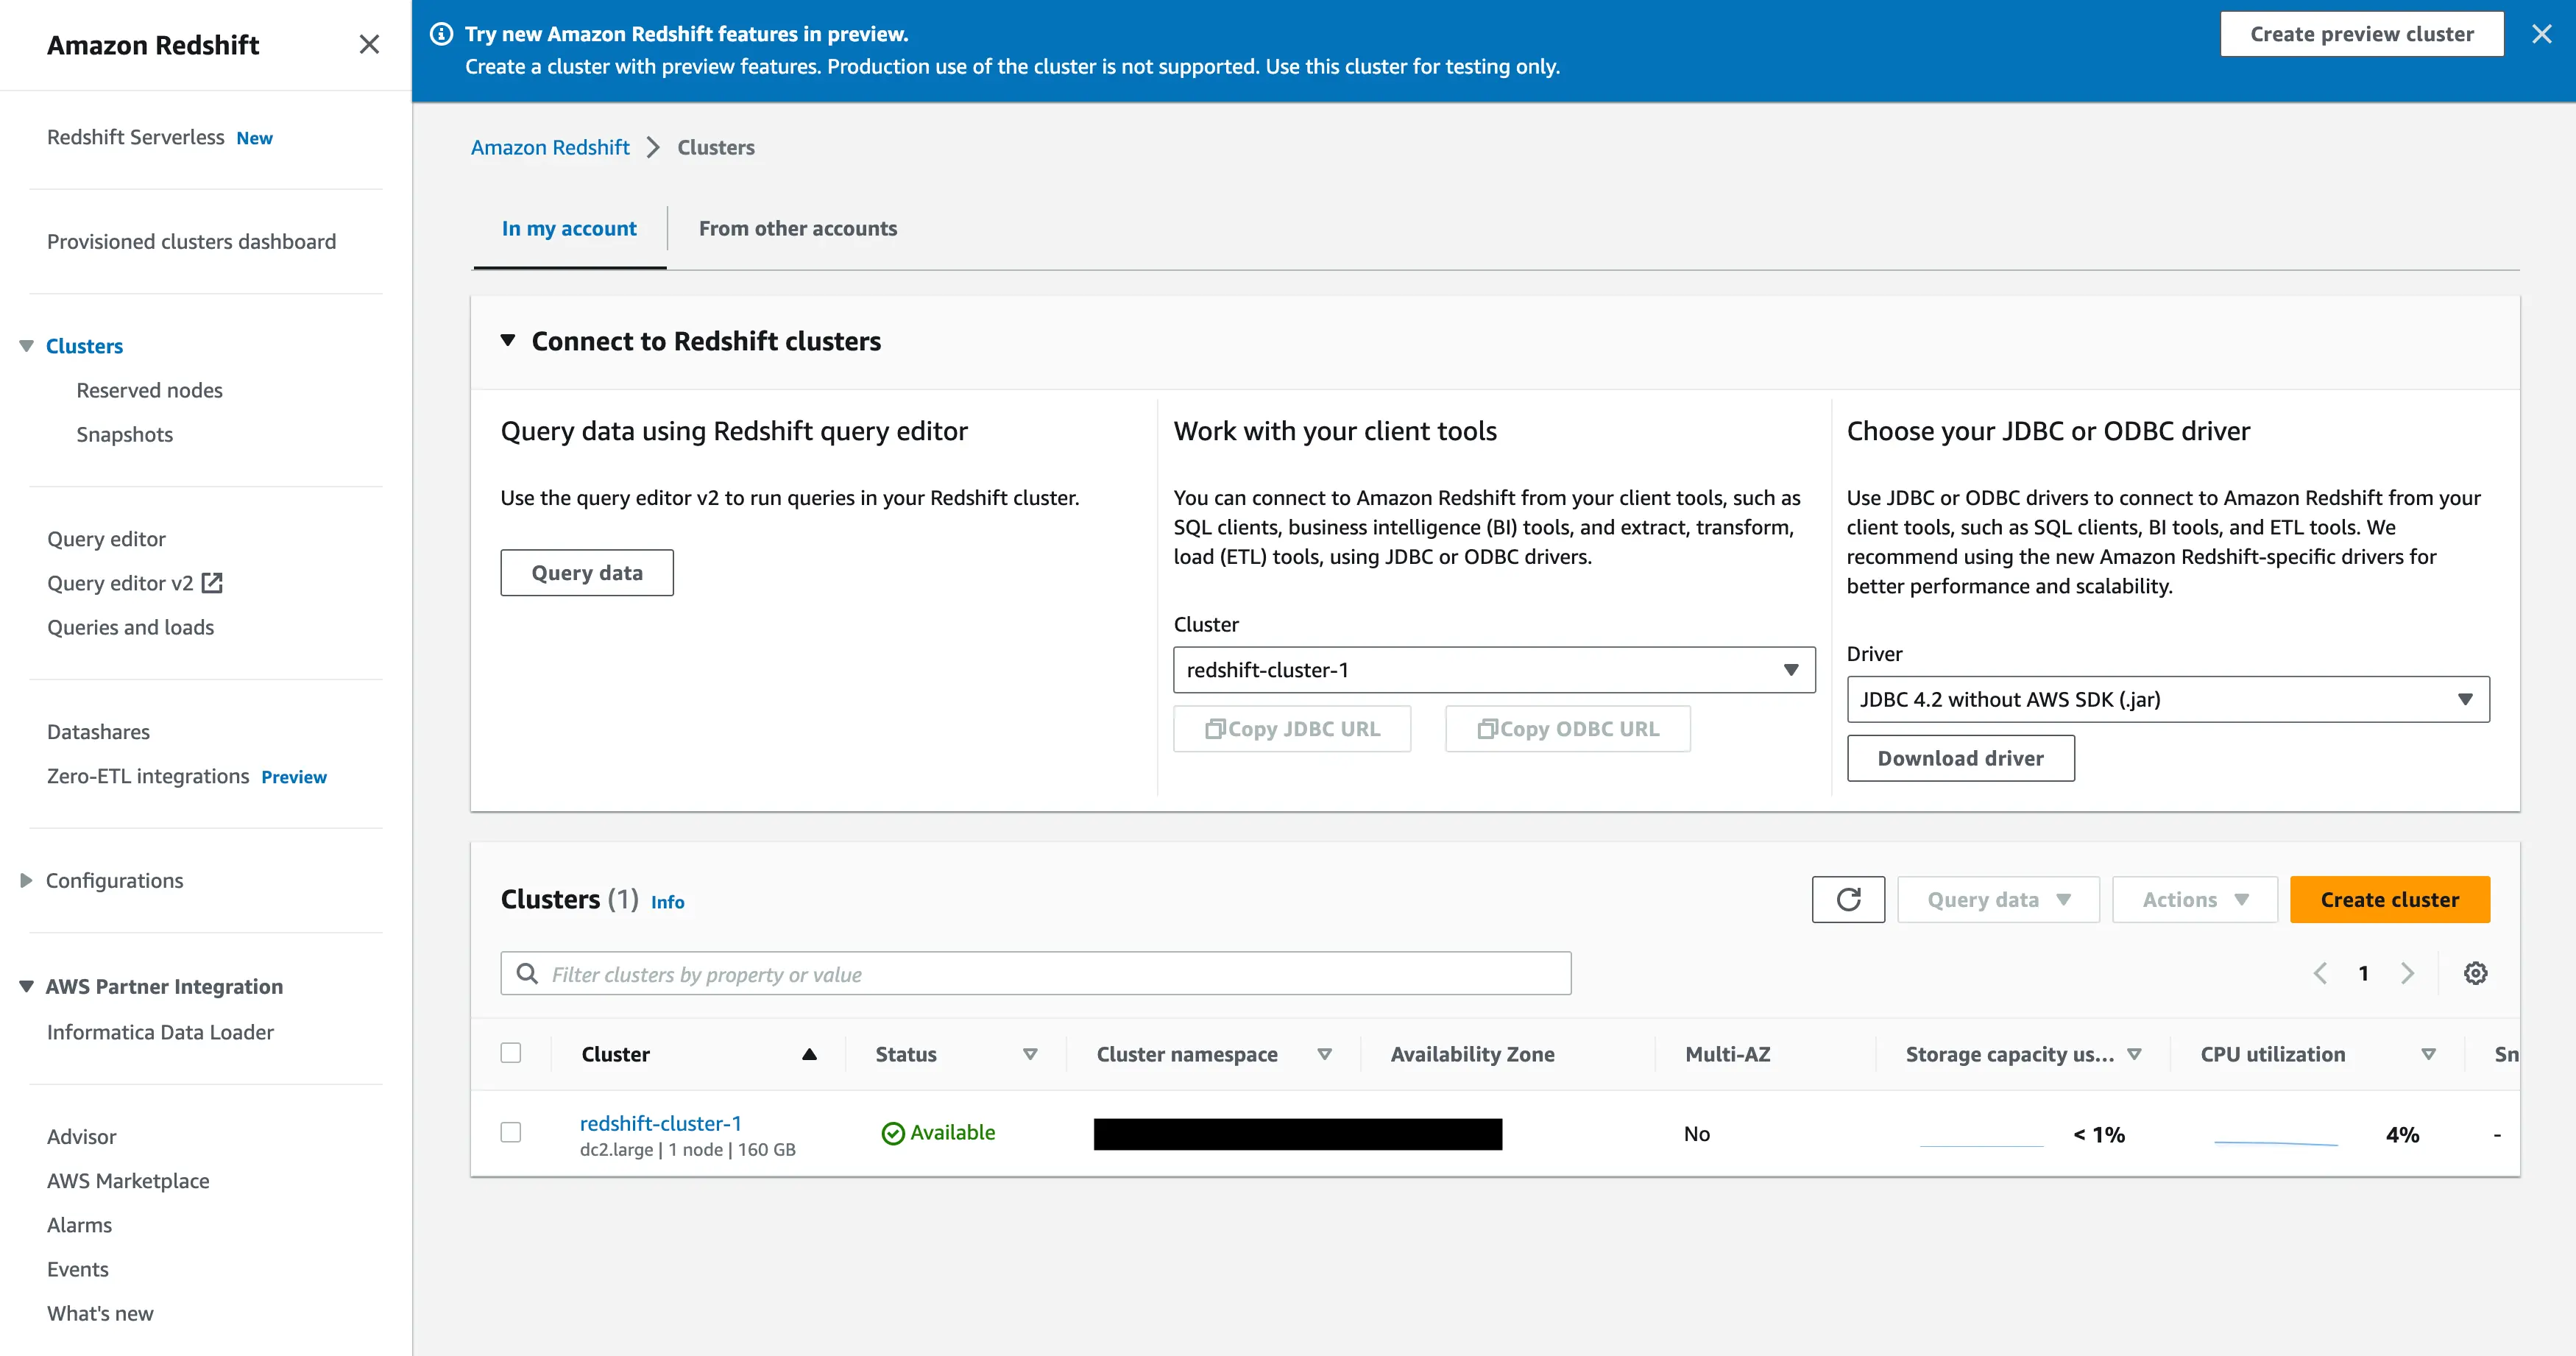
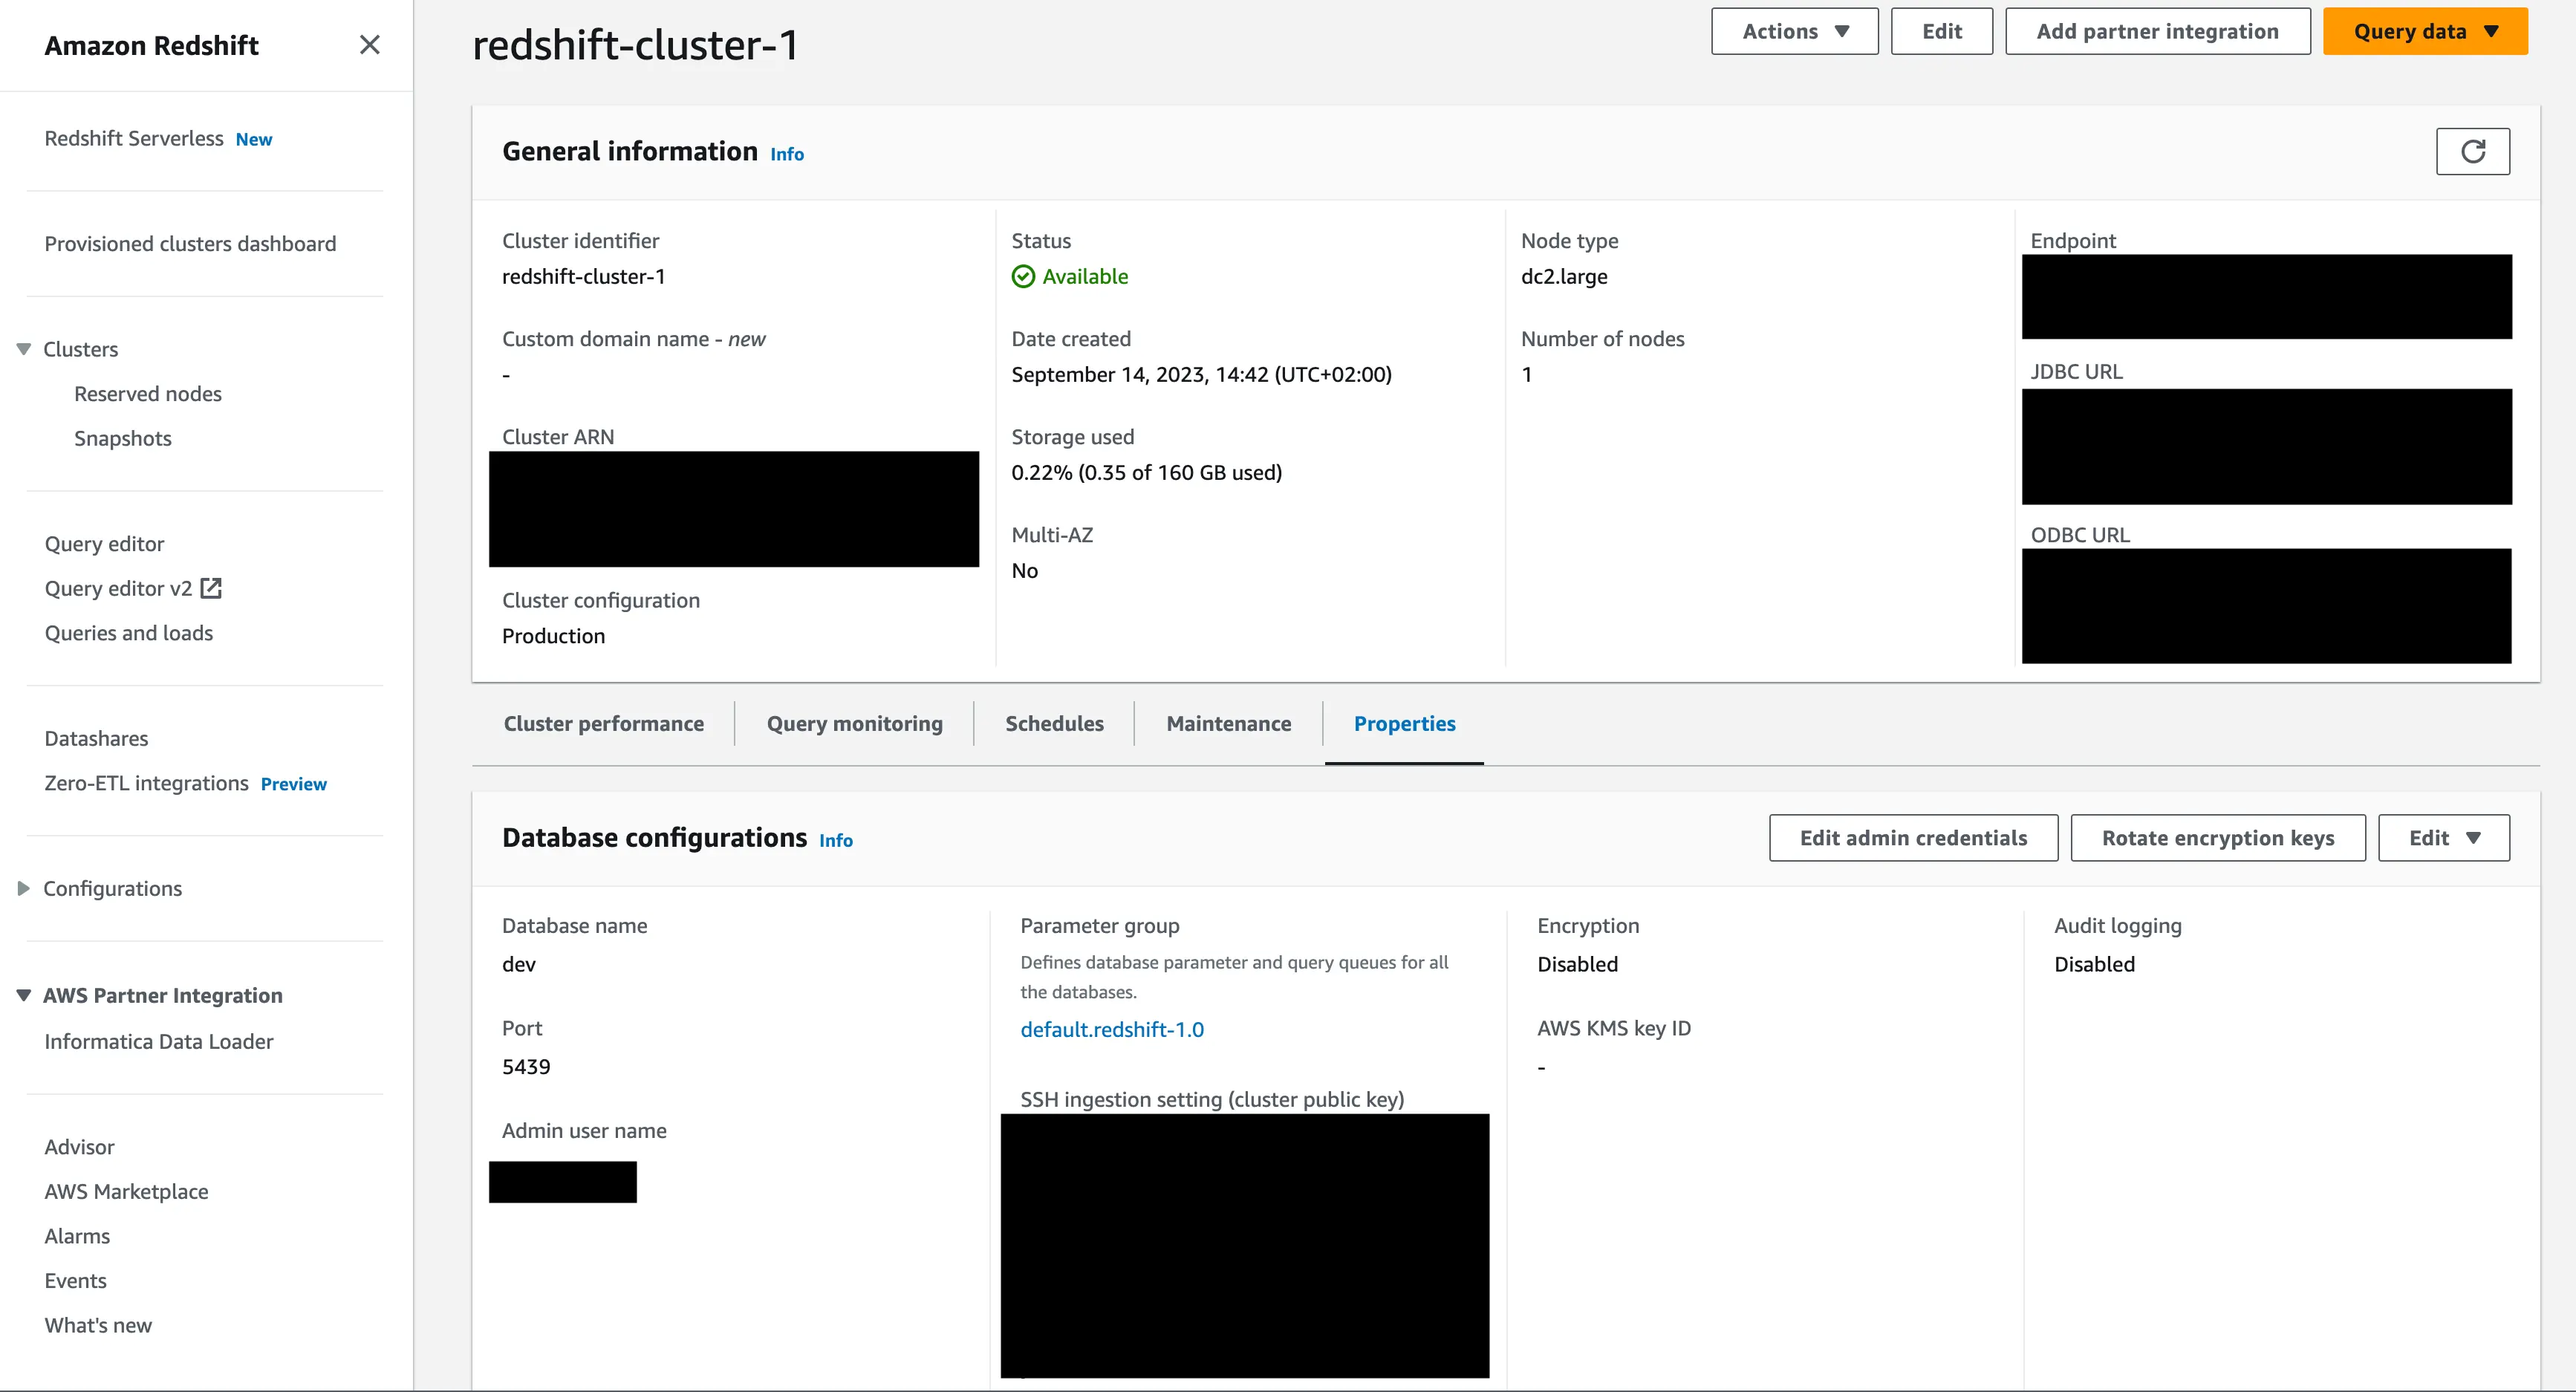
Steps to connect to AWS Redshift (ODBC)
- Navigate to the "Clusters" tab in order to extract the required information from the respective cluster. Click on "Properties" to get the information.
- Go to the Abacus.AI Connected Services Dashboard. Click on the "Add New Connector" button at the top right corner of the page.
- To set up a new ODBC connector, click on the ODBC/JDBC option.

- Fill out all the configuration information described above in this document and hit save, making sure to select the Redshift ODBC driver.
- Click on the "Verify" button and wait for the connector to get verified. If there are any errors or exceptions, follow the message to troubleshoot your configuration.
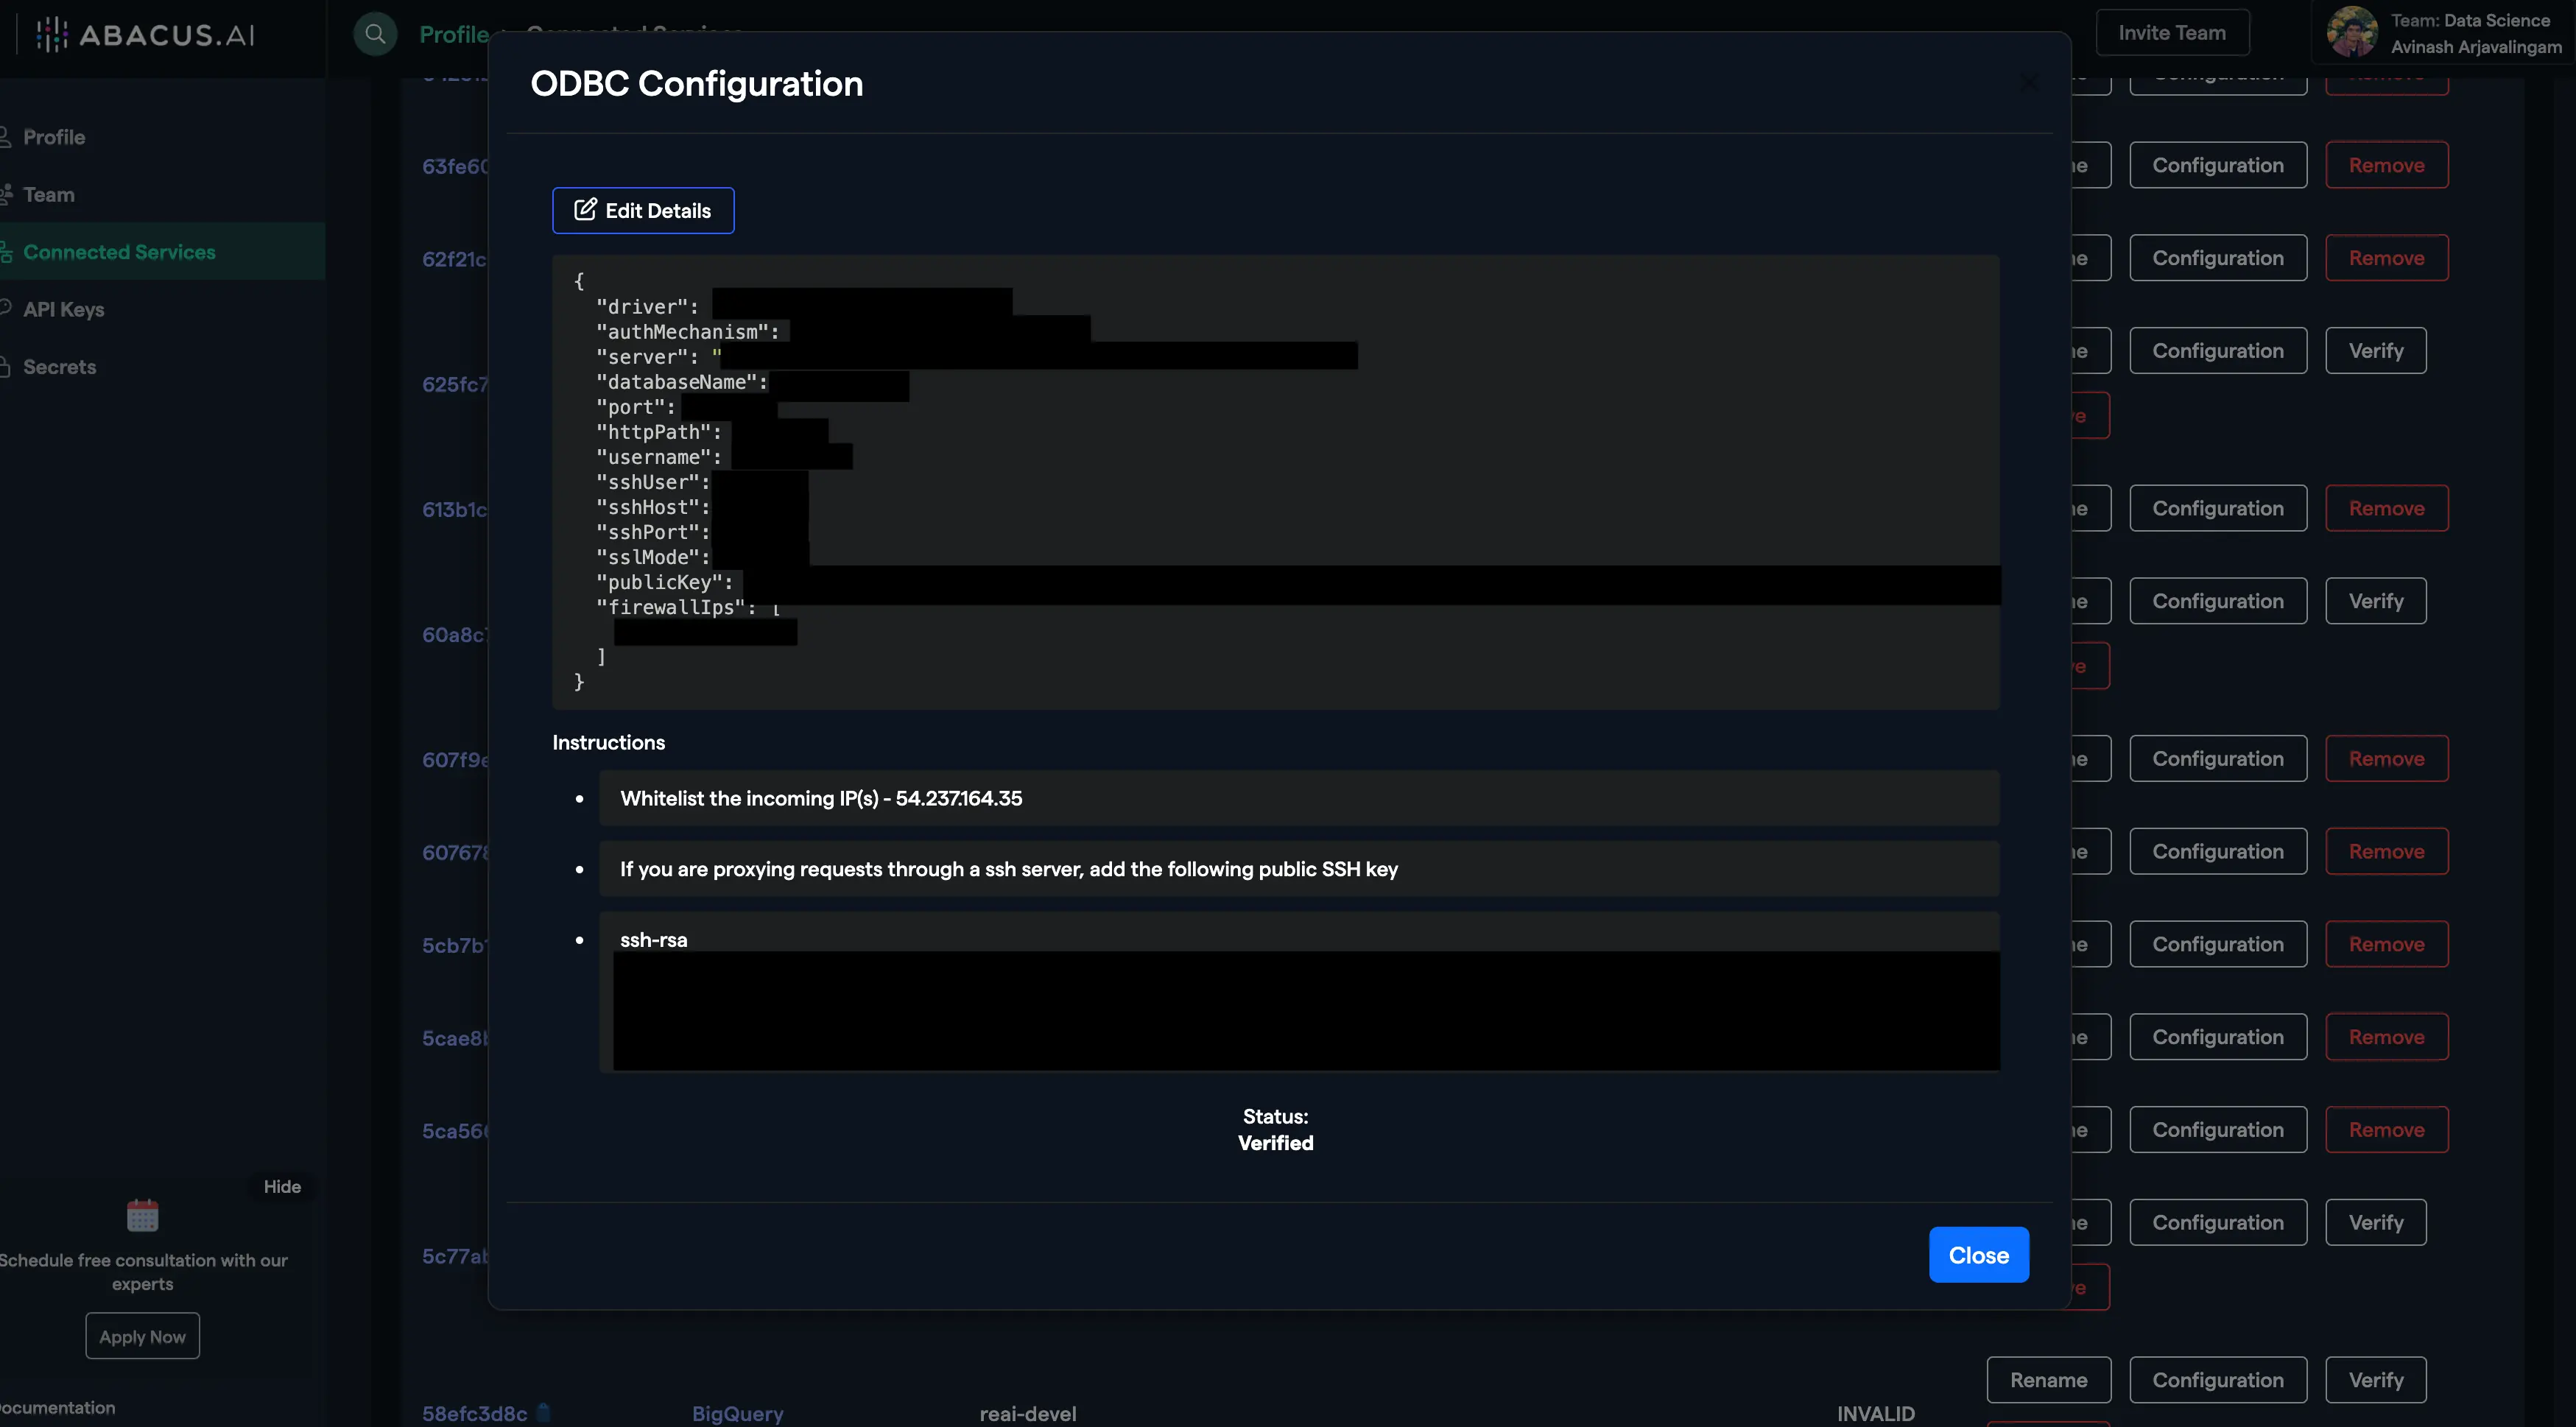
- Rename, edit configuration, or delete your connector(s) as you see fit from the Abacus.AI Connected Services Dashboard by clicking on the respective buttons.
Whitelist an IP Address for an Amazon Redshift Cluster
To whitelist an IP address for your Amazon Redshift cluster, you need to modify the associated security group to allow inbound traffic from that IP address. Follow these steps:
- Log in to the AWS Management Console and navigate to the Amazon Redshift dashboard.
- Find your cluster by looking for the cluster identifier.
- Identify the VPC security groups associated with your cluster. You can find this information in the details pane of your selected cluster.
- Navigate to the VPC Dashboard by either searching for "VPC" in the AWS Management Console or by going to the "Security" section in the Redshift dashboard and clicking on the link to the security group.
- Select Security Groups from the navigation pane on the left side of the VPC Dashboard.
- Find and select the security group that your Redshift cluster is using.
- Go to the Inbound Rules tab for the security group.
- Edit the inbound rules by clicking on the "Edit inbound rules" button.
- Add a new rule with the following settings:
- Type: Redshift (or Custom TCP if Redshift is not an option)
- Protocol: TCP
- Port Range: The port your Redshift cluster is listening on (default is 5439)
- Source: Enter the IP address you want to whitelist, followed by
/32to indicate a single IP address
- Save the rule by clicking on the "Save rules" button.
Steps to connect to Oracle (JDBC)
Oracle has a different approach to database organization compared to some other databases like MySQL or SQL Server. In Oracle, what is often referred to as a "database" in other systems is more akin to a "schema" in Oracle. To connect to an Oracle database schema using the Abacus.AI platform, you should use the schema name as the "database name" in the connection configuration. Here's how to do it:
- Obtain the schema name that you have access to and wish to connect to.
- When filling out the configuration information for the Oracle database connection on the Abacus.AI platform, use the schema name as the "Database Name".
- Ensure that all other required information, such as the database server URL/IP, port, and authentication details, are correctly provided and that the Abacus.AI IP address is whitelisted.
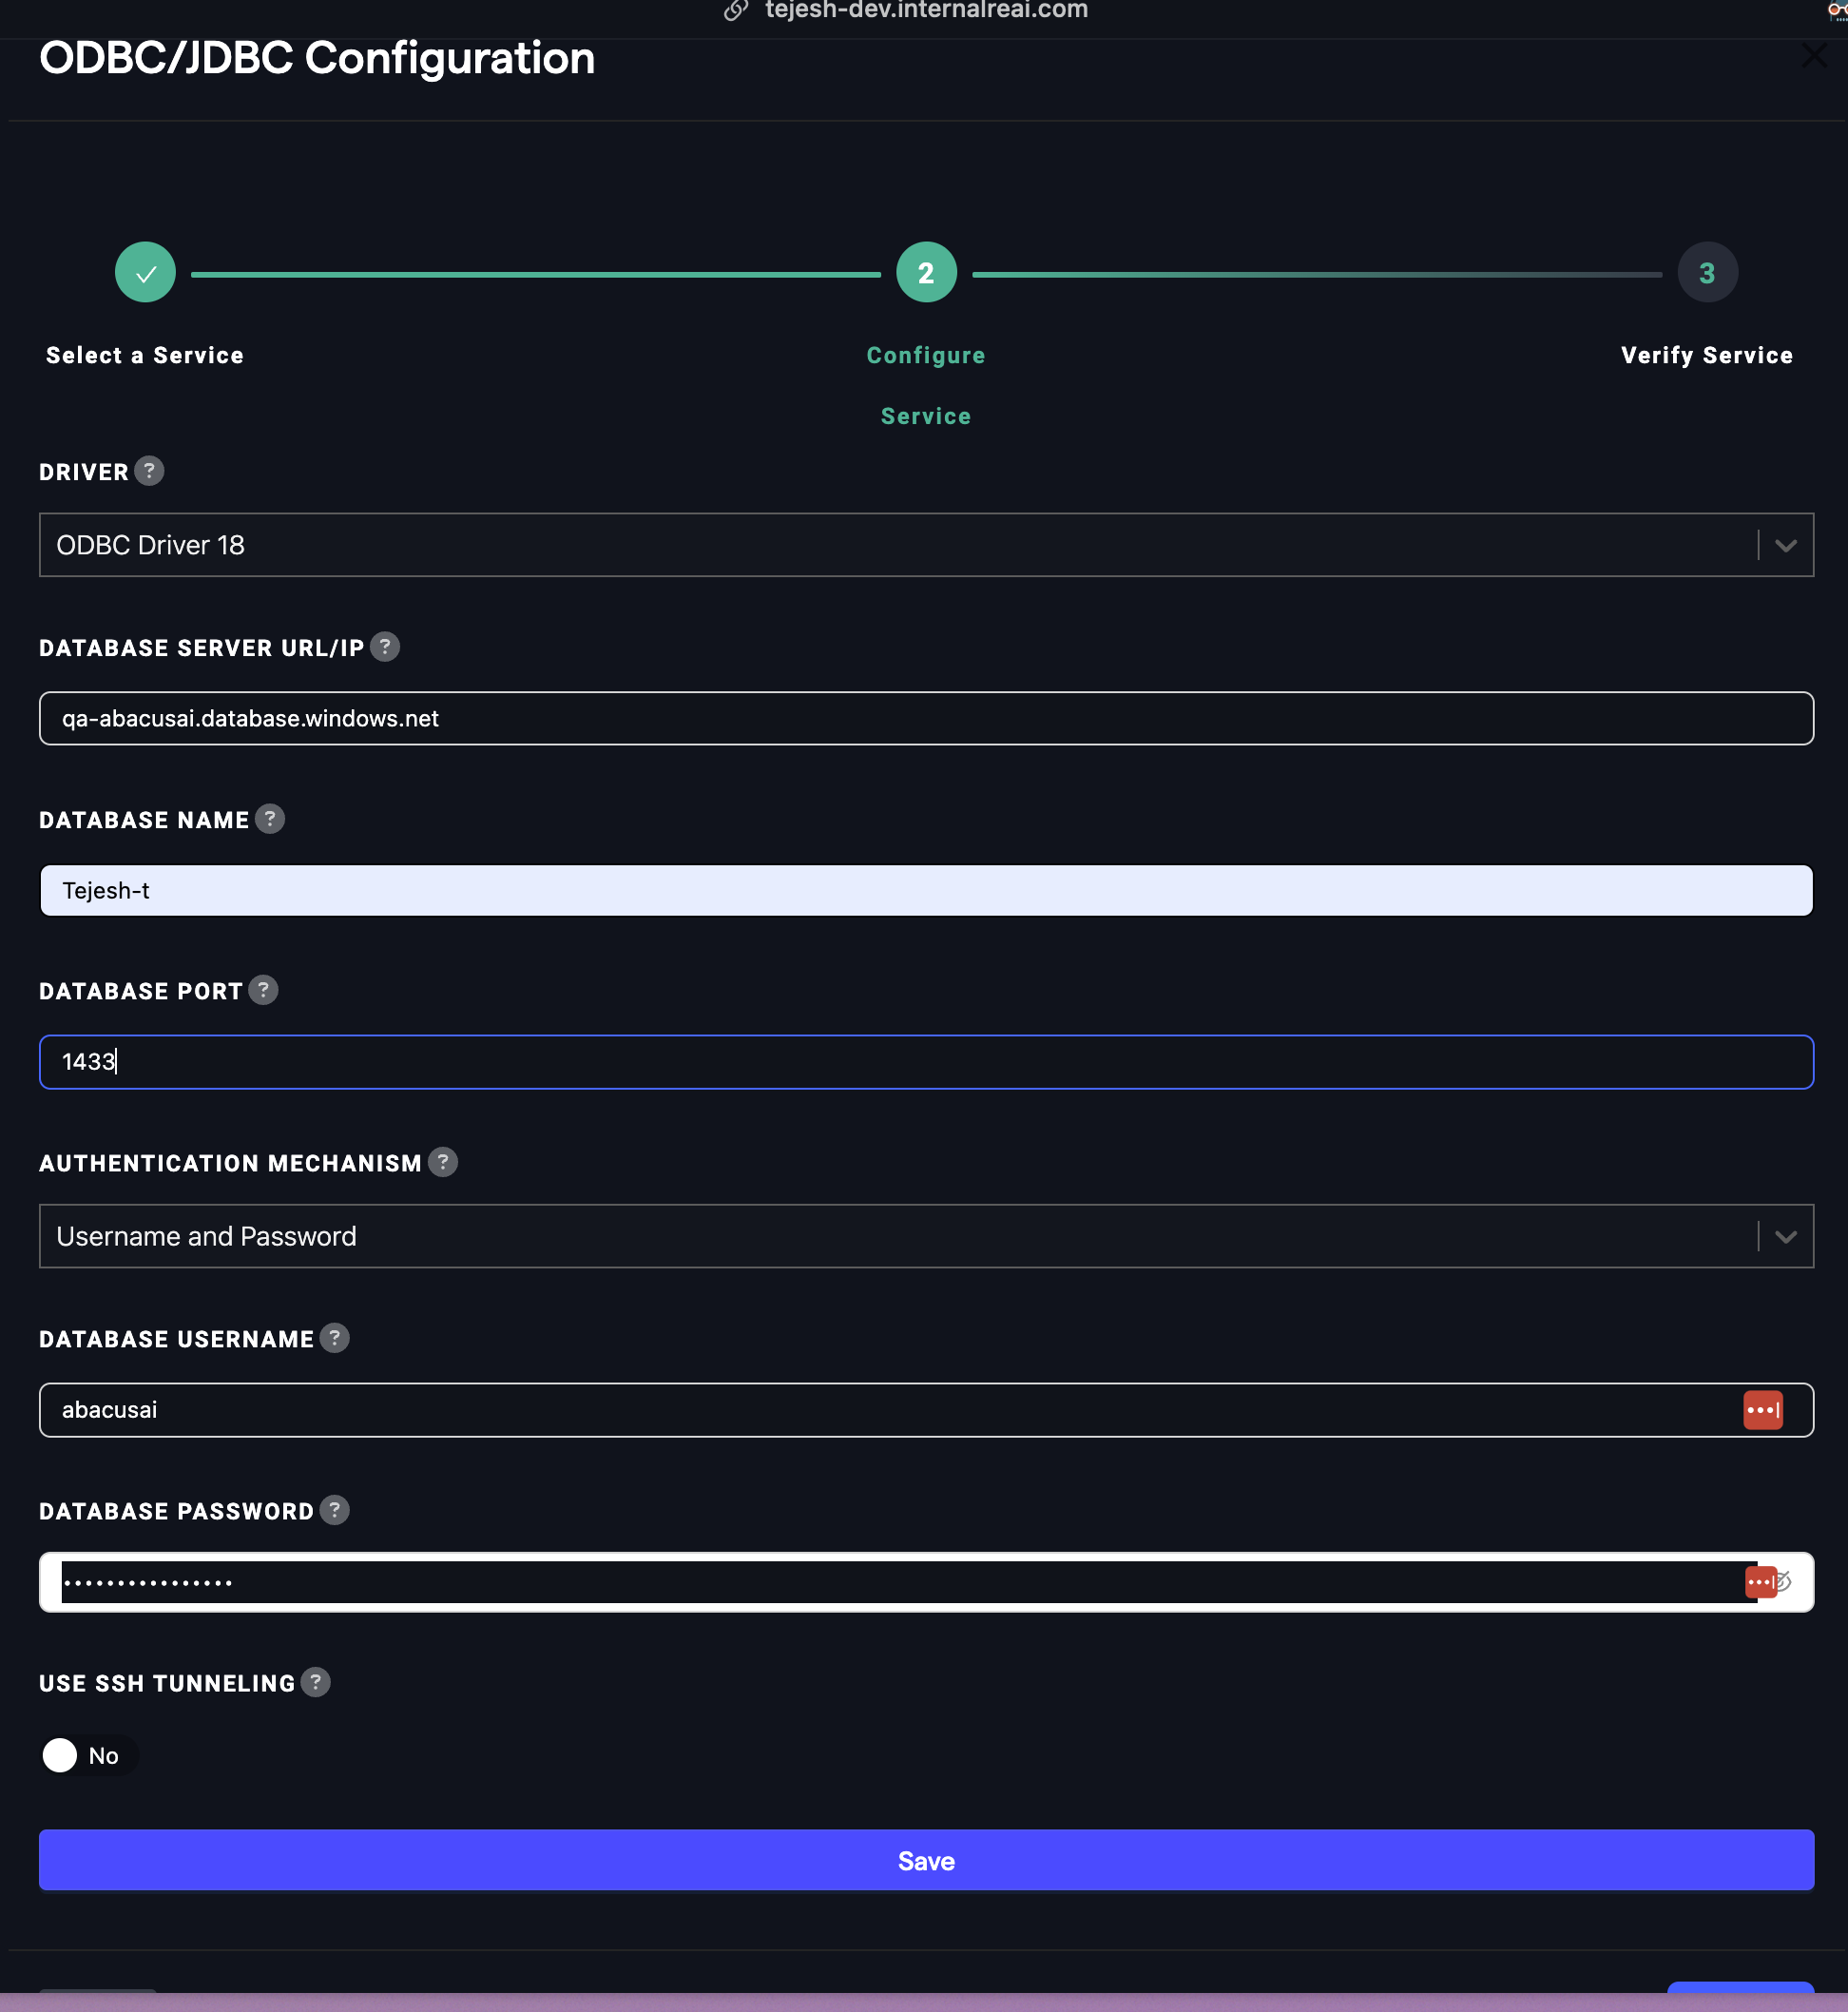
Steps to connect to MS SQL (JDBC/ODBC)
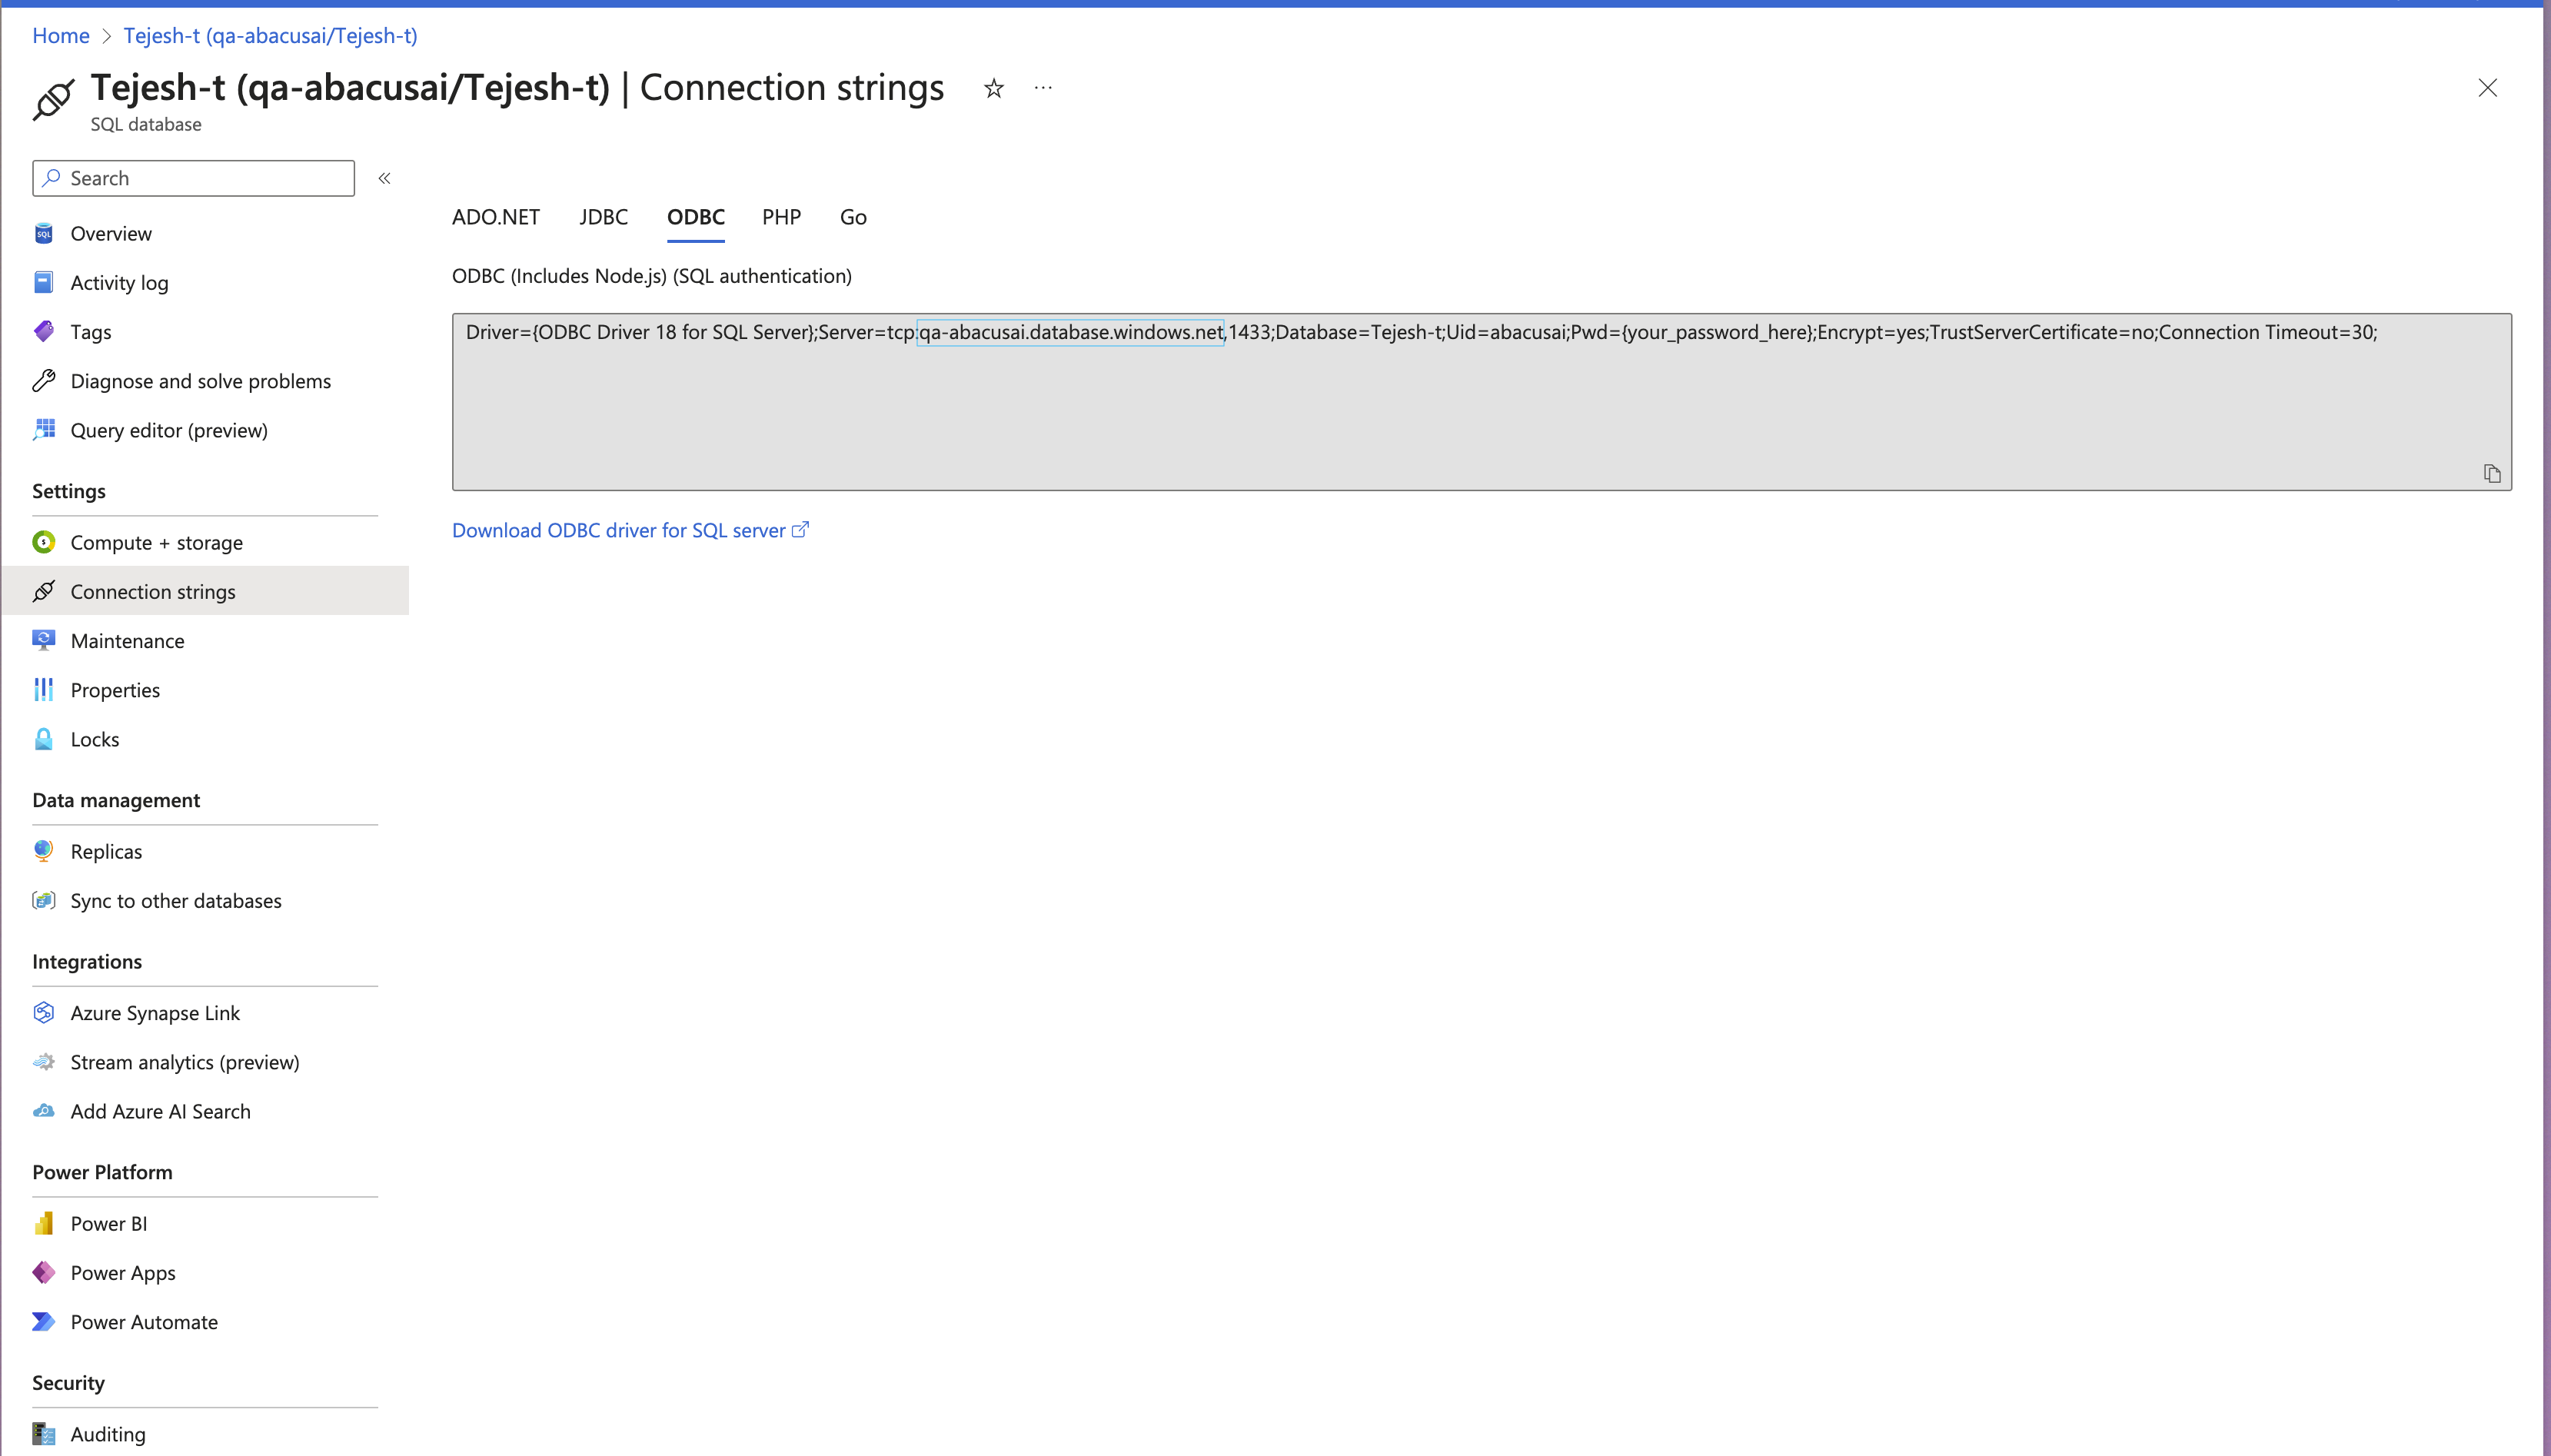
- Navigate to your SQL database page in Microsoft Azure:
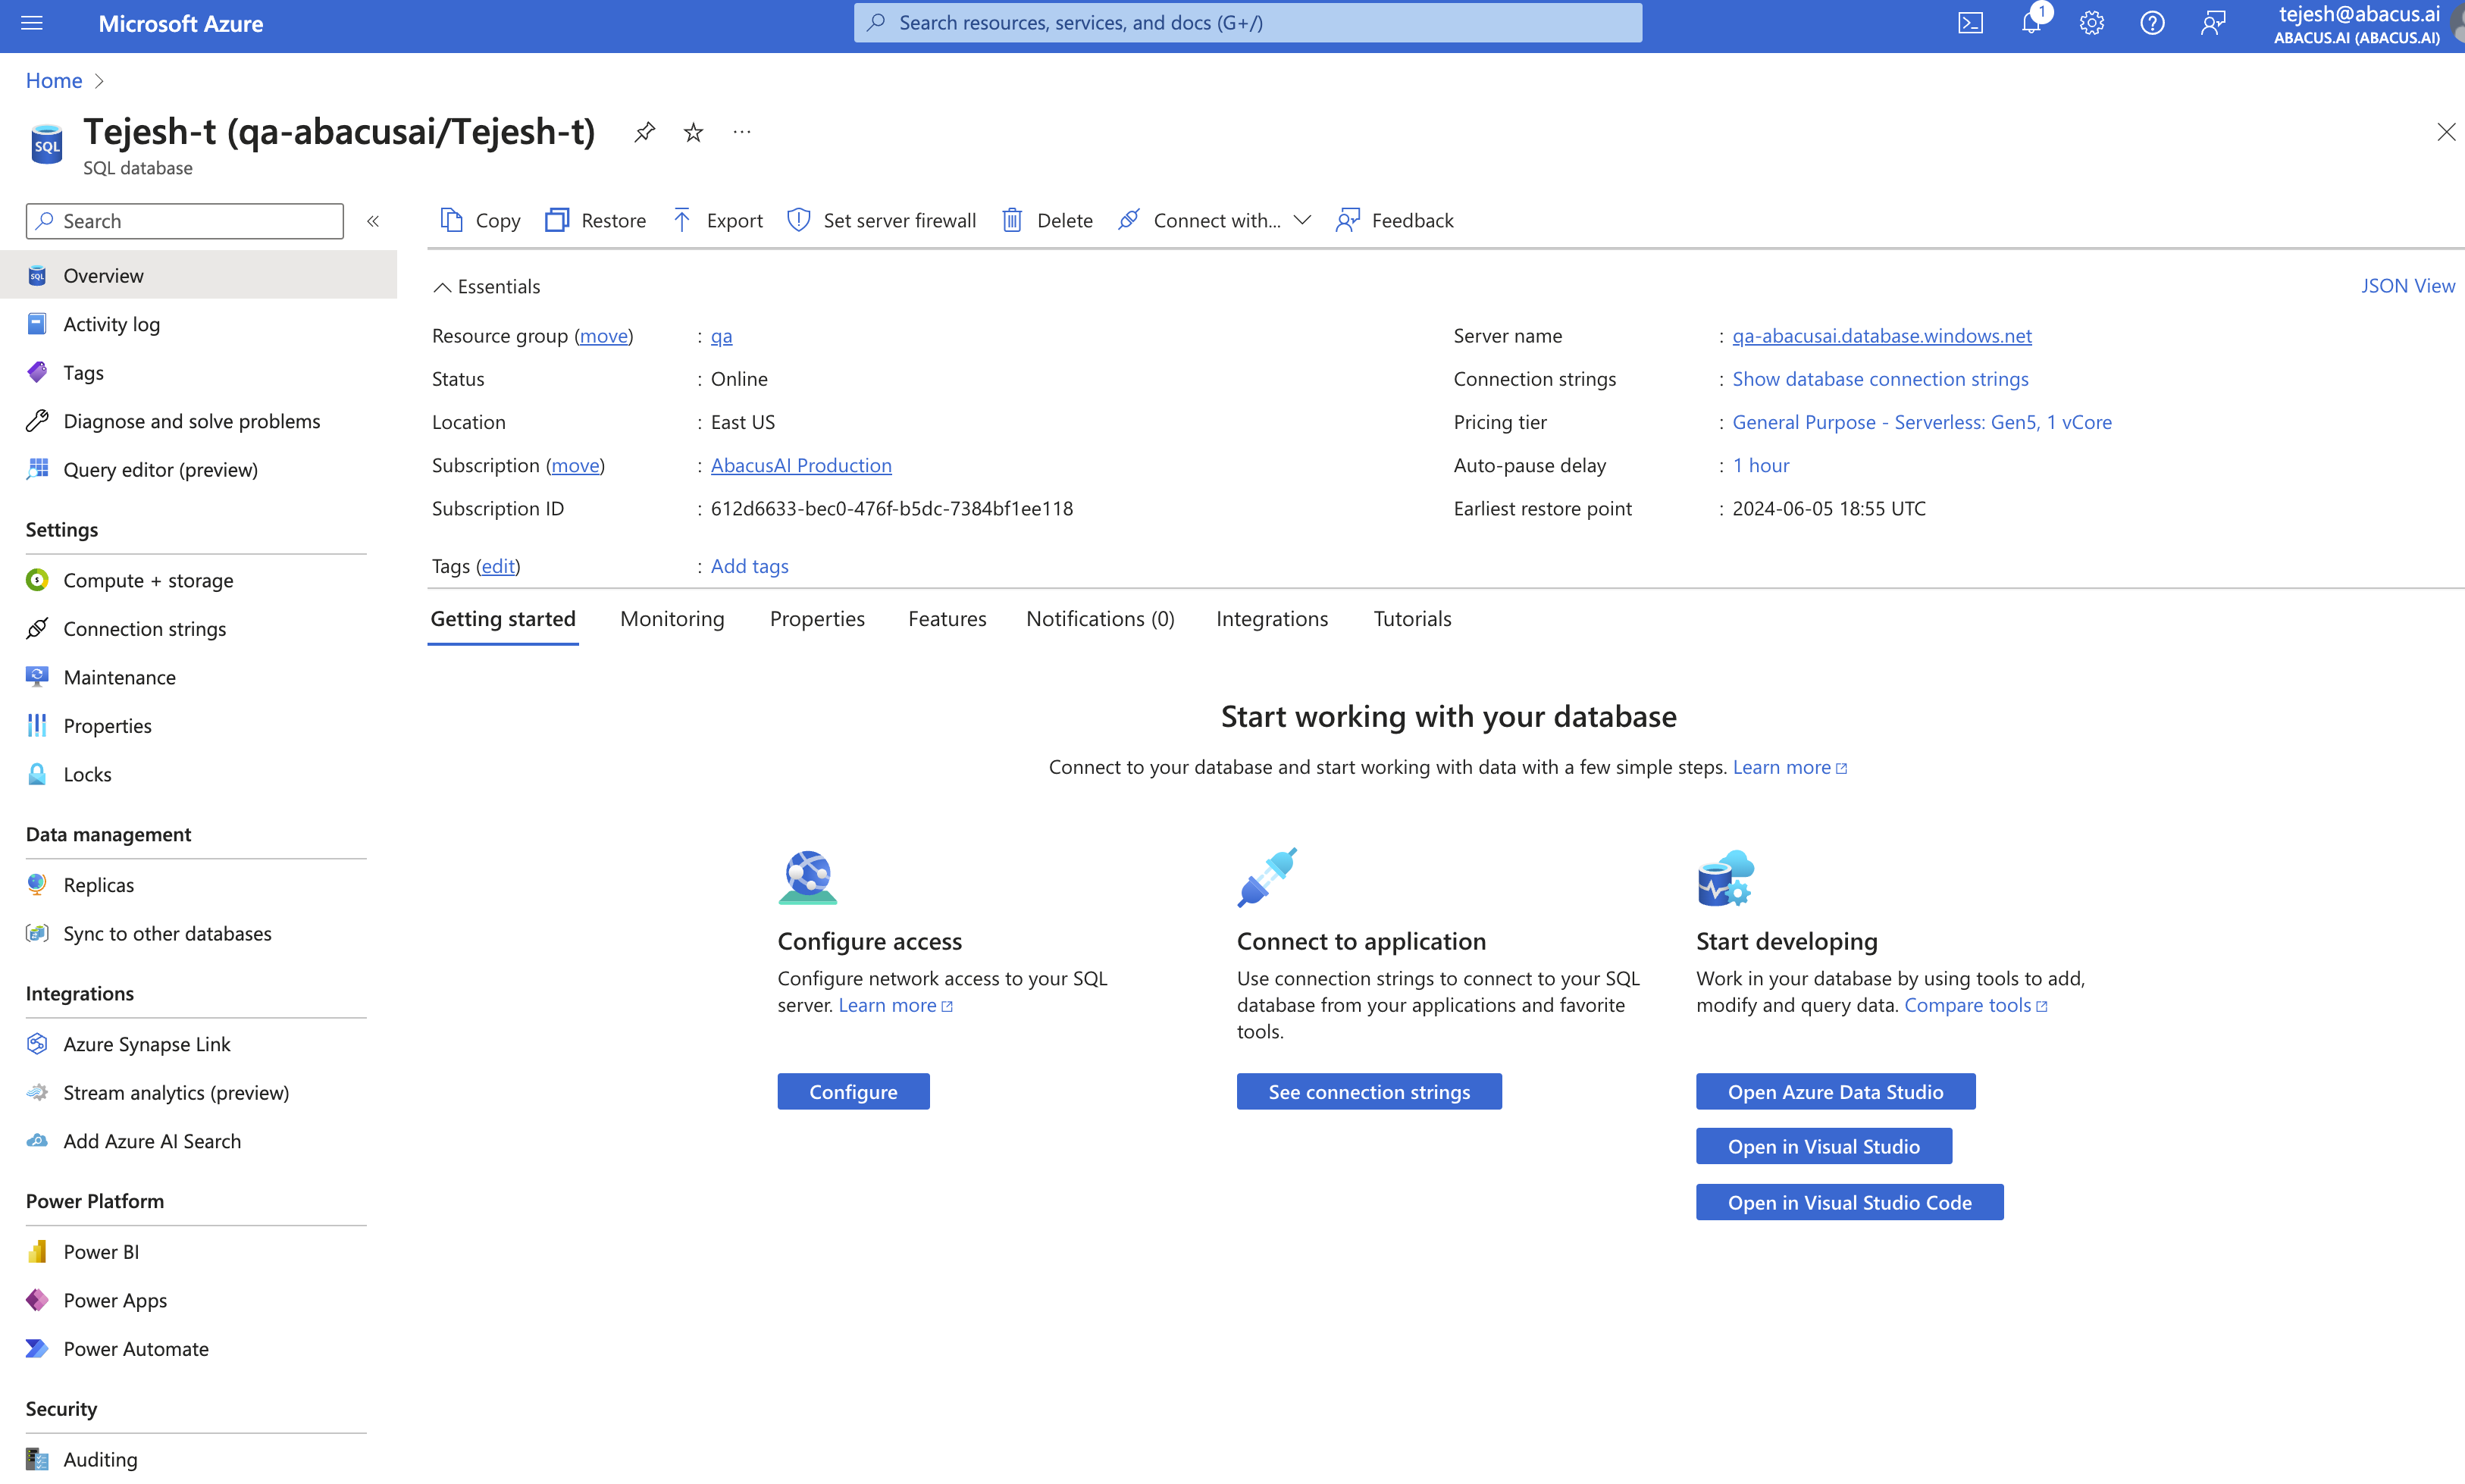
- Click on "Connection strings", then select
ODBCand note the server name aftertcp:<name>.database.windows.net:
- Whitelist the Abacus.AI IPs. Please reach out to Abacus.AI support for the most up-to-date addresses:
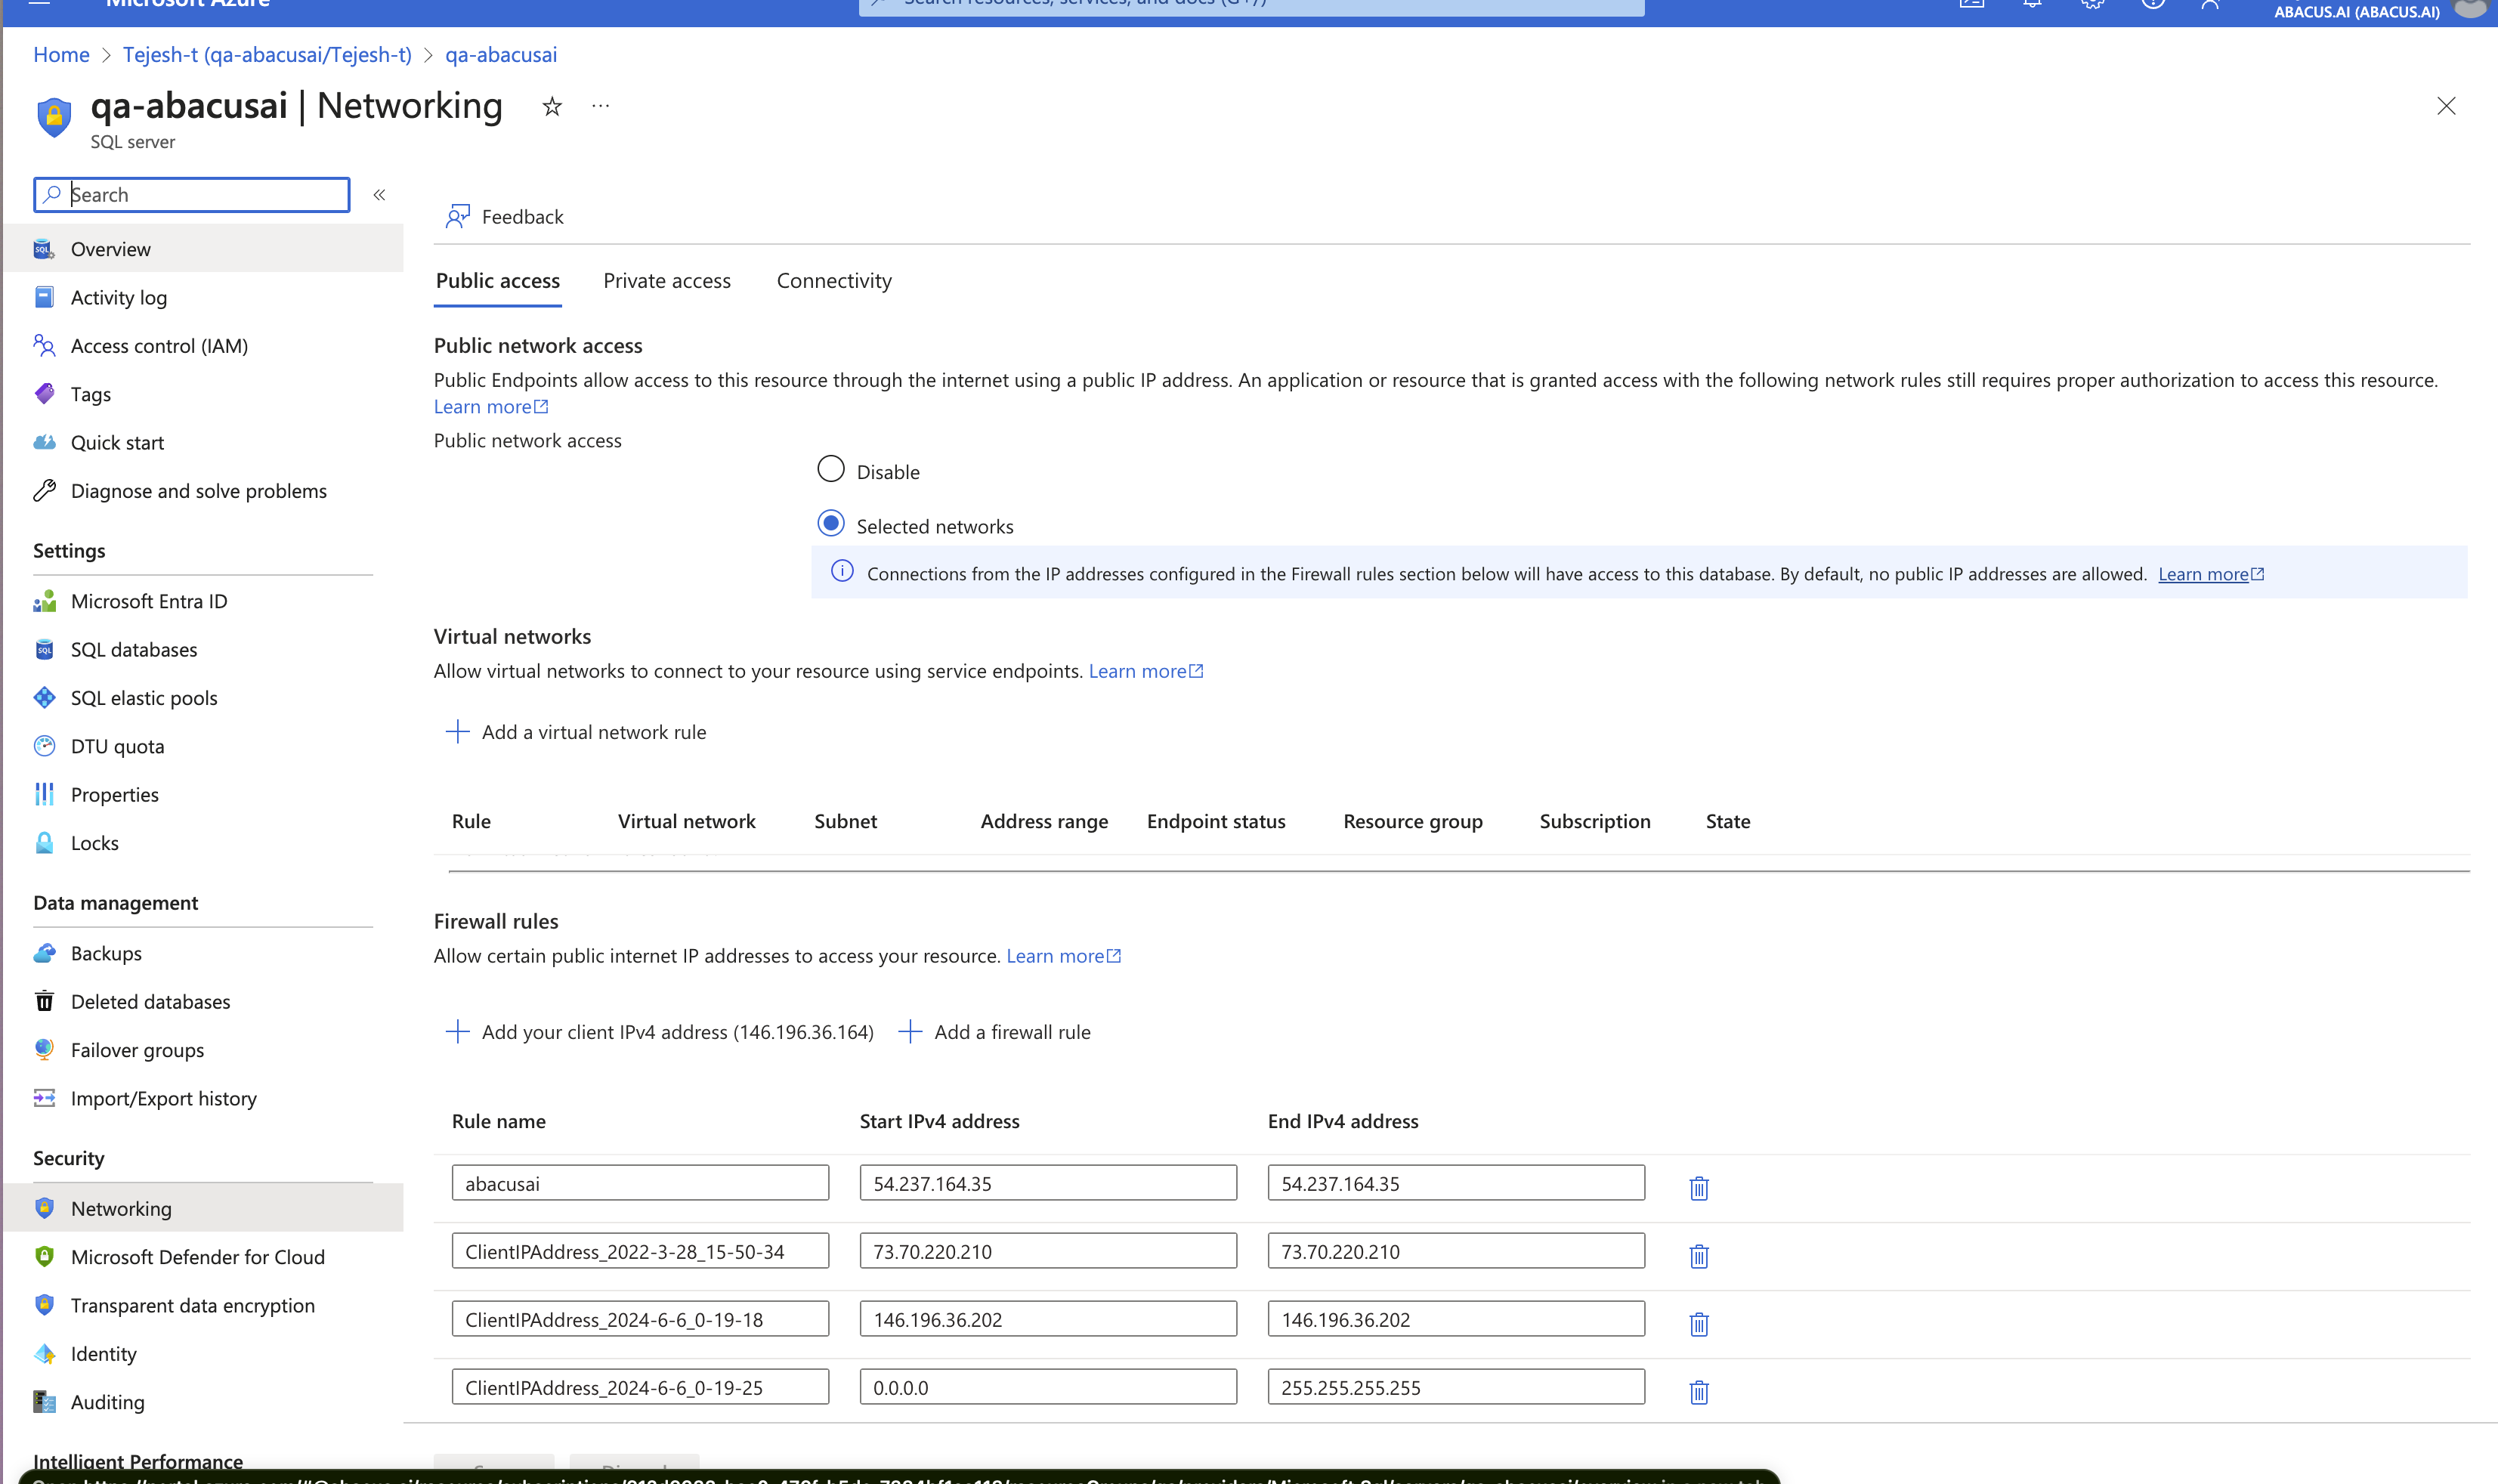
- While filling the JDBC/ODBC connection:
- Choose ODBC Driver 18.
- Fill in the server name ending with
<server_name>.database.windows.net. - Enter the database name.
- Use port 1433.
- Select 'Username and Password' as the Authentication Mechanism/
- Enter a username with access to the database.
- Enter the password for the username.
- Click
Save
- For ODBC Driver 17 and ODBC Driver 18, you can also use the Client ID and Secret of the Microsoft Service Principal as an authentication method:
- Client ID: The client ID of the service principal, if required to connect to the Azure SQL database.
- Client Secret: The client secret of the service principal.
Steps to connect to SAP HANA (JDBC/ODBC)
This guide outlines the steps required to gather the necessary connection details from your SAP HANA Cloud instance to establish a JDBC connection.
Prerequisites
- You must have an SAP HANA Cloud instance and an associated database created.
Reference: SAP HANA Cloud Administration Guide
To configure SAP HANA connection gather the below details from your instance:
- Navigate to your SAP HANA Cloud instance and select the specific instance you wish to connect to.
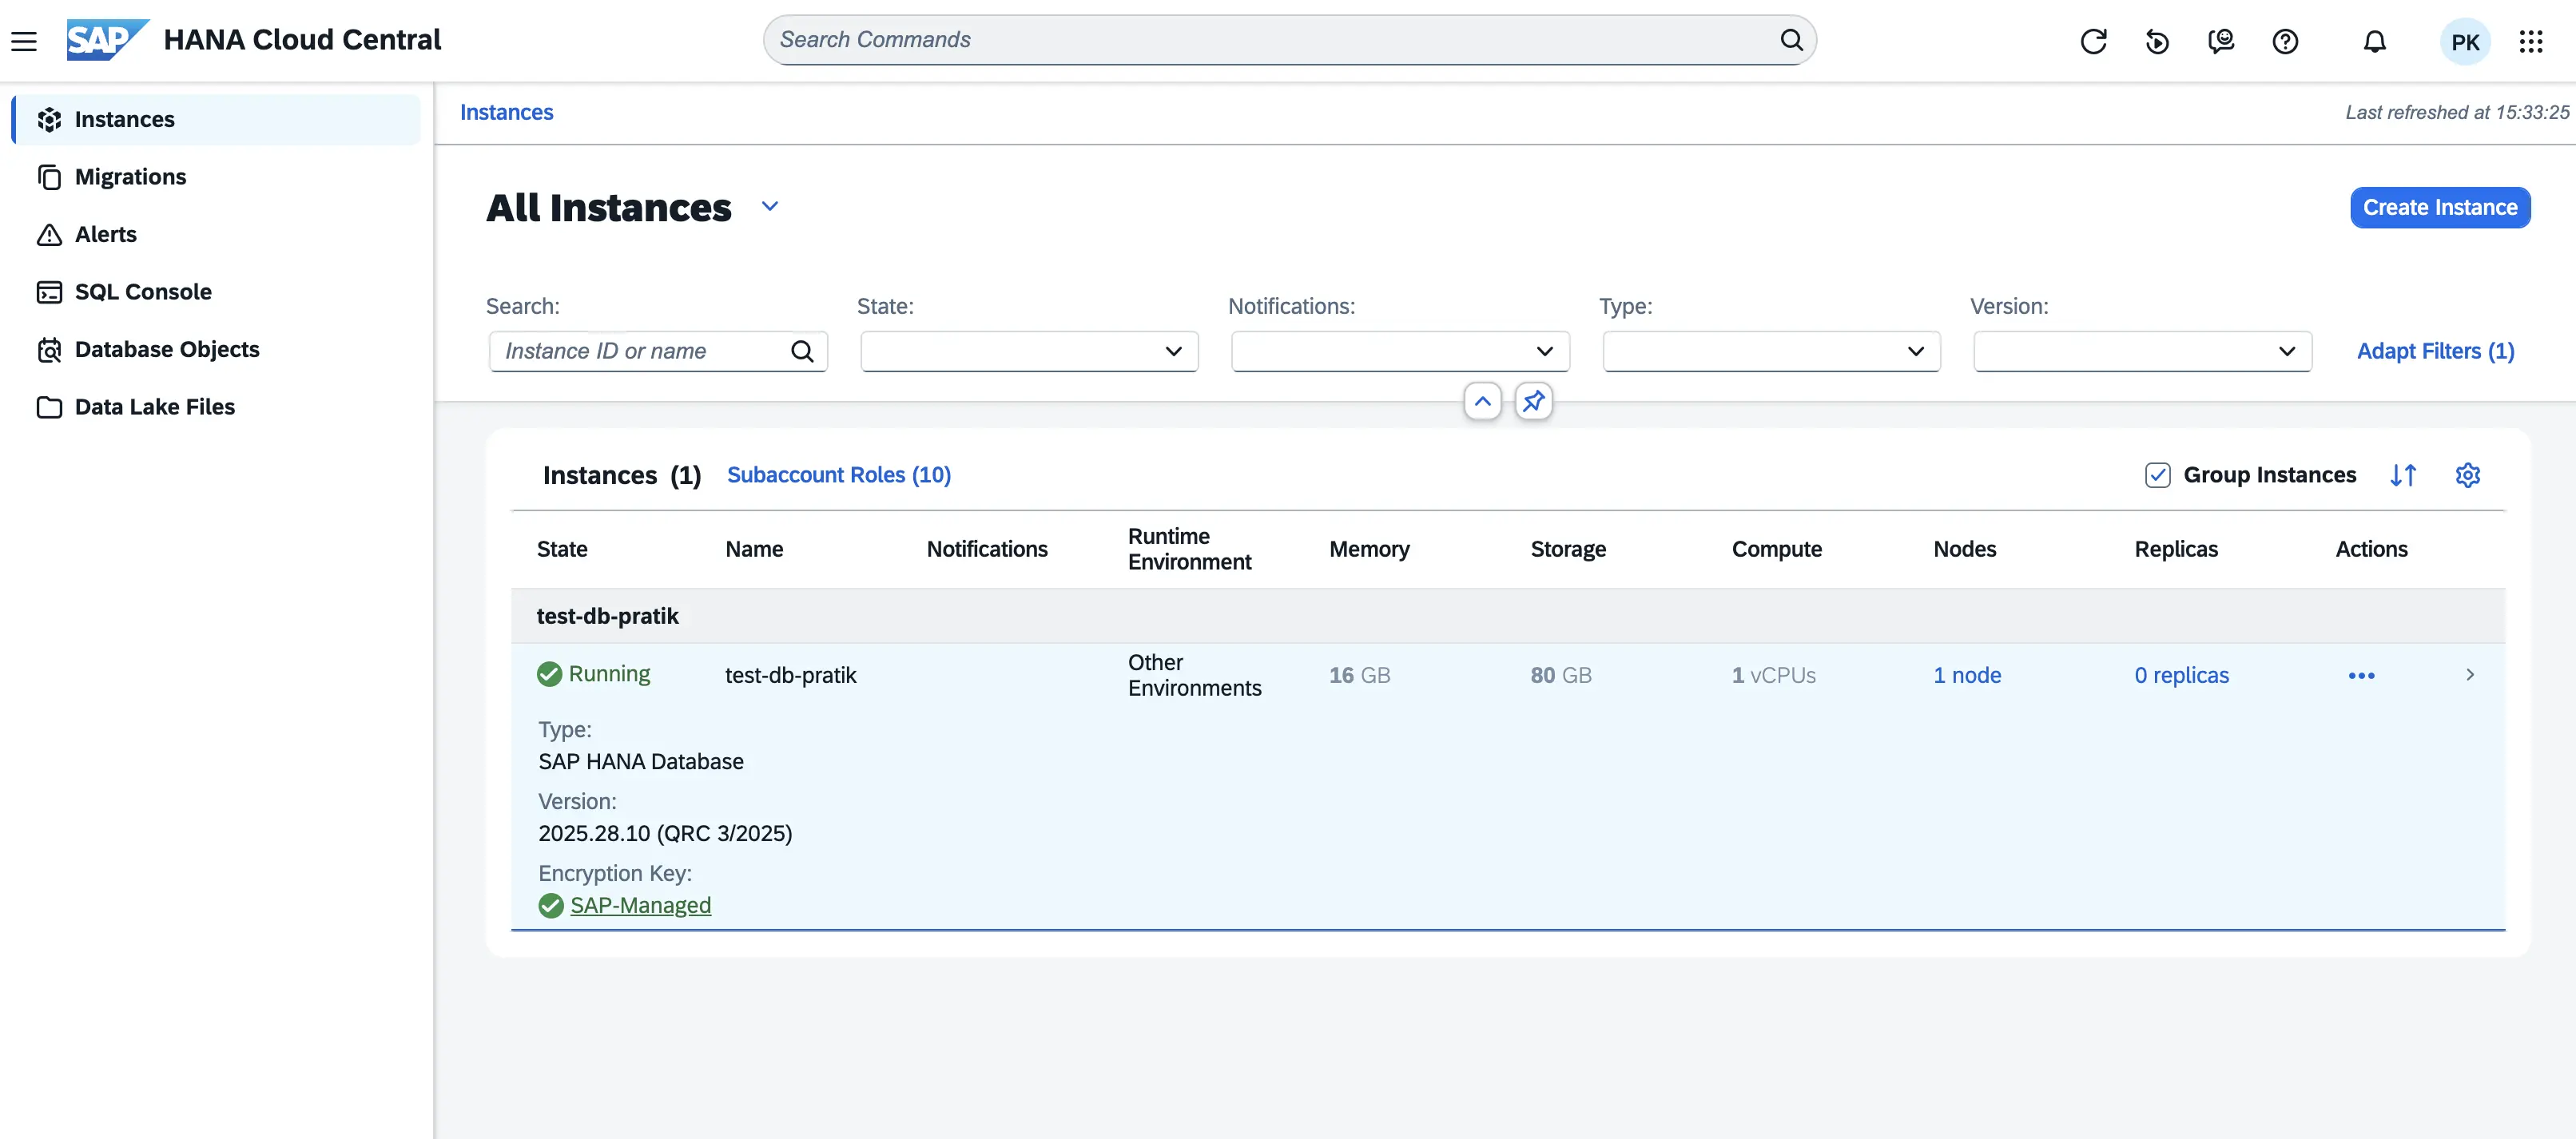
- Go to the
Connectionssection and copy theSQL Endpointvalue. This URL is crucial for configuring the Database Server URL in your connection setup.
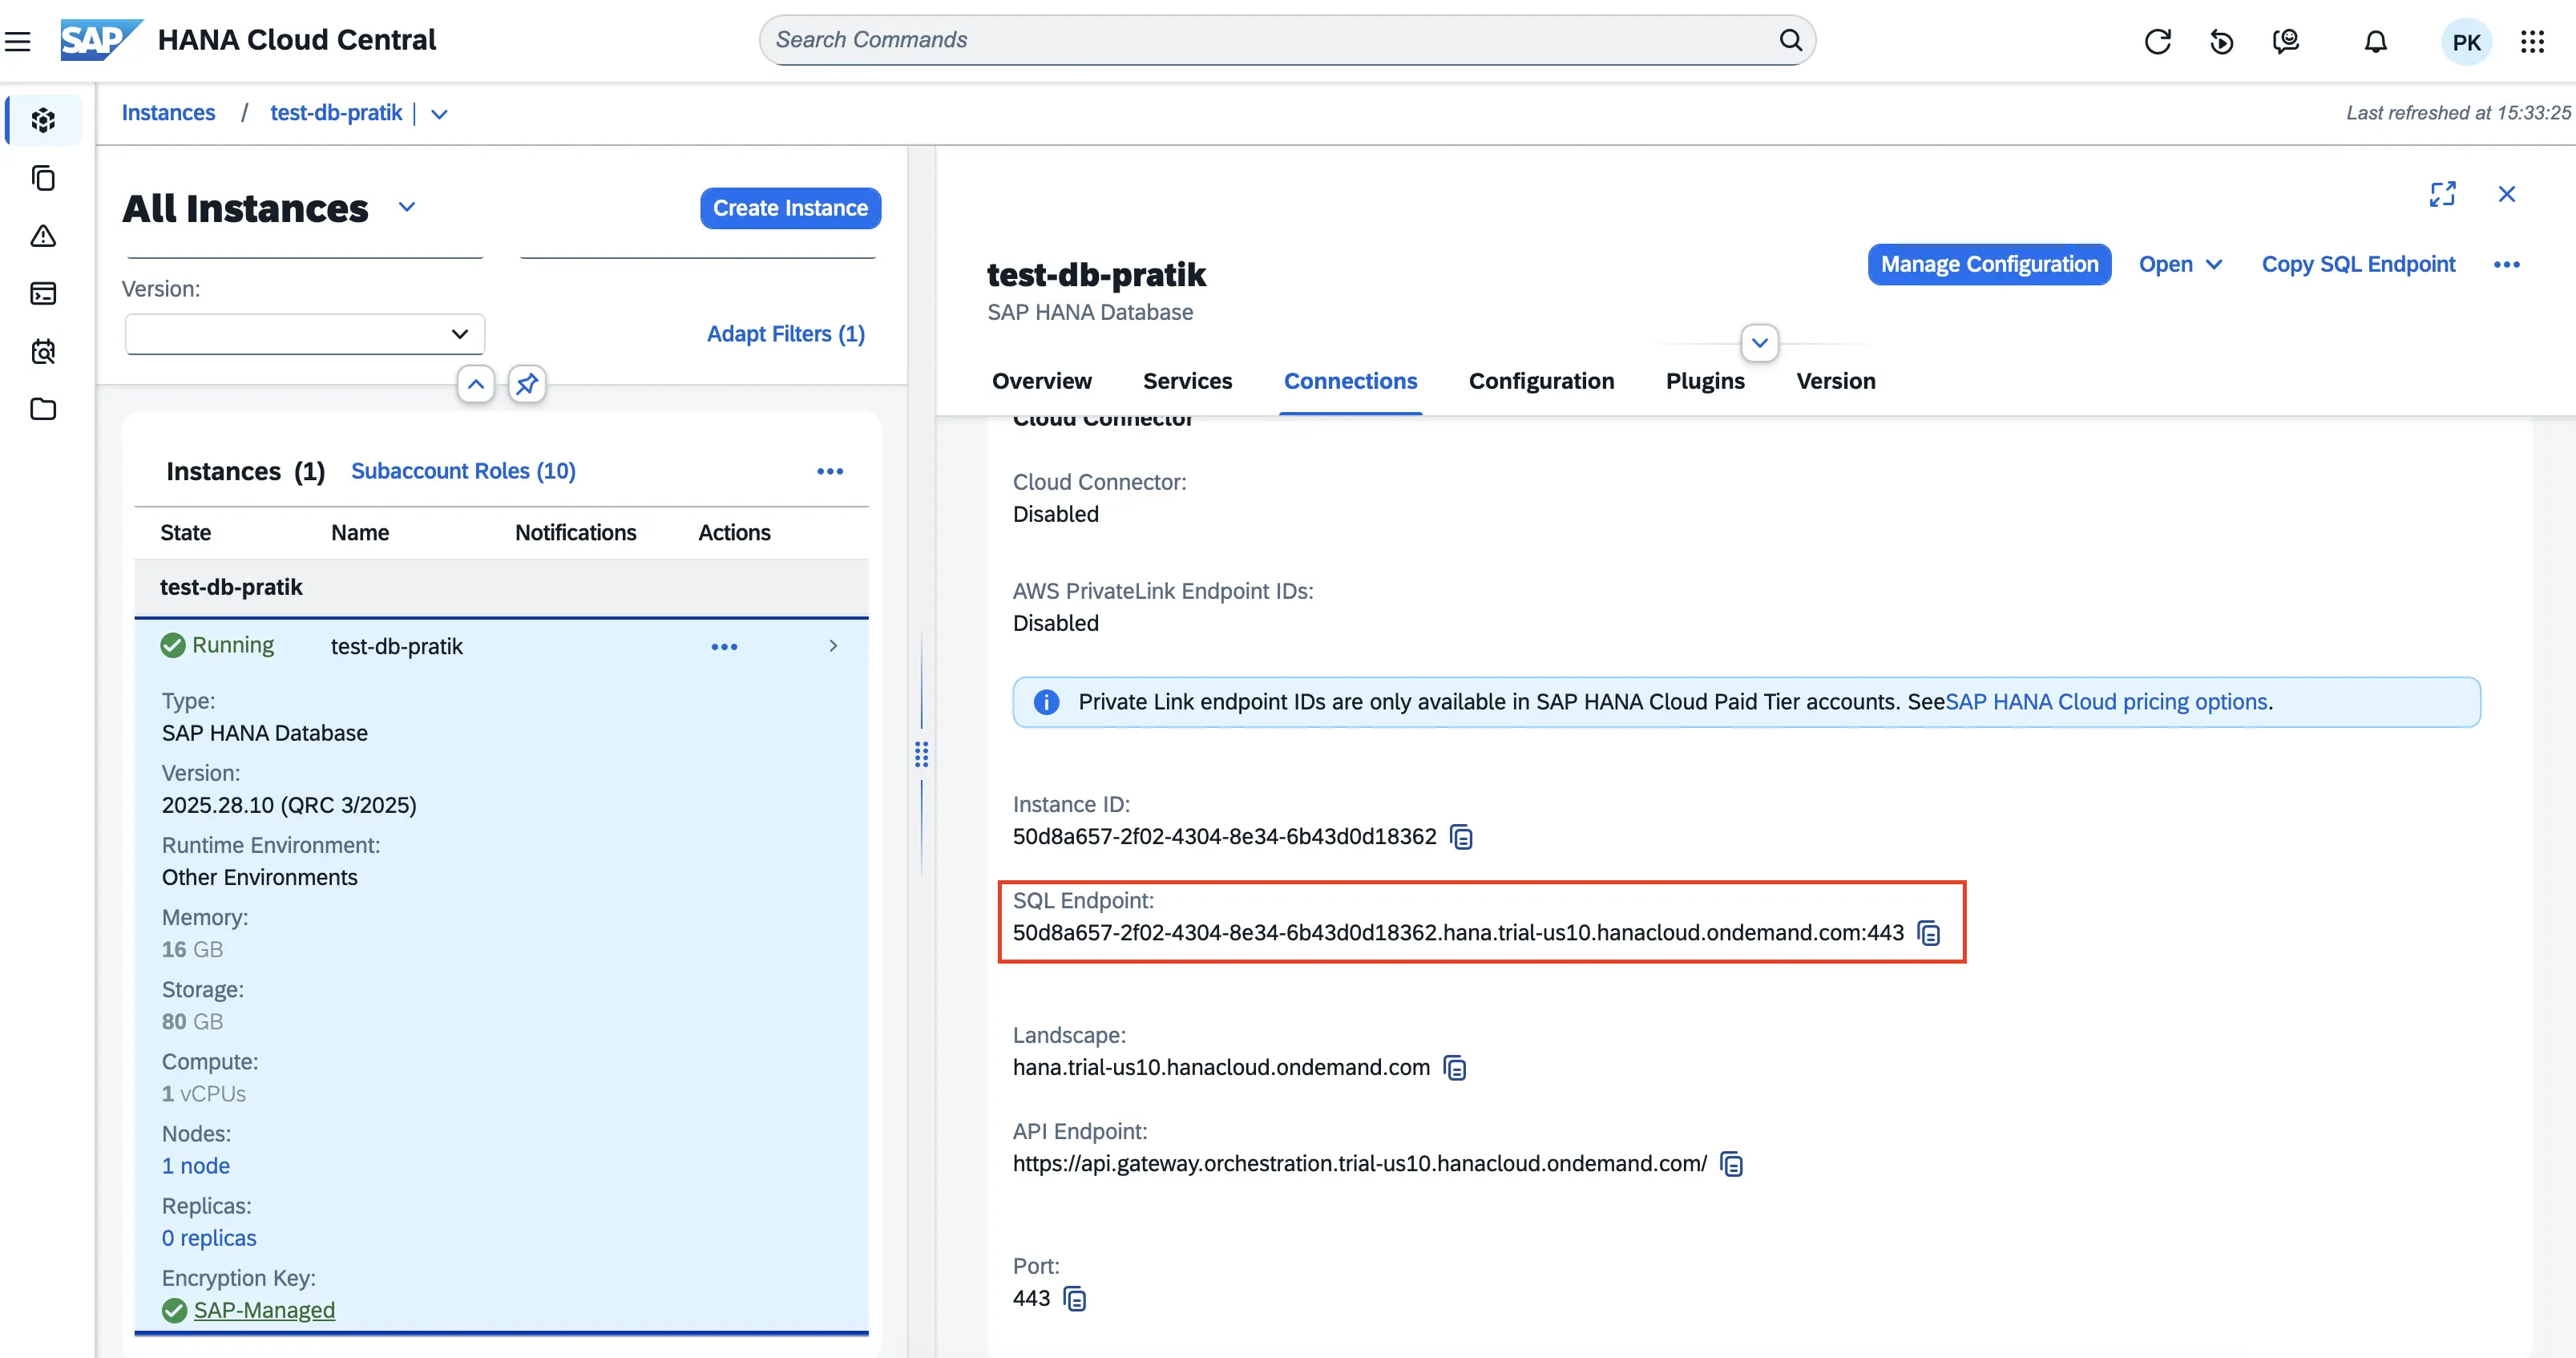
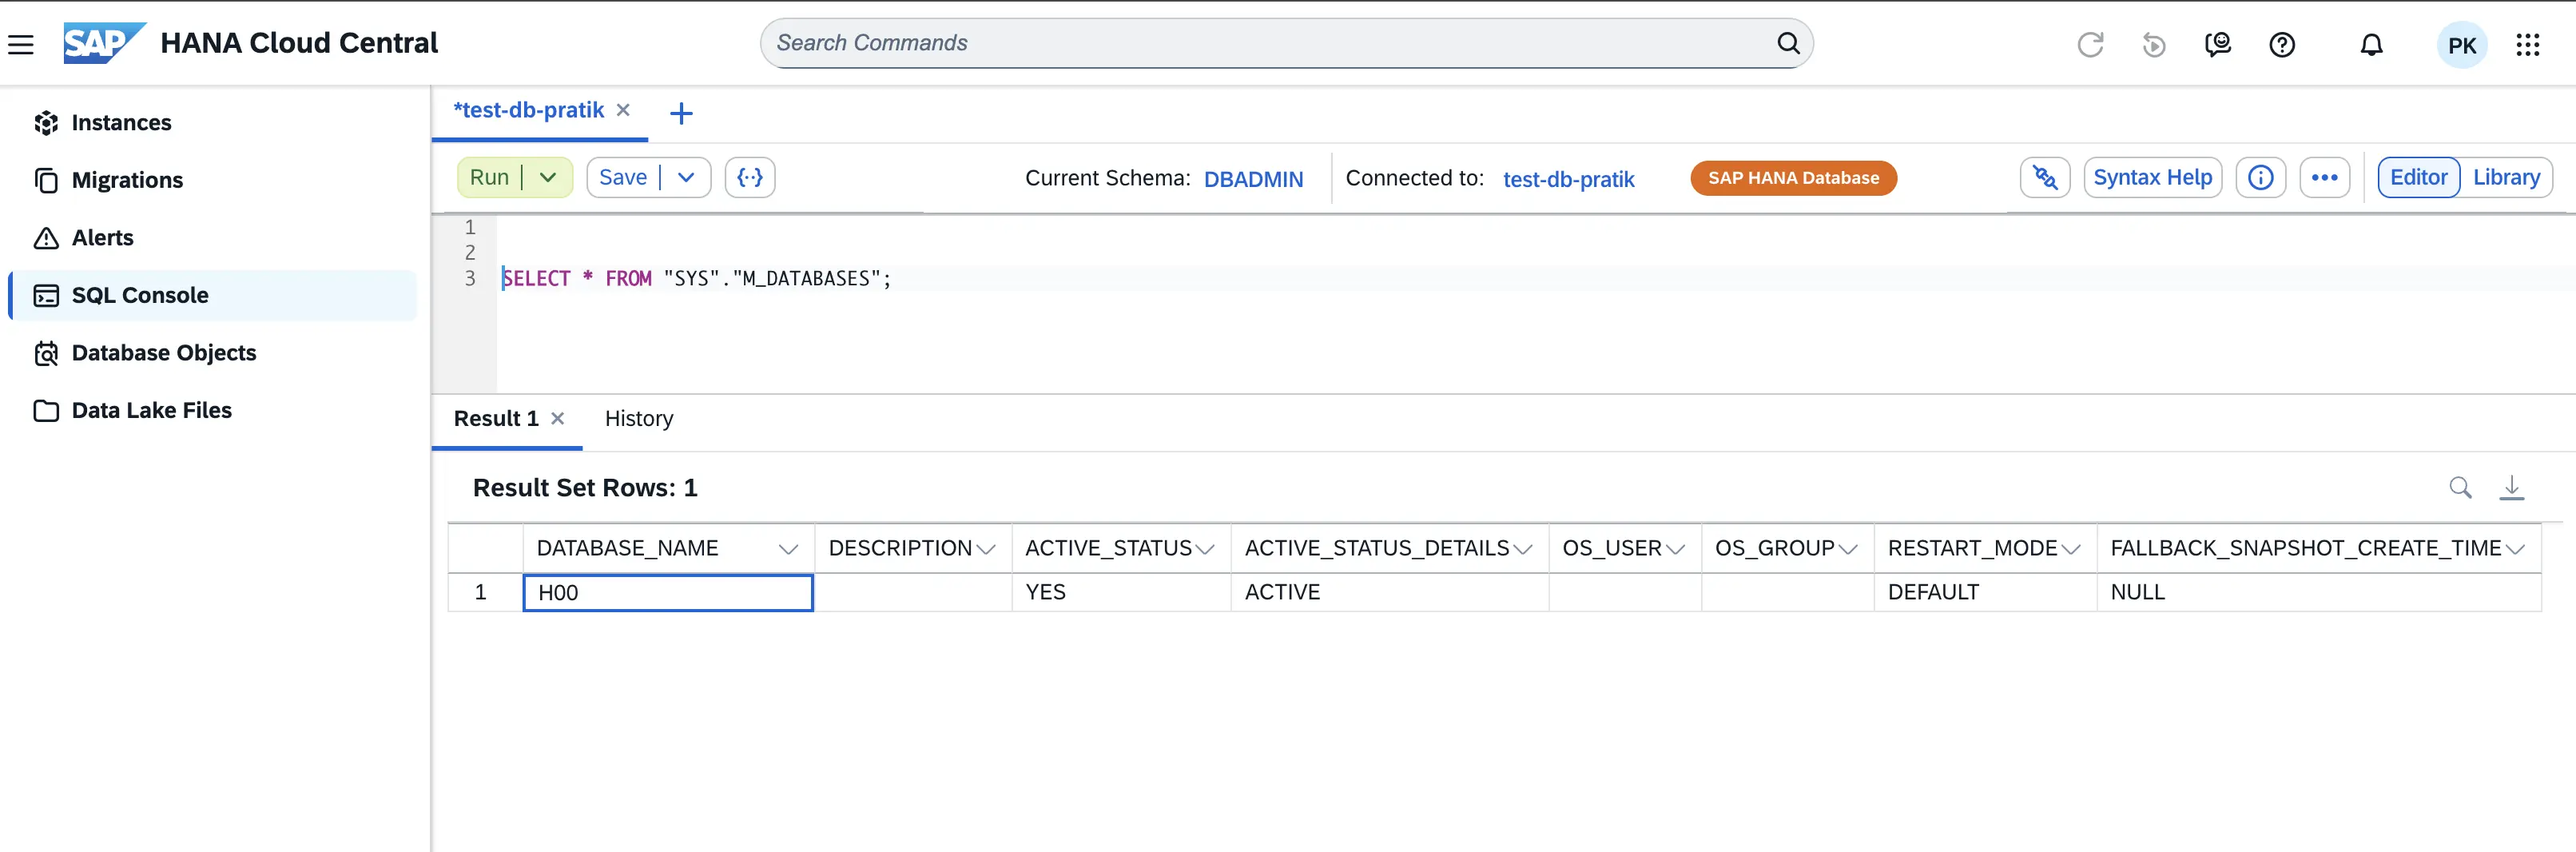
- The database name is also required. If you are unsure which database to connect to, you can use the query shown in the image below to retrieve the database name.
- When filling out the connection details in your Abacus.AI SAP HANA setup, follow these steps:
- Choose the SAP HANA JDBC Driver.
Database Server URL: Enter theSQL Endpointvalue obtained in Step 2, ensuring that you remove the port number from the end of the URL before entering it.Database Name: Enter the database name identified in Step 3.- Enter the port number.
- Select Username and Password as the Authentication Mechanism.
- Enter a Database username and password.
- Enter the schema name you intend to access.
- Click
Createto save the configuration. - Once saved, click
Verifyto test the connection.
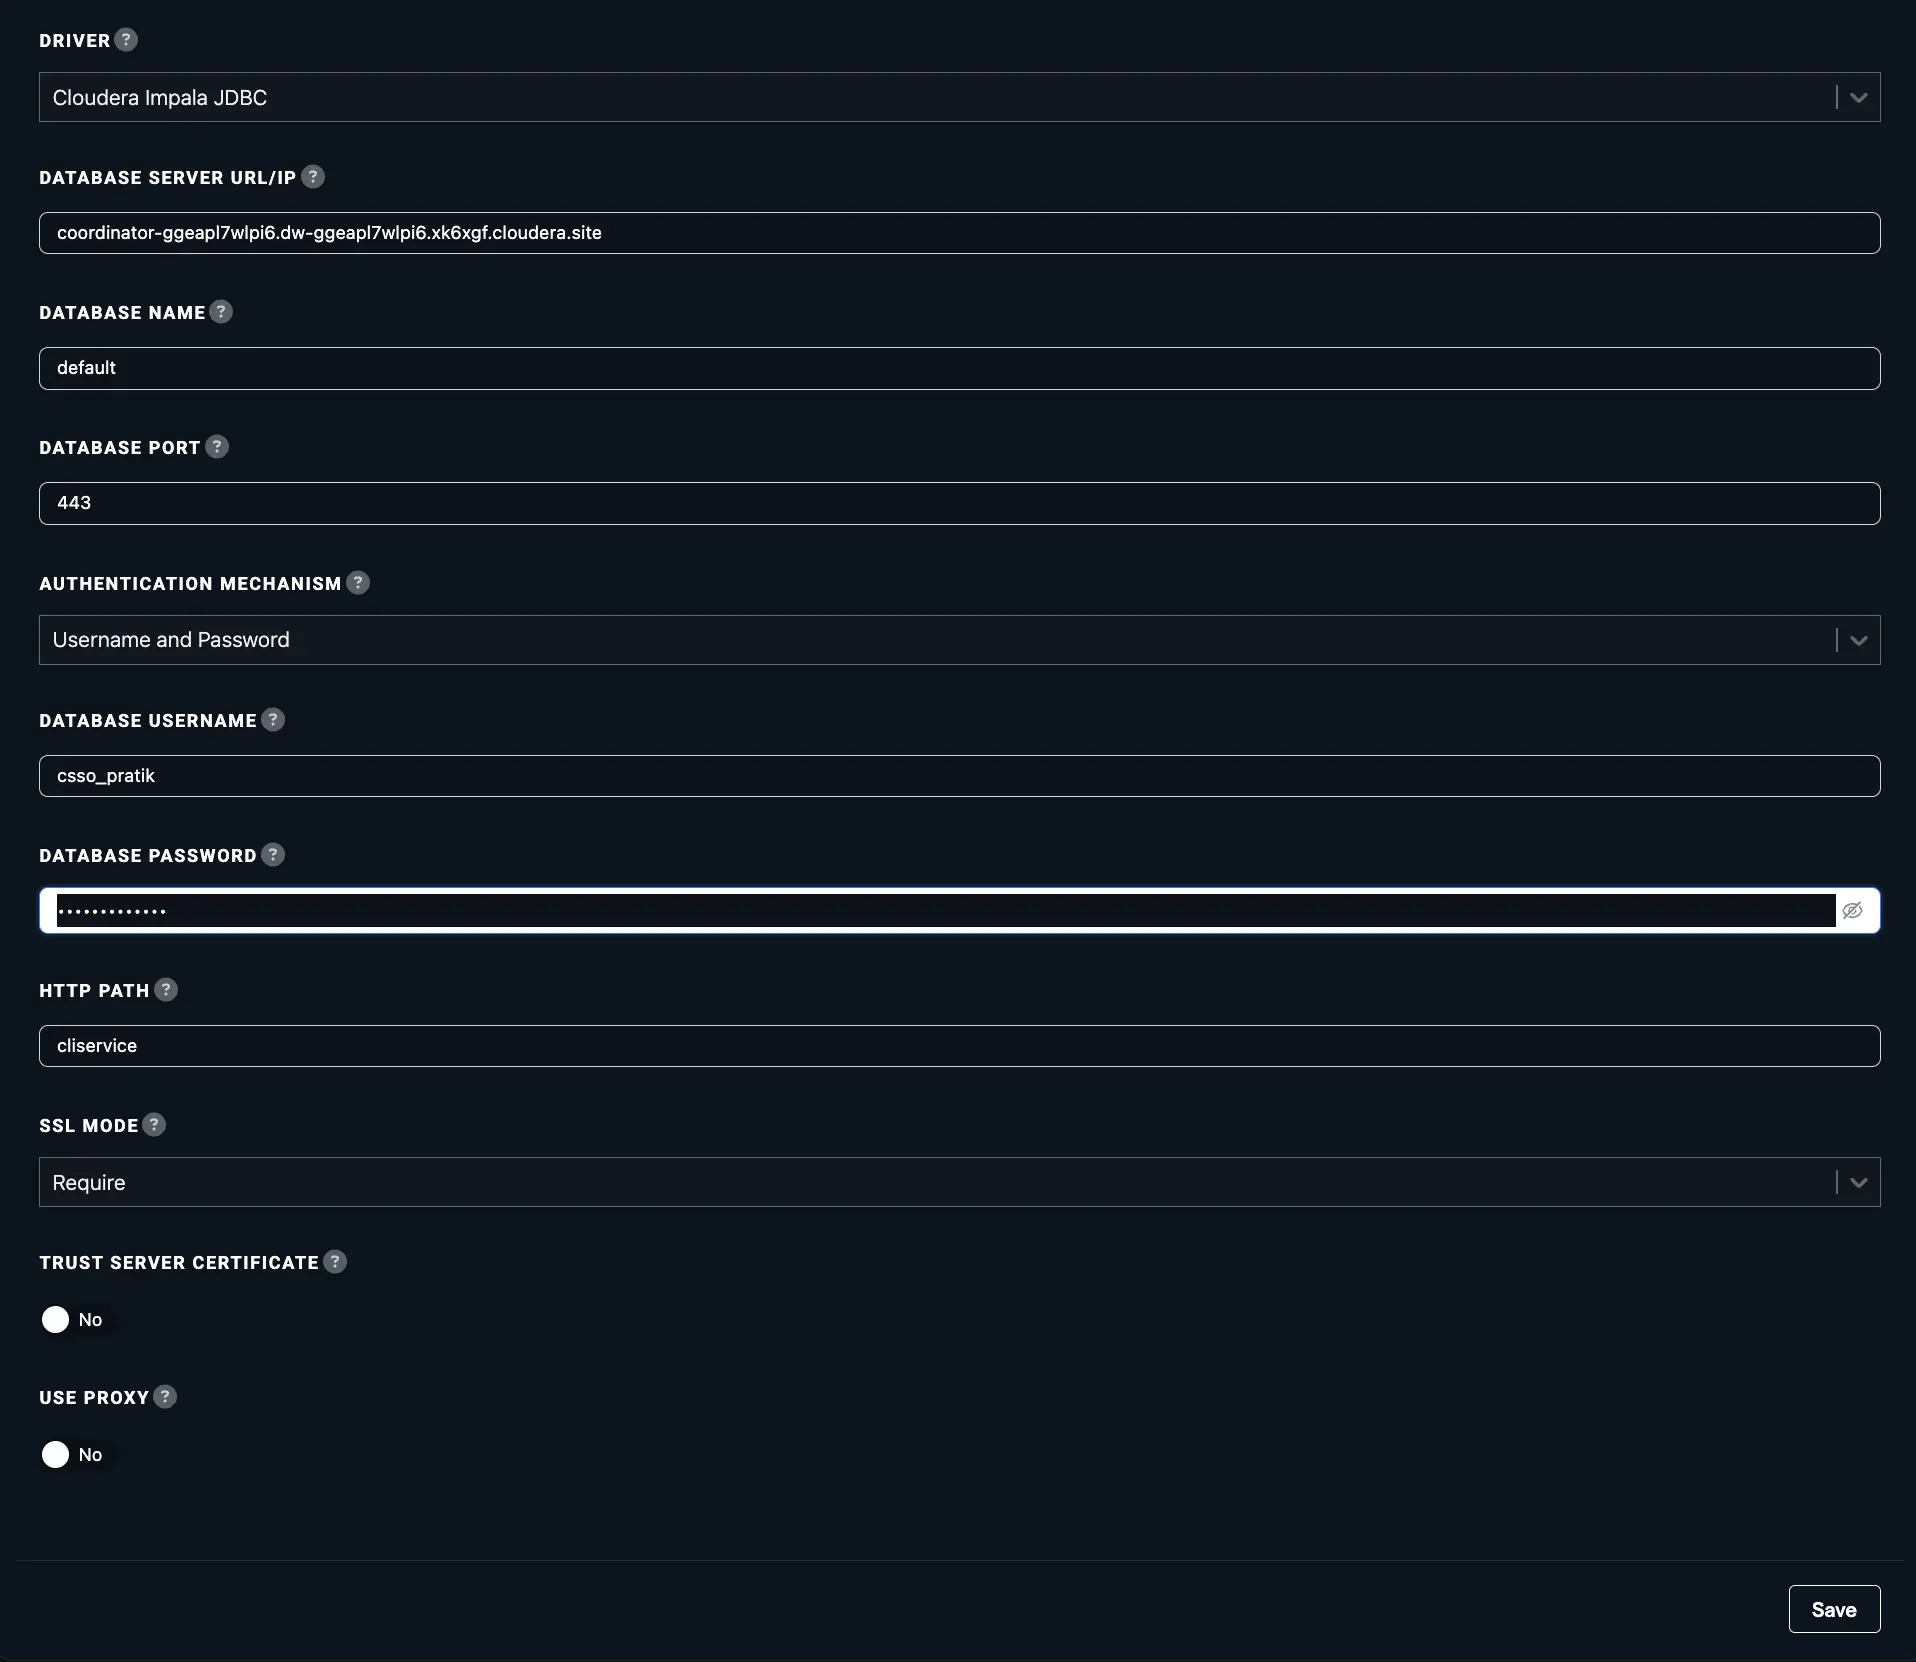
Steps to connect to Cloudera Impala JDBC
This guide outlines the steps required to gather the necessary connection details from your Cloudera Impala Warehouse to establish a JDBC connection.
Prerequisites
- You must have an Cloudera data platform account with access to associated database.
Reference: Cloudera Setup Guide
To configure Cloudera Impala JDBC connection gather the below details from your instance:
-
Navigate to your Cloudera Impala Warehouse instance and select the specific instance you wish to connect to.
-
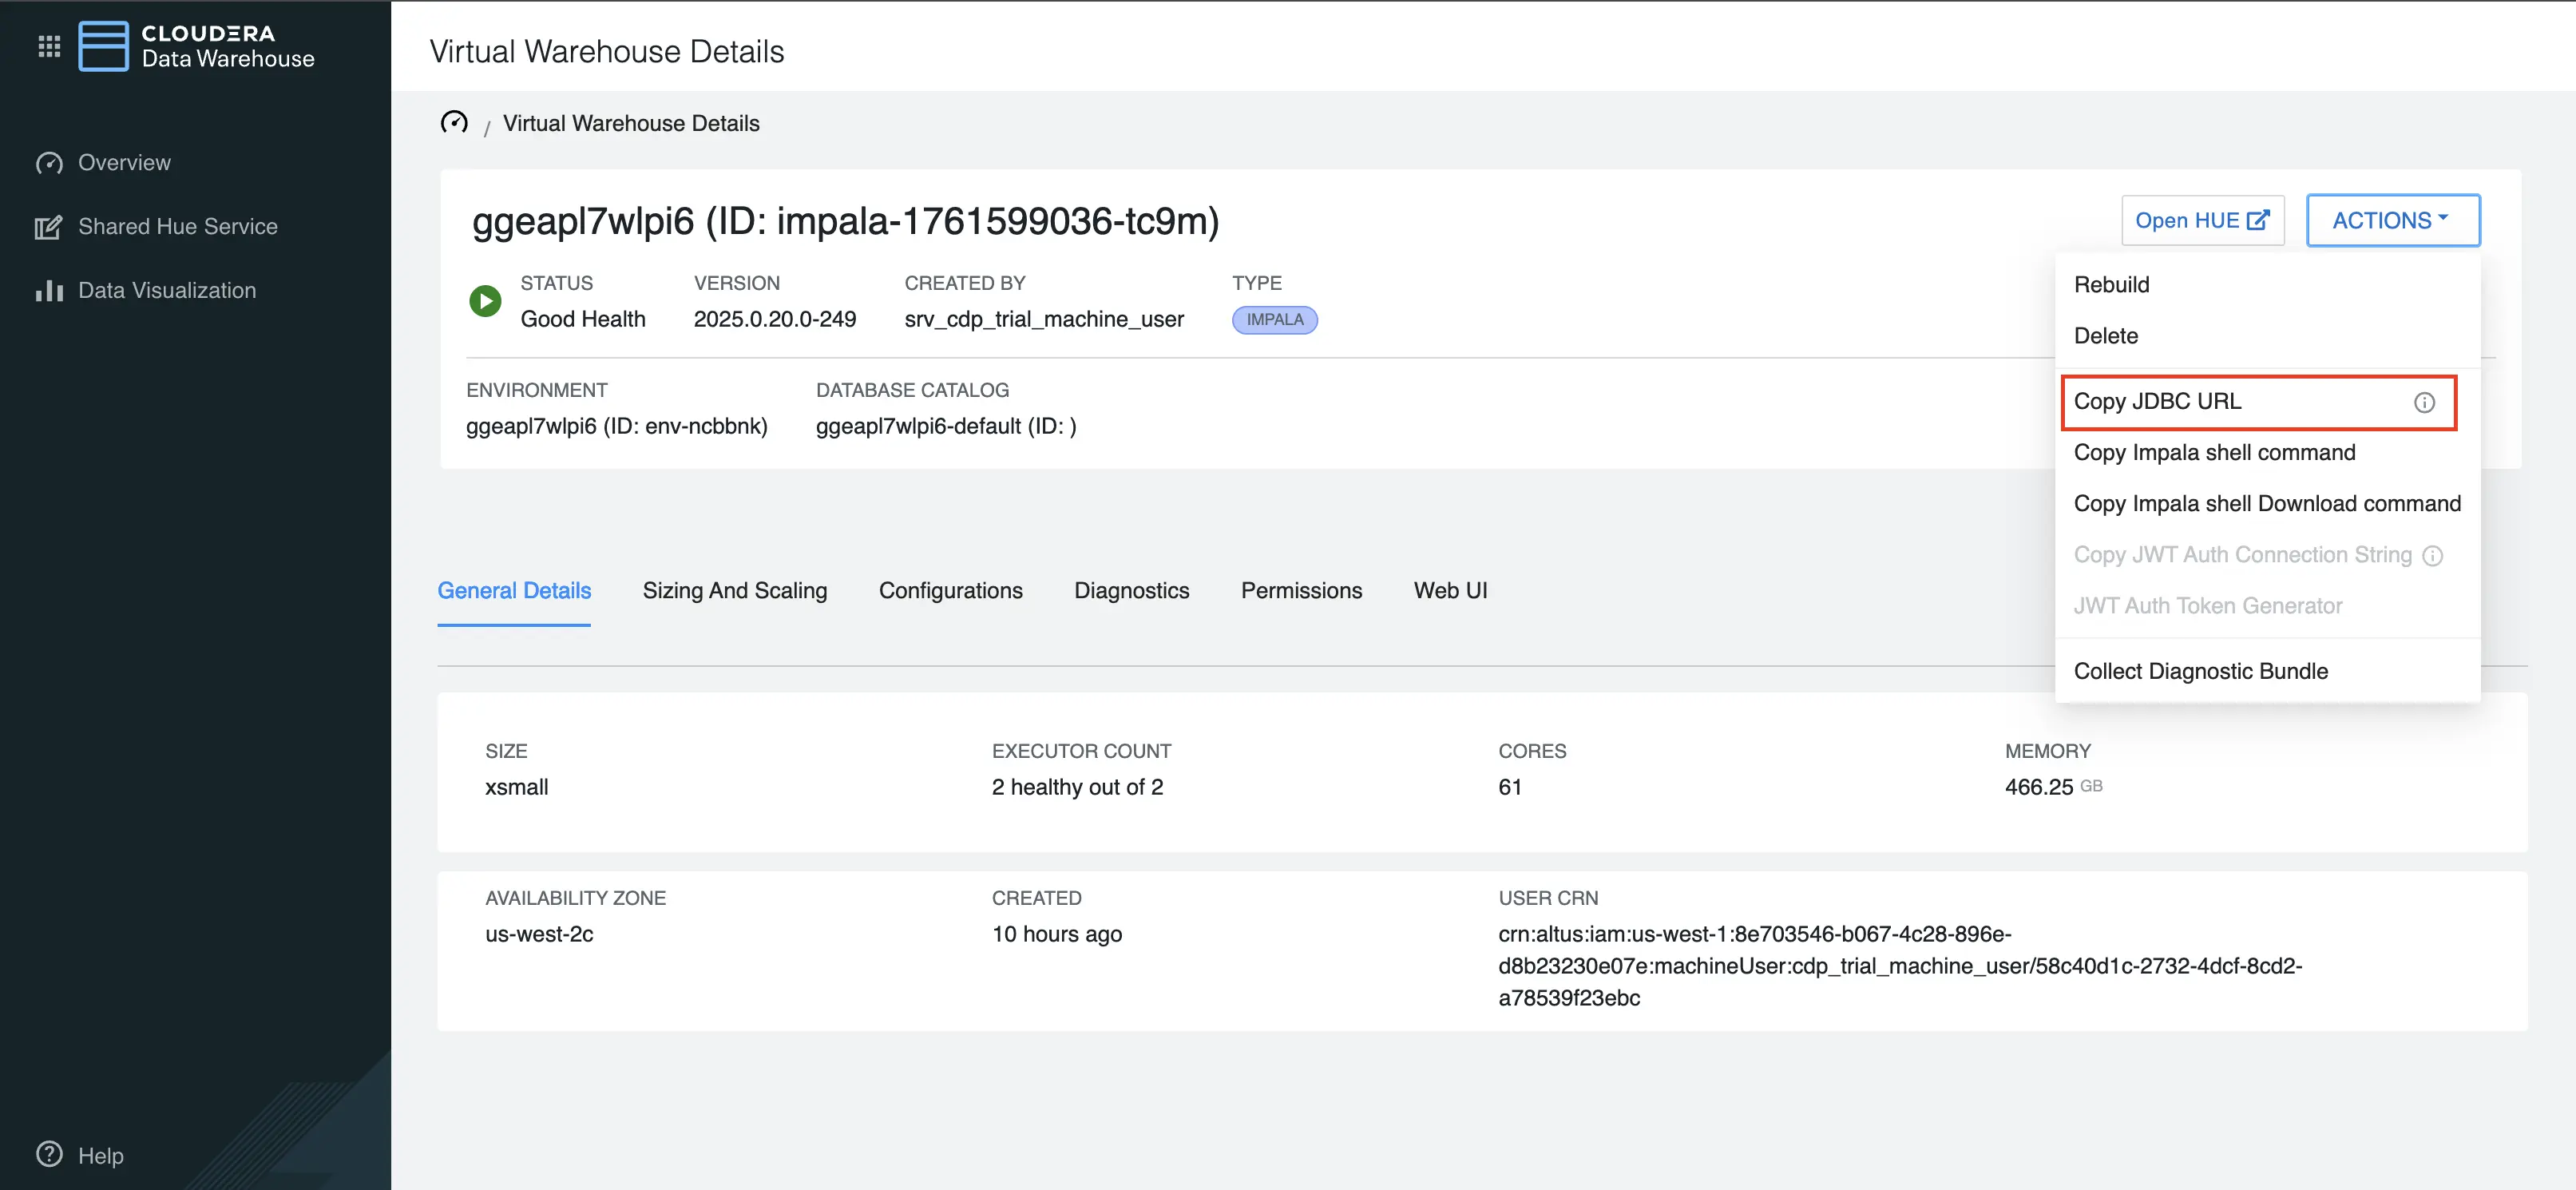
Click on
Actionstab and hit theCopy JDBC Urlvalue. This URL is crucial for configuring the Database Server URL in Abacus.AI connection setup.
-
When filling out the connection details in your Abacus.AI Cloudera Impala setup, follow these steps:
- Choose the
Cloudera Impala JDBCDriver. Database Server URL: Enter the hostname of the database server. This is the portion of the connection string that identifies the server, excluding the port number and any other parameters.
Example: For a JDBC URL formatted like this, you should only use
HOSTNAMEjdbc:impala://[HOSTNAME]:443/default;AuthMech=3;transportMode=http;...
- Enter the database name.
- Enter the port number mentioned in your JDBC URL
- Select Username and Password as the Authentication Mechanism.
- Enter the Workload username and password.
HTTP Path: It can be found within your JDBC URLSSL Mode: If your URL contains SSL=1 then select theRequireoption- Click
Createto save the configuration. - Once saved, click
Verifyto test the connection.
- Choose the