Organization-Level MCP Servers
Overview
An organization-level MCP server is a Model Context Protocol server that an administrator configures once for the whole organization. Instead of every member figuring out the correct URL, transport, and OAuth settings on their own, an admin defines the server a single time and it becomes available to everyone in the workspace.
Organization-level MCP configurations are configuration only — they store how to reach the server (URL/command, transport, and authentication method), but they do not store any member's personal credentials. When a member wants to use a shared server, they connect to it and authenticate with their own credentials. This gives you central, consistent setup without ever sharing tokens between users.
Typical uses:
- Standardize access to an internal or third-party MCP server (for example, an internal knowledge base, a ticketing system, or a custom tools server) across your team.
- Let members enable a vetted server in one click instead of pasting JSON config.
- Provide MCP tools that can be attached to Custom Chatbots built in ChatLLM Teams.
Organization-level configurations are shared setup, not shared sessions. Each member authenticates individually, so every request runs under that member's own identity and permissions on the external service.
Organization-level vs. user-level MCP servers
| User-level MCP server | Organization-level MCP server | |
|---|---|---|
| Who sets it up | Any individual member | An organization admin / developer |
| Who can use it | Only the member who added it | Any member (after they connect) |
| Credentials | The member's own | Each member connects with their own |
| Where it is configured | MCP Server Configuration page | MCP Server Configuration page → Make available to the whole organization |
| Good for | Personal, one-off integrations | Team-wide, standardized integrations |
Both types share the same runtime limits: you can have up to 5 active MCP servers and up to 50 tools across those servers. Servers that need access to your local filesystem will not work, because MCP servers run in an isolated environment.
Prerequisites
- An organization admin (or a user with permission to modify organization settings) to create the shared configuration.
- The MCP server details:
- For a remote server (SSE or Streamable HTTP): the server URL, and — if the server requires OAuth — the Client ID and Client Secret (optional, depending on the server).
- For a local server (STDIO): the
command,args, and anyenvvariables.
- Members will need their own credentials/accounts for the external service the server talks to.
Configure an organization-level MCP server
Only an administrator (or a user with permission to modify organization settings) can create an organization-level configuration.
Step 1 — Open the MCP Server Configuration page
- Log in to ChatLLM Teams.
- Click your profile in the top-right corner and open Settings.
- In the sidebar, go to Connectors → MCP Server Configuration.
Step 2 — Add the server
You can define the server with the guided form or by pasting JSON.
Using the guided form:
- Click to add a new MCP server.
- Enter an MCP Server Name (this name identifies the server across the organization).
- Enter the server URL for a remote server.
- If the server uses OAuth, enable Enable OAuth (static registration) and provide the Client ID and, if required, the Client Secret. The OAuth authorization and token URLs are discovered automatically from the server URL.
- For a local (STDIO) server, provide the
command,args, andenvvalues instead of a URL.
Each organization-level configuration holds exactly one server. To share several servers with your organization, create a separate configuration for each one.
Step 3 — Make it available to the whole organization
Enable the Make available to the whole organization checkbox before saving.
Save this as an organization-level MCP configuration. It can be selected when training models, and members connect their own credentials at chat time.
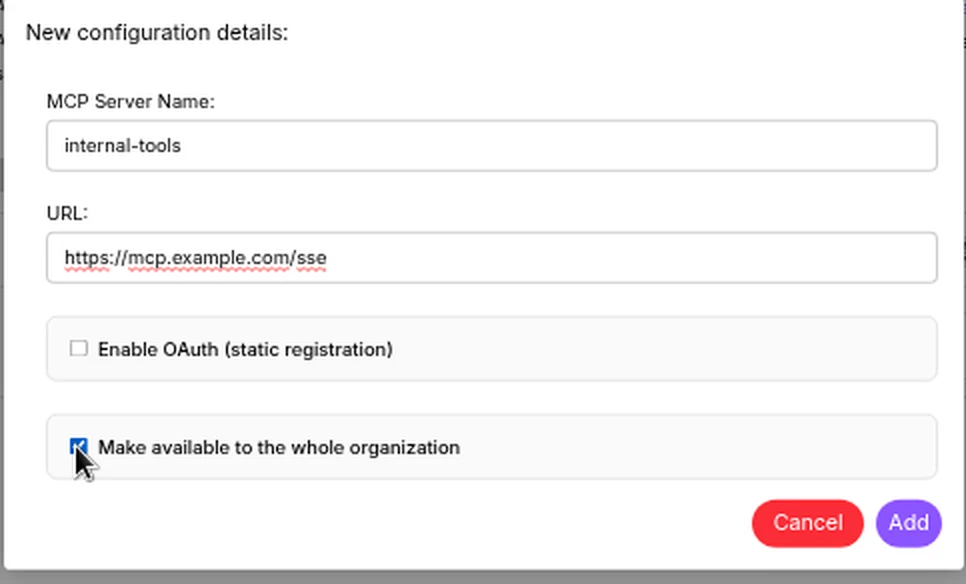
Save the configuration. It now appears to every member in the Organization MCP Configurations section of their MCP Server Configuration page.
Secrets are never exposed after saving. When configurations are listed, sensitive values (such as OAuth client secrets, custom headers, and STDIO environment variables) are redacted.
Connect to a shared server (for members)
Sharing a configuration does not automatically connect a member — each member connects once, on their own, and authenticates with their own credentials.
- Log in to ChatLLM Teams.
- Open Settings → Connectors → MCP Server Configuration.
- Find the server under the Organization MCP Configurations section. Each entry shows the server name, transport, authentication type, and a Connector ID.
- Click Connect next to the server.
- If the server uses OAuth, complete the sign-in flow with your own account for that service.
- Once connected, the button changes to Connected and the server's tools become available to you.
Because you authenticate with your own credentials, you only ever see the data your account is allowed to access on the external service.
Use an organization-level MCP server with a Custom Chatbot
Custom Chatbots (custom bots) in ChatLLM Teams can call MCP tools. This lets you build a purpose-built assistant — for example, a support bot or an internal-knowledge bot — that uses the tools exposed by your organization-level MCP server.
Step 1 — Connect to the server first
Before a server can be attached to a Custom Chatbot, you must have connected to it (see Connect to a shared server). Servers you have not connected — or that expose no tools — are skipped and cannot be attached.
Step 2 — Create the Custom Chatbot
You can create a Custom Chatbot in two ways:
- By prompting the Abacus AI Agent in ChatLLM Teams. Describe the bot you want and mention the external service it should use (for example, "Create a support chatbot that looks up tickets in our internal ticketing MCP server"). The agent presents a selection of your configured remote MCP servers; pick the ones the chatbot should use. Only servers you have already connected can be selected.
- From the Developer Platform, where you can attach the MCP server connections you want the chatbot to use.
Step 3 — Use the chatbot
Once the chatbot is created with the MCP server attached, start a conversation and ask it to do something that uses the server's tools. The chatbot invokes the MCP tools at runtime, using each user's connected credentials, and returns the result in chat.
Prefer a User Connector when one already exists for the service you need (for example, Gmail, Jira, Slack, Google Drive, Google Sheets, Google Calendar, Confluence, X, or GitHub). Use an MCP server for services that are not covered by a User Connector.
A Custom Chatbot that uses MCP servers (or Connector Tools) cannot be made Public. These chatbots depend on per-user credentials, so they remain private to members who have connected the underlying servers.
FAQs and Troubleshooting
Who can create an organization-level MCP configuration?
Only an organization admin, or a user with permission to modify organization settings, can create or delete a shared configuration. Any member can then connect to it.
Does sharing a configuration share my credentials?
No. Organization-level configurations are configuration only. They never contain a member's tokens or secrets — each member authenticates with their own credentials when they connect.
A member sees the server but can't use its tools. Why?
Make sure the member has clicked Connect on the server and completed any required authentication. A configuration that is shared but not connected does not expose any tools to that member.
Why can't I make my chatbot Public?
Chatbots that use MCP servers (or Connector Tools) cannot be made Public because they rely on per-user credentials. Keep the chatbot private to members who have connected the underlying servers.
How many servers and tools can I use?
Across all your MCP servers (user-level and organization-level combined) you can have up to 5 active servers and up to 50 tools. Limit active tools to avoid overwhelming the model.
My server won't connect.
- Verify the URL (for remote servers) or the
command/args(for local servers) are correct and the server is running. - For OAuth servers, confirm the Client ID (and Client Secret, if required) are correct and that you completed the sign-in flow.
- Servers that need access to your local filesystem will not work, because MCP servers run in an isolated environment.