SCIM Provisioning for Abacus.AI
SCIM (System for Cross-domain Identity Management) lets your identity provider create, update, deactivate, and remove Abacus.AI users automatically, and keep your directory groups in sync with Abacus.AI roles. It complements SSO: SSO controls how people sign in, SCIM controls who exists in your organization and what role they have.
- Overview
- Requirements
- Step 1: Enable SCIM in Abacus.AI
- Step 2: Configure your identity provider
- Attribute mapping
- Group and role mapping
- Managing SCIM after setup
- Supported operations and limits
- Troubleshooting and FAQ
Overview
Abacus.AI exposes a standard SCIM 2.0 service provider endpoint. Once you enable it and connect your identity provider (IdP), the IdP becomes the source of truth for user lifecycle in that Abacus.AI organization:
- Provisioning: assigning a user to your Abacus.AI application in the IdP creates the user in Abacus.AI.
- Updates: profile changes (name, email, roles) flow through to Abacus.AI.
- Deprovisioning: unassigning or deactivating a user in the IdP removes them from the Abacus.AI organization.
- Group sync: directory groups are pushed to Abacus.AI as groups, and can be mapped to Abacus.AI roles.
SCIM works alongside any of the supported SSO methods:
| Identity provider | SSO documentation | Where SCIM is configured |
|---|---|---|
| Microsoft Entra ID (OIDC / OAuth) | Microsoft Entra ID | A separate, SCIM-only non-gallery enterprise application |
| Microsoft Entra ID (SAML) | Microsoft Entra SAML | Provisioning section of the same enterprise application |
| Okta (SAML) | Okta SAML | Provisioning tab of the same SAML application |
| Okta (OIDC / OAuth) | Okta | A separate, SCIM-only Okta application |
SCIM provisioning is available for enterprise organizations only, and only organization admins can configure it.
Requirements
- An enterprise Abacus.AI organization (SCIM is not available on self-service plans).
- Organization admin access in Abacus.AI.
- Administrator access to your identity provider.
- SSO already set up for the organization (recommended, so that provisioned users can sign in).
Step 1: Enable SCIM in Abacus.AI
- Sign in to Abacus.AI as an organization admin and switch to the organization you want to provision.
- Click your profile in the top right, then open SCIM Provisioning (
https://<subdomain>.abacus.ai/app/profile/scim). - Select your Identity Provider — Microsoft Entra ID, Okta, or Generic SCIM 2.0. This only tunes a few provider-specific behaviors; the endpoint itself is standard SCIM 2.0.
- Click Enable SCIM Provisioning.
- The SCIM Provisioning Credentials dialog appears with two values:
- Tenant URL:
https://api.abacus.ai/scim/v2 - Bearer Token: the secret your IdP will send in the
Authorizationheader.
- Tenant URL:
Copy the bearer token before closing the dialog — it is not shown again. If you lose it, use Rotate Token to generate a new one (the old token stops working immediately).
Enabling SCIM also creates a system service account named scim-svc-<organization_id>@abacus.ai. It performs the provisioning actions on behalf of your IdP and appears in audit logs. Do not delete it.
Step 2: Configure your identity provider
Microsoft Entra ID
Entra always configures SCIM from the Provisioning section of an enterprise application. Which application that is depends on how your organization signs in.
Which application hosts provisioning
| Sign-in method | Application that hosts provisioning |
|---|---|
| SAML | The same non-gallery enterprise application you created in the Microsoft Entra SAML guide. No second application is needed. |
| OIDC / OAuth | A separate, SCIM-only non-gallery enterprise application that you create yourself. The Abacus.AI application used for OIDC sign-in (Application ID b89bbf6f-22a7-4b66-9bcf-6a80edf04dc5) is a multi-tenant application published by Abacus.AI, so its Provisioning blade in your tenant does not offer an automatic SCIM configuration you can edit. |
If you sign in with SAML, skip to Configure provisioning.
Create a SCIM-only enterprise application (OIDC sign-in)
Leave the OIDC application you use for sign-in exactly as it is — it keeps handling authentication. Create a second, non-gallery application that exists only to provision users and groups into Abacus.AI:
- Sign in to the Microsoft Entra Admin Center as an application administrator (or global administrator).
- Go to Entra ID → Enterprise applications → New application.
- Click Create your own application.
- Give it a clear name, such as
Abacus.AI SCIM. - Select Integrate any other application you don't find in the gallery (Non-gallery).
- Click Create. Entra creates the application and opens it.
Assign the same users and groups to the SCIM application that you assign to the OIDC sign-in application, and keep them in sync. The OIDC application decides who can sign in; the SCIM application decides who exists in Abacus.AI and what role they get. A user assigned to only one of them will either be unable to sign in or will not be provisioned.
Configure provisioning
- In the Microsoft Entra Admin Center, go to Enterprise applications and open the application that hosts provisioning:
- OIDC / OAuth: the SCIM-only application you just created, for example
Abacus.AI SCIM. - SAML: the non-gallery application from the Microsoft Entra SAML guide.
- OIDC / OAuth: the SCIM-only application you just created, for example
- In the left menu, under Manage, select Provisioning.
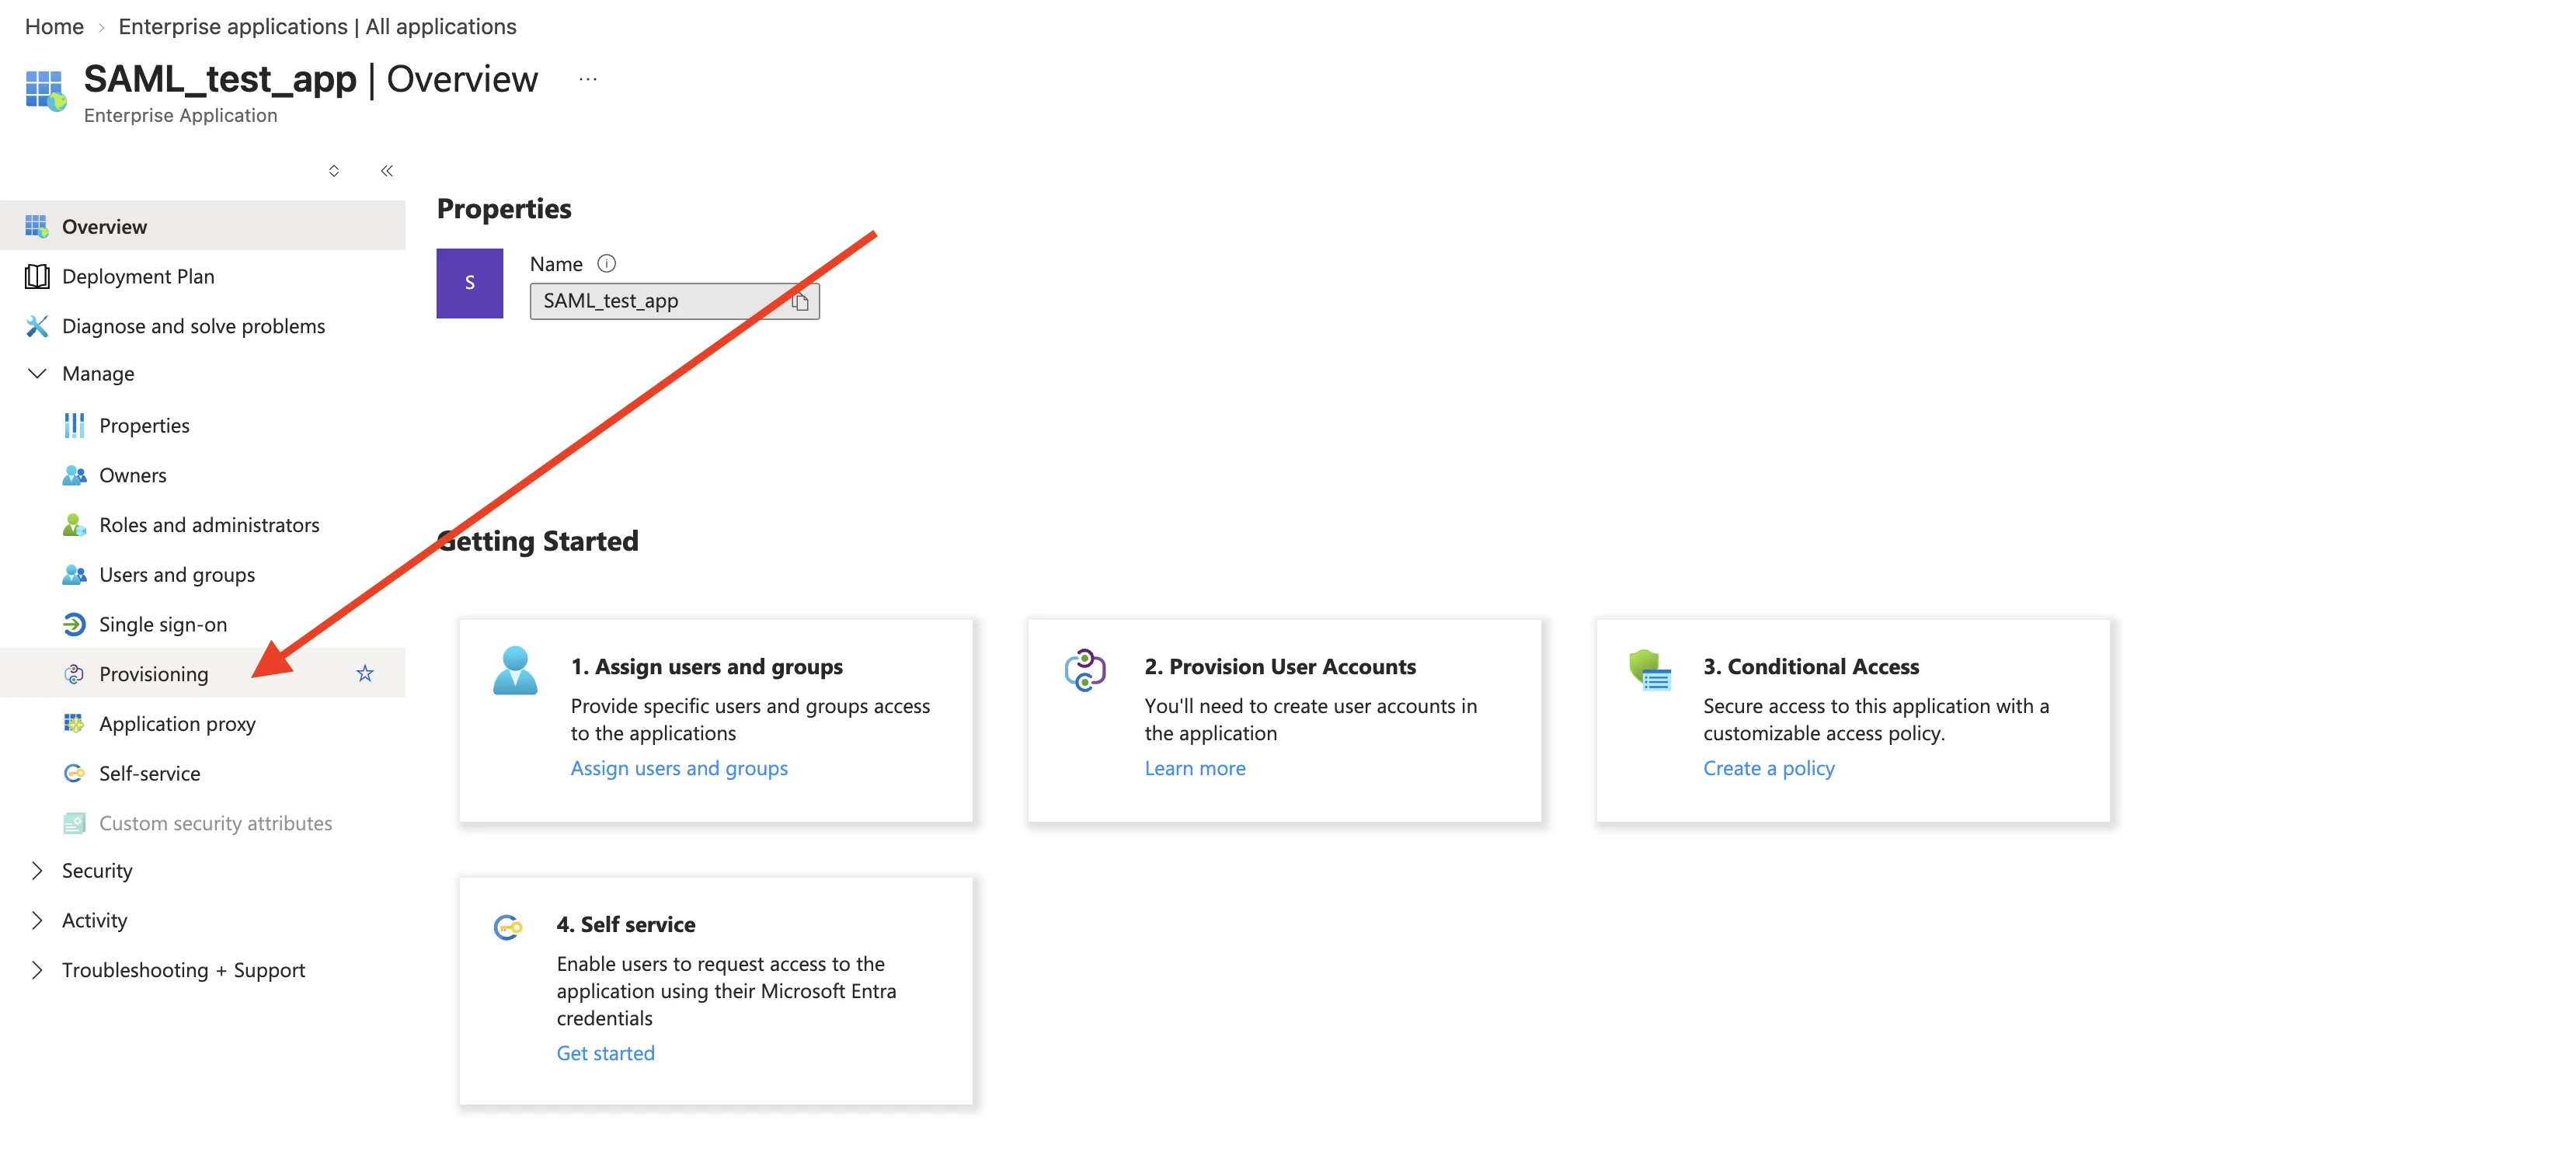
- On the Get started screen, click Connect your application (on older blades: Get started → set Provisioning Mode to Automatic).
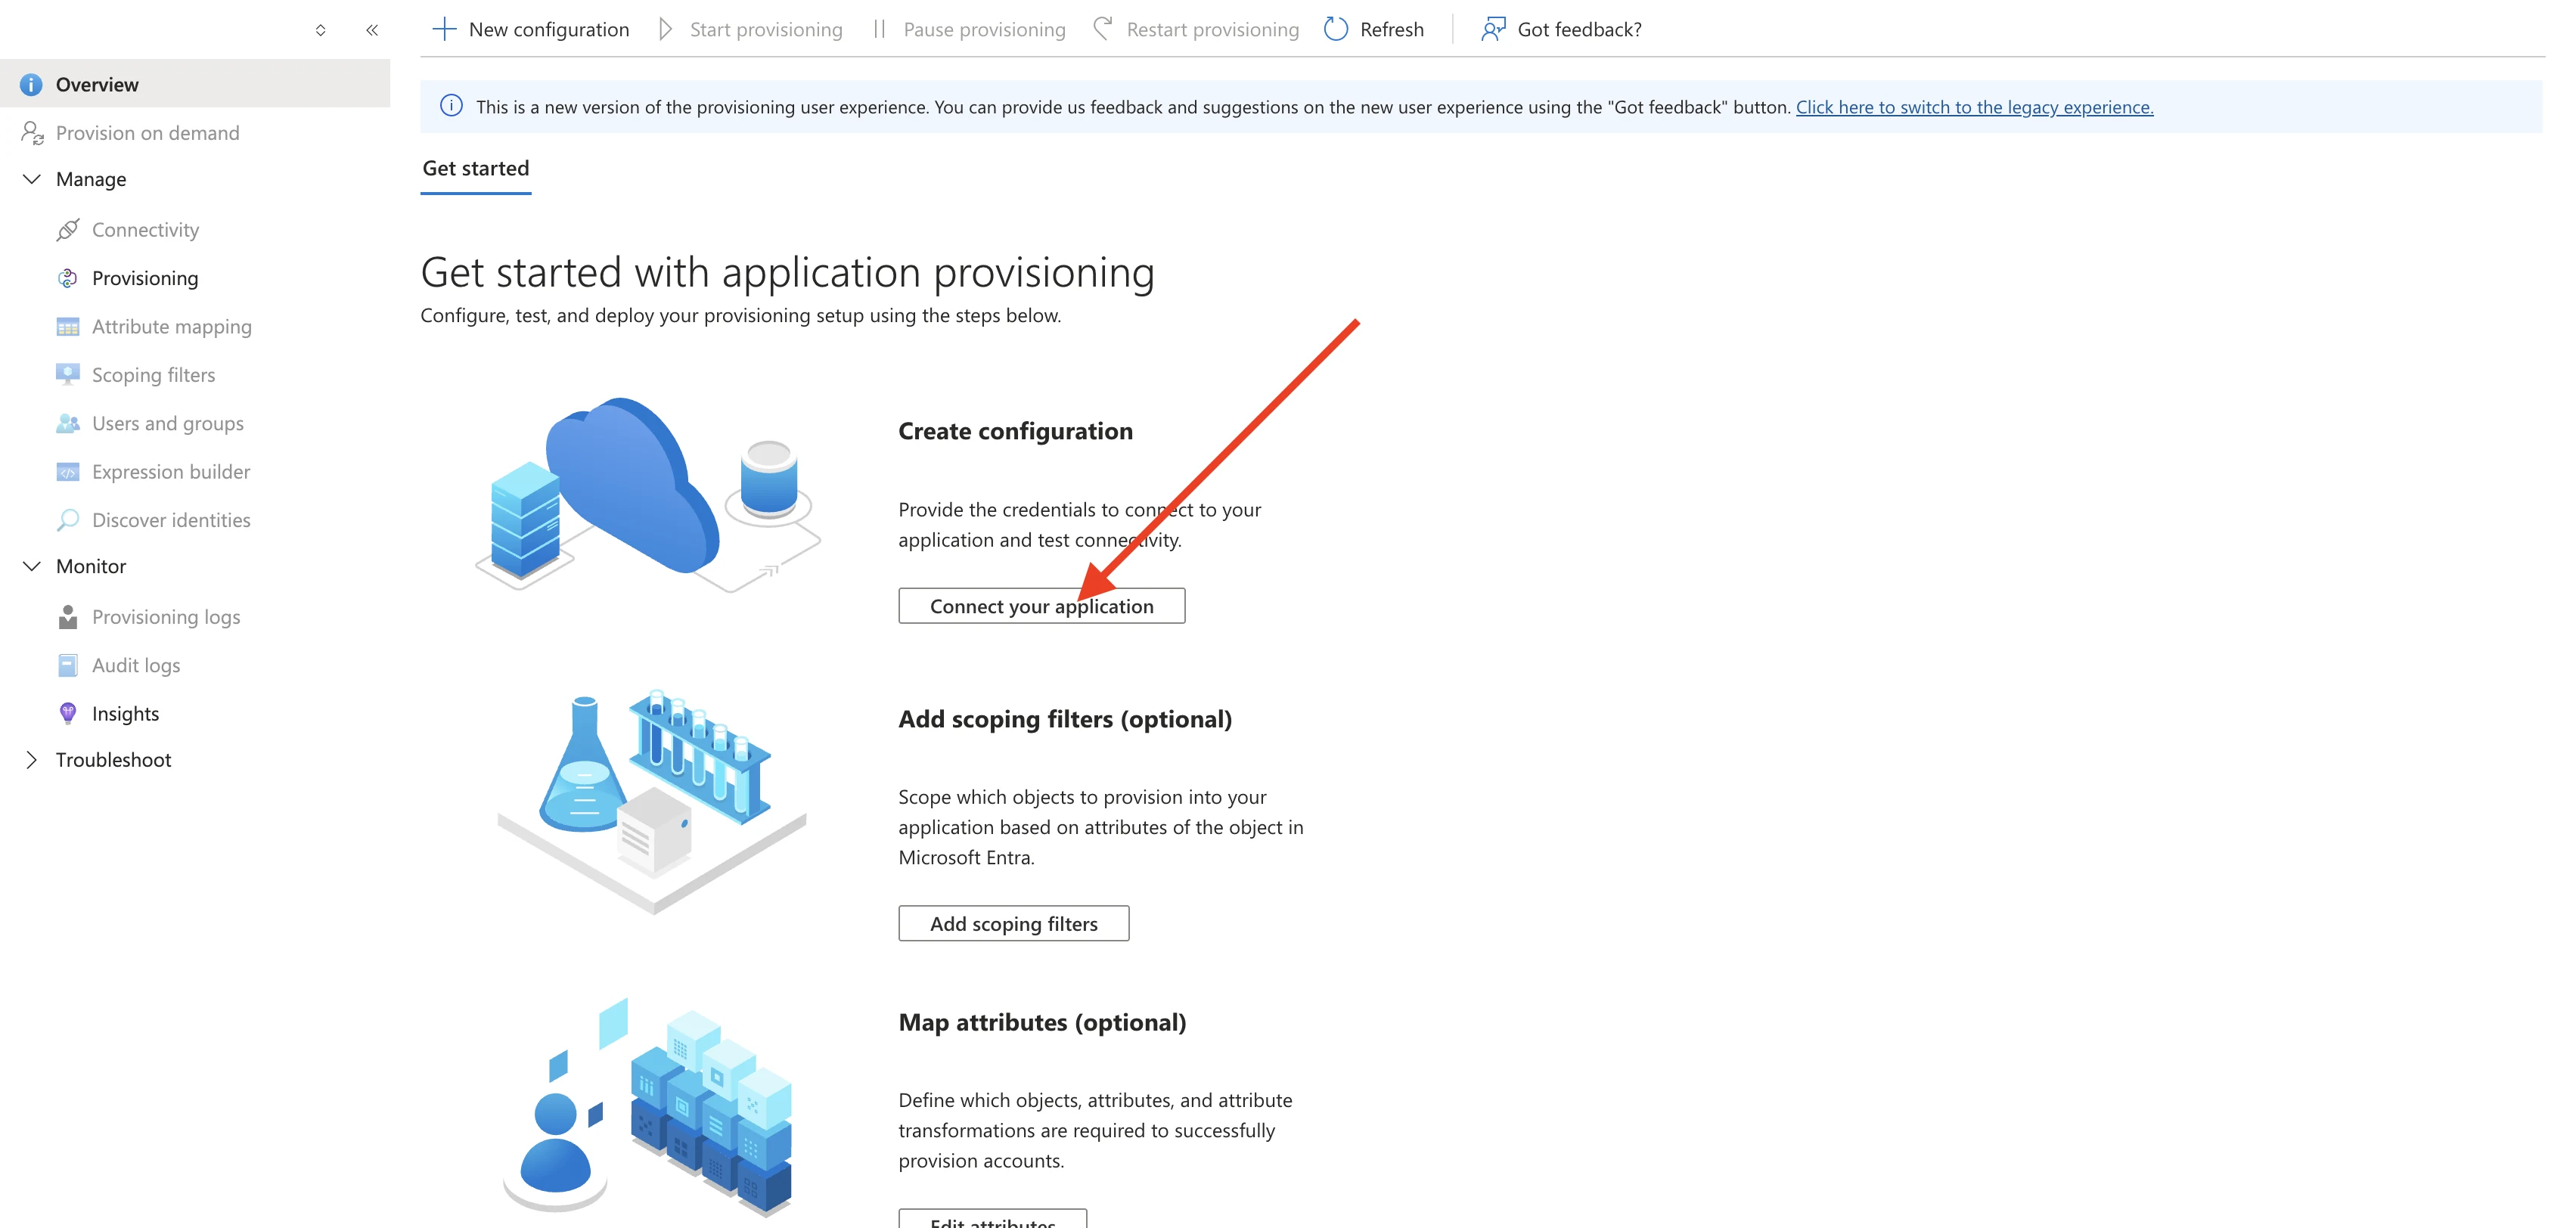
- On New provisioning configuration, fill in the Admin credentials:
- Select authentication method: Bearer authentication
- Tenant URL:
https://api.abacus.ai/scim/v2 - Secret token: the bearer token from Step 1.
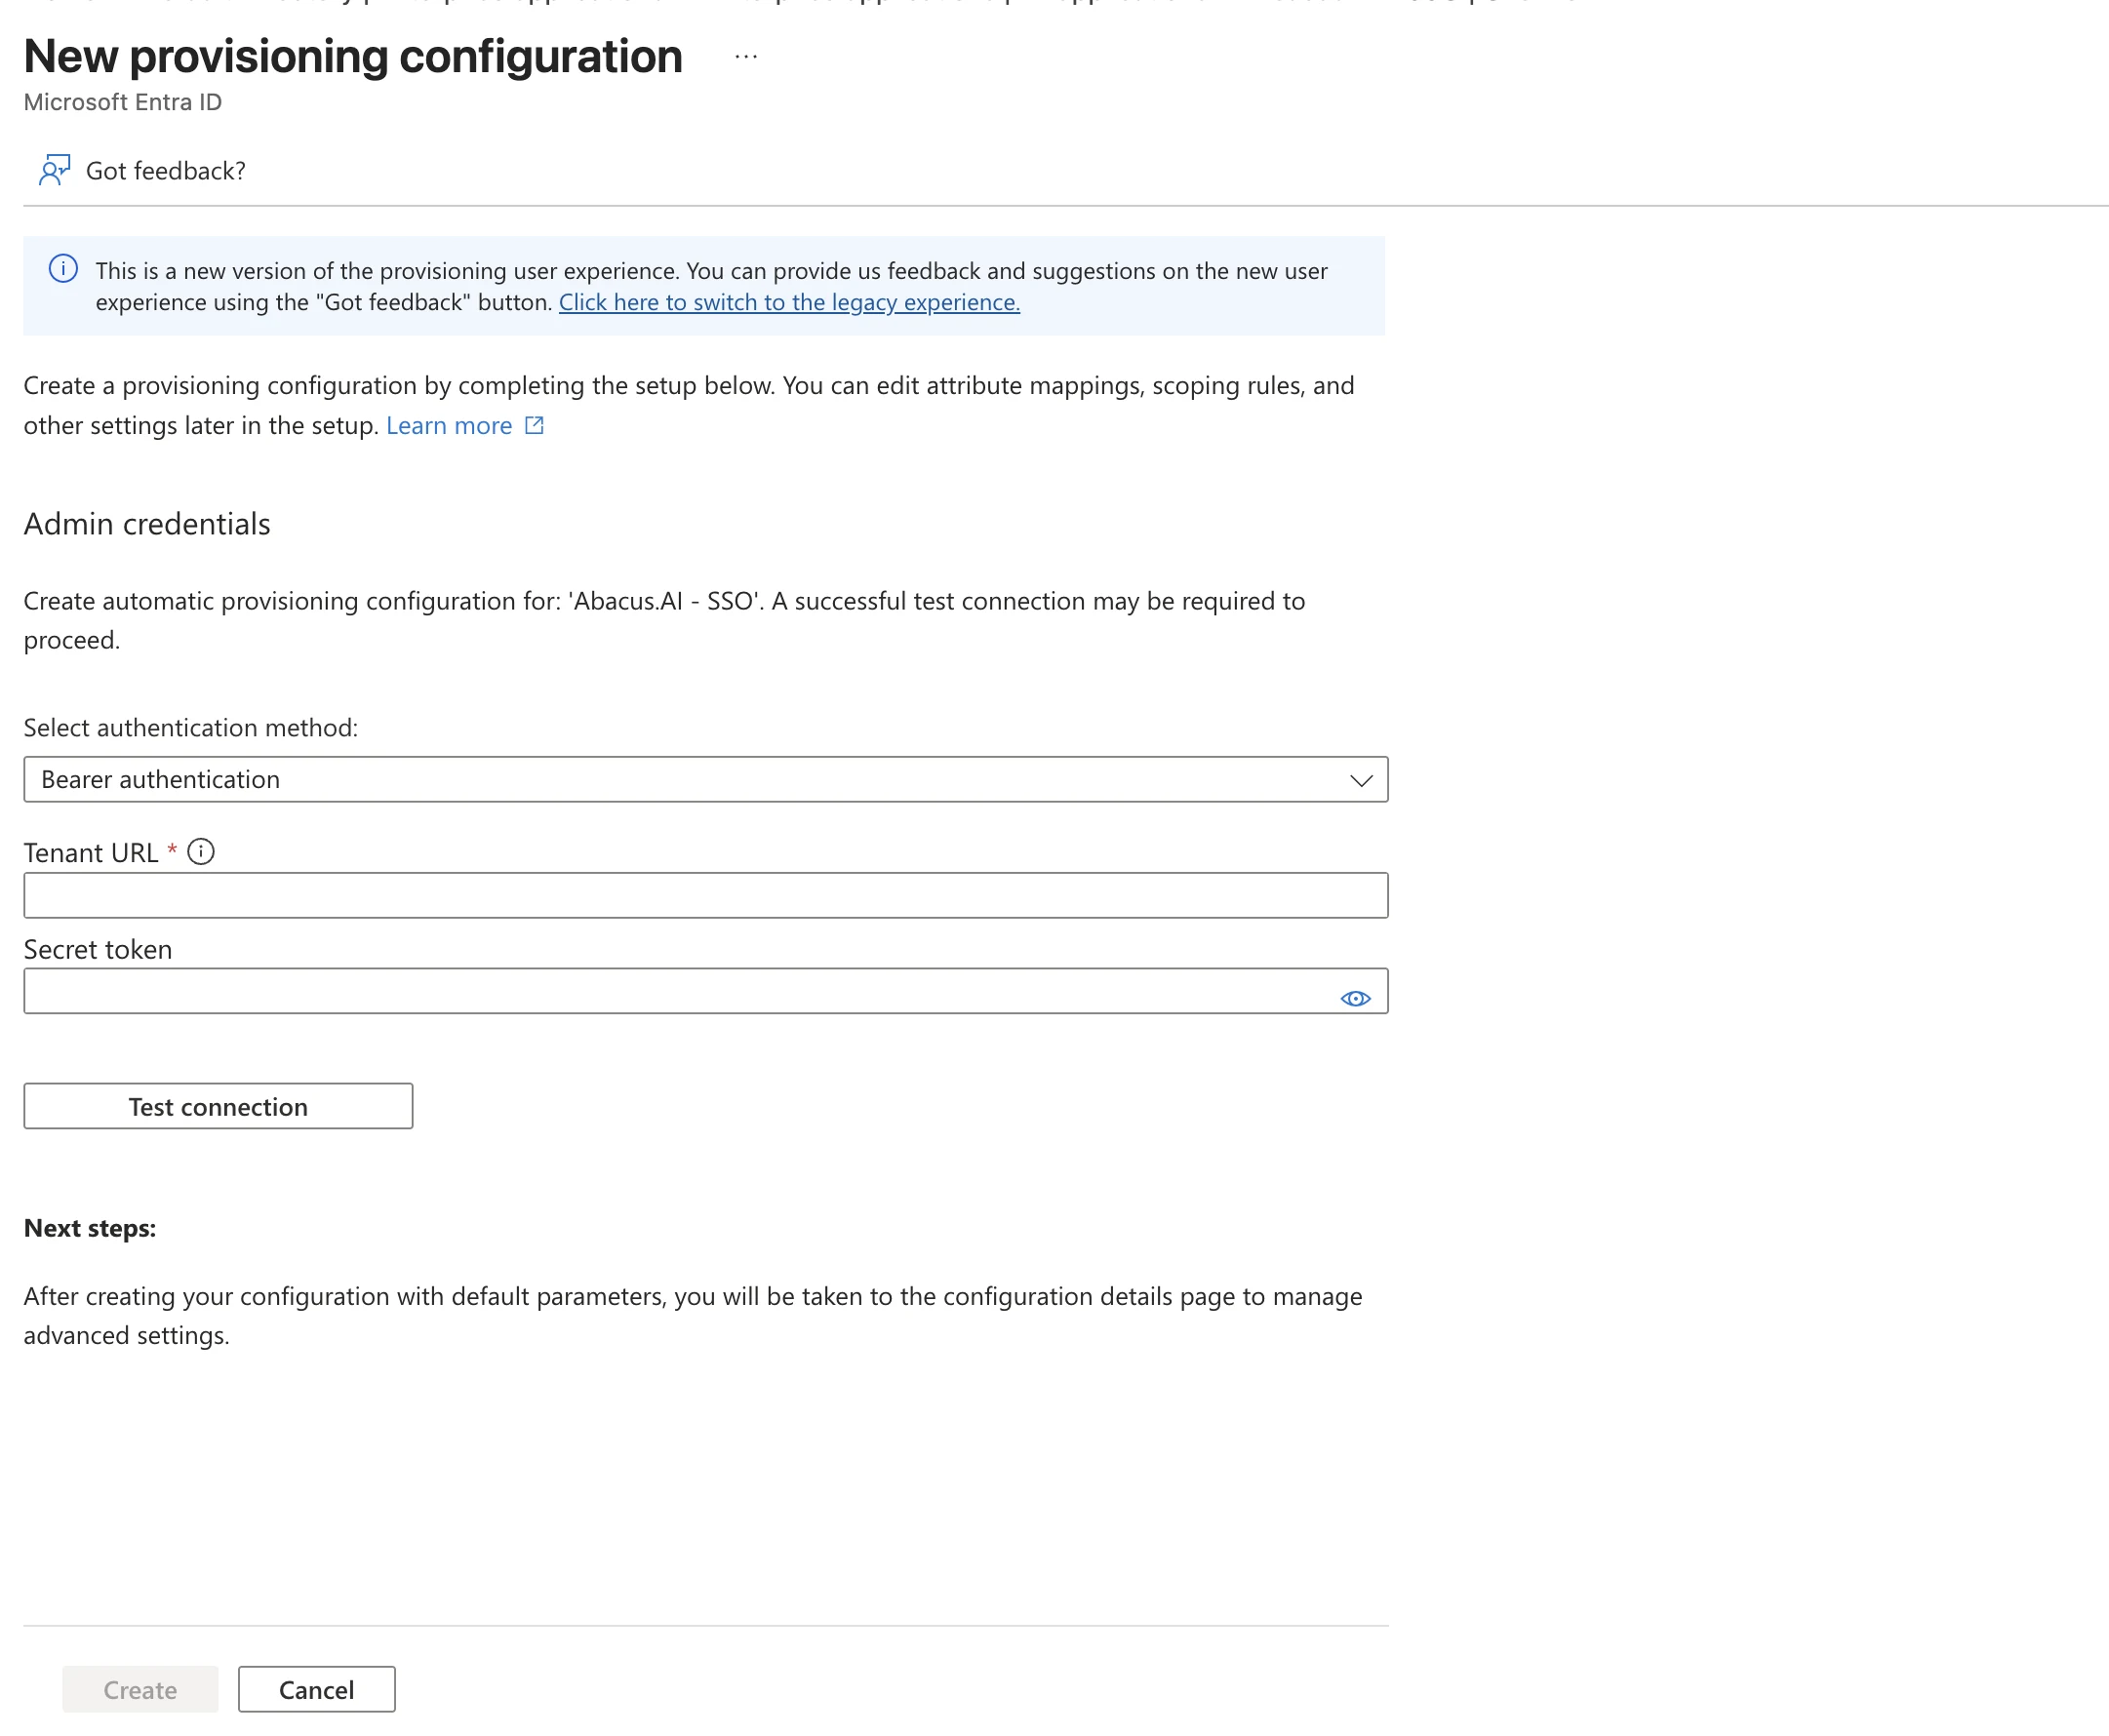
- Click Test connection. Entra performs a
GET /ServiceProviderConfigand a filtered user lookup; both must succeed before you can continue. - Click Create (older blades: Save). Entra creates the configuration with default settings and opens the configuration details page.
- Open Attribute mapping and review what Entra sends on the Users and Groups tabs (see Attribute mapping):
- On the Users tab, confirm the
userNametarget attribute is sourced fromuserPrincipalNameormail. Abacus.AI identifies users by email address, so this must resolve to the user's real email. - On the Groups tab, keep the group mappings in place if you want group-based role assignment.
- Target attributes are listed against
customappsso. That is Entra's generic SCIM target schema, not an Abacus.AI-specific one — no change is needed.
- On the Users tab, confirm the
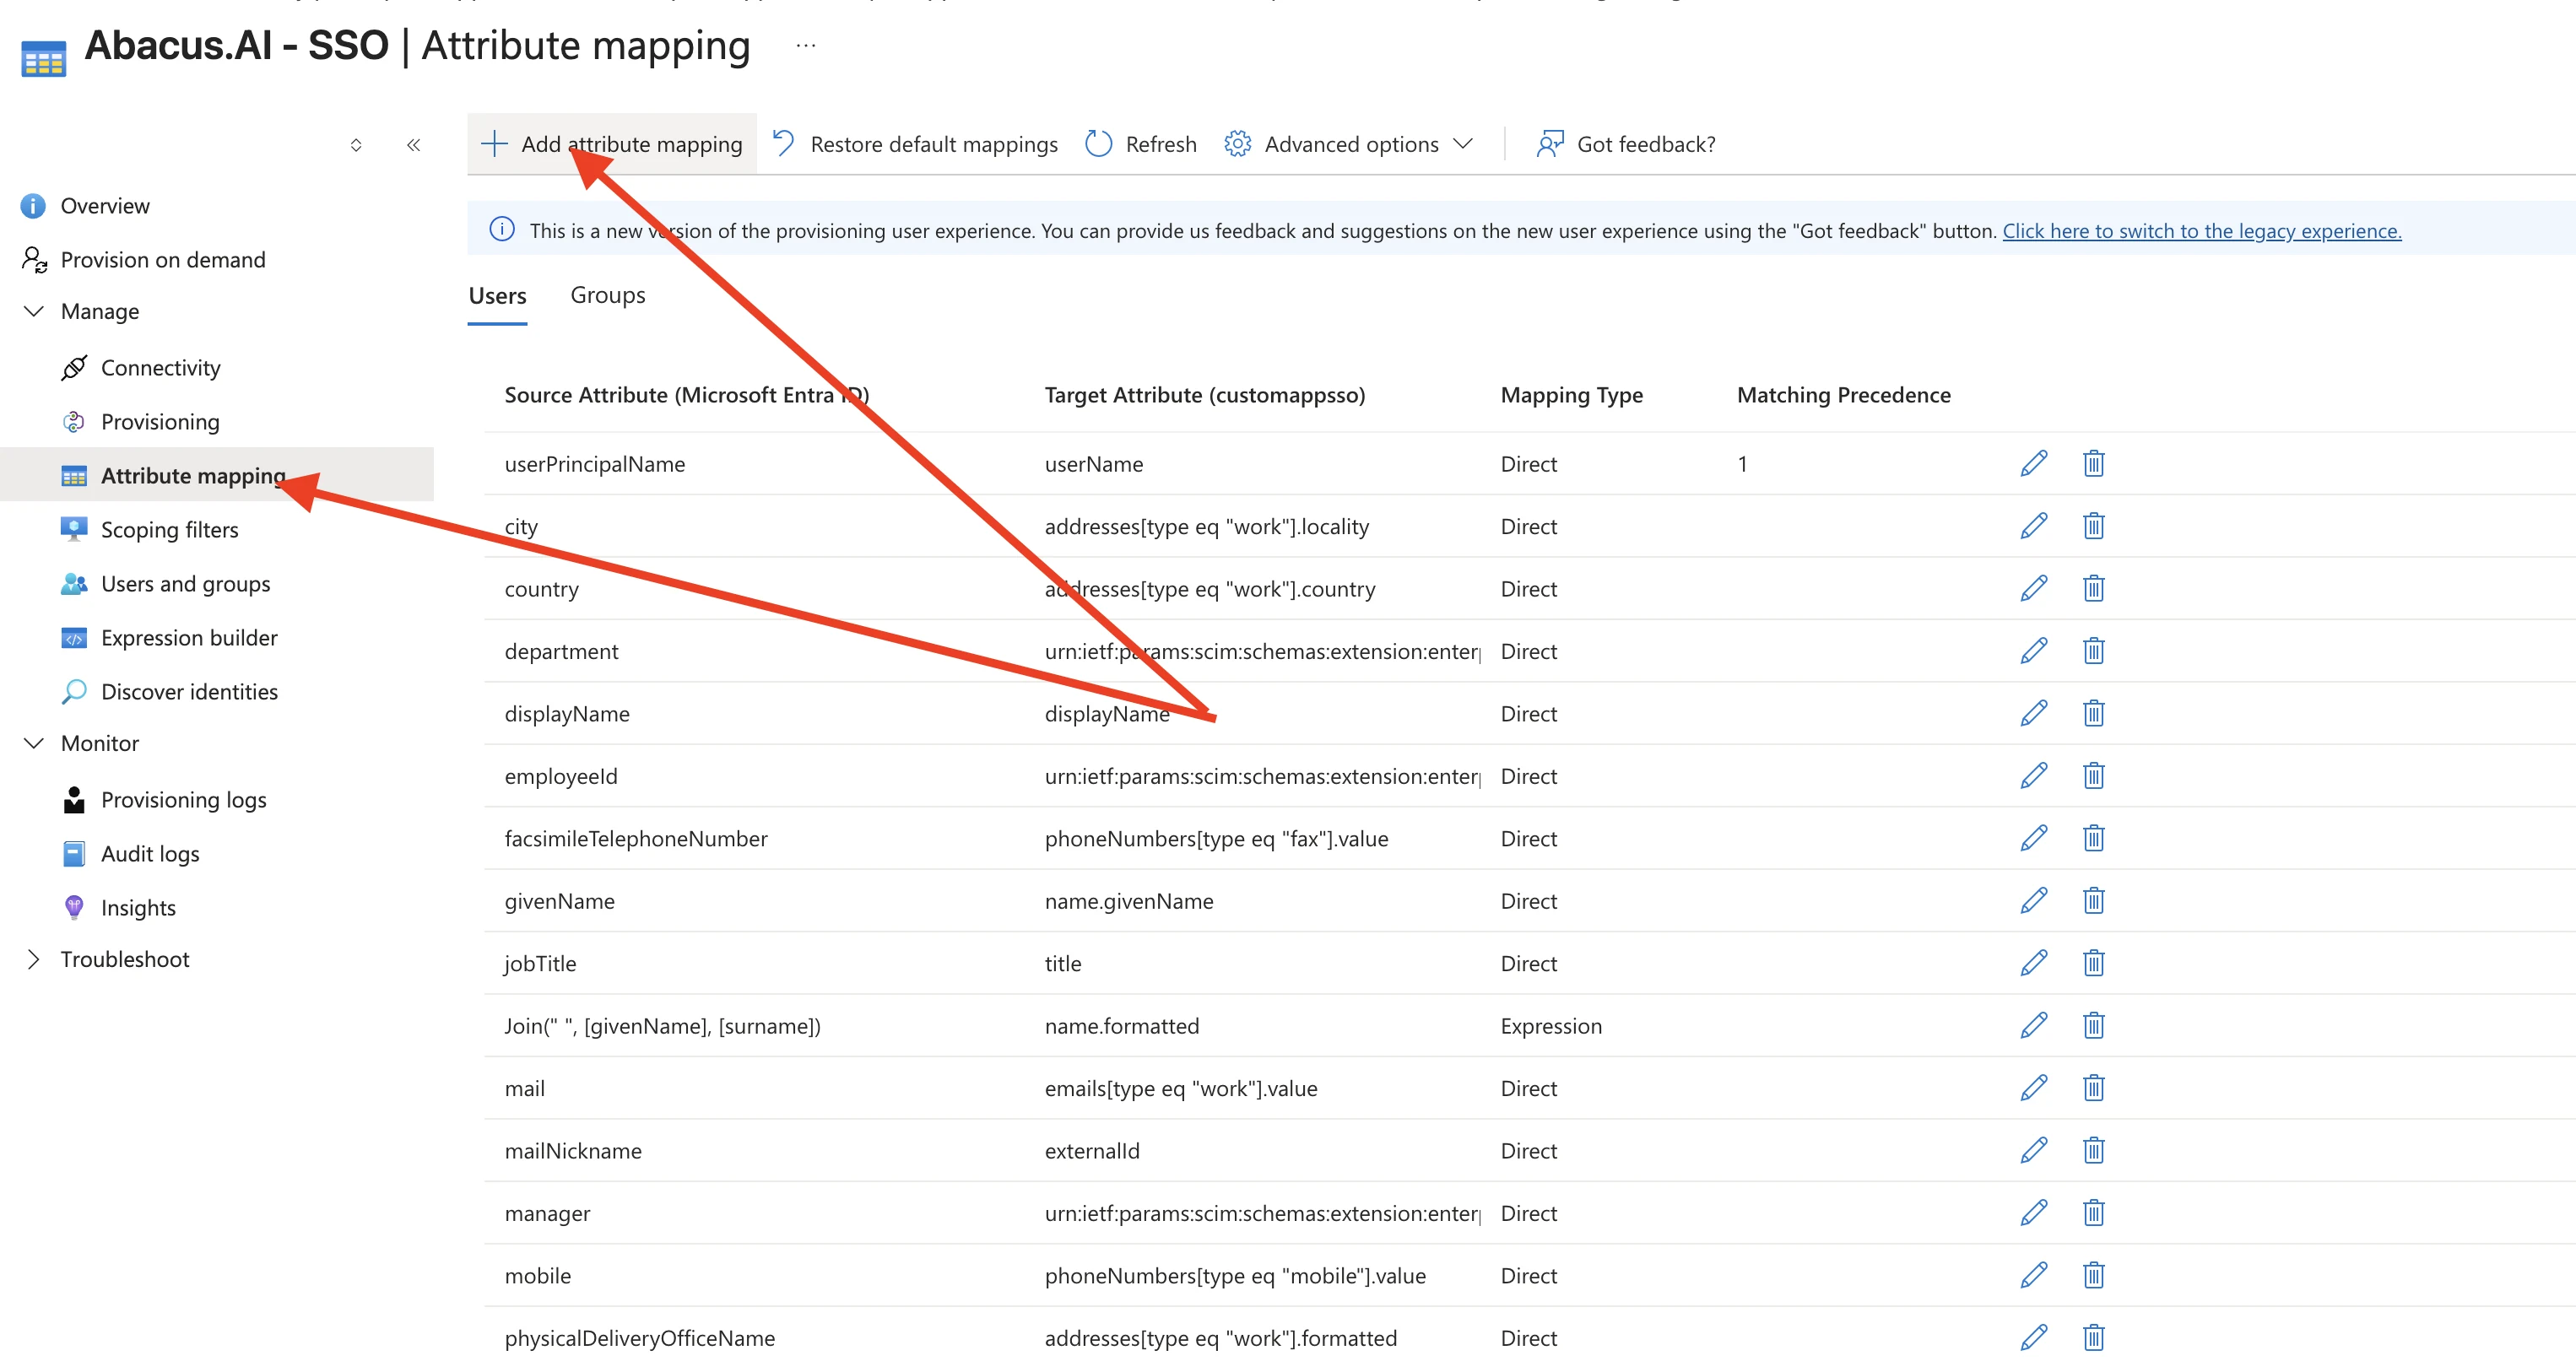
- Go to Users and groups and assign the users and groups that should exist in Abacus.AI. Only assigned objects are provisioned. With OIDC sign-in, assign the same objects here that are assigned to your OIDC application.
- Back on Provisioning, set Provisioning Status to On and click Save to start the first cycle.
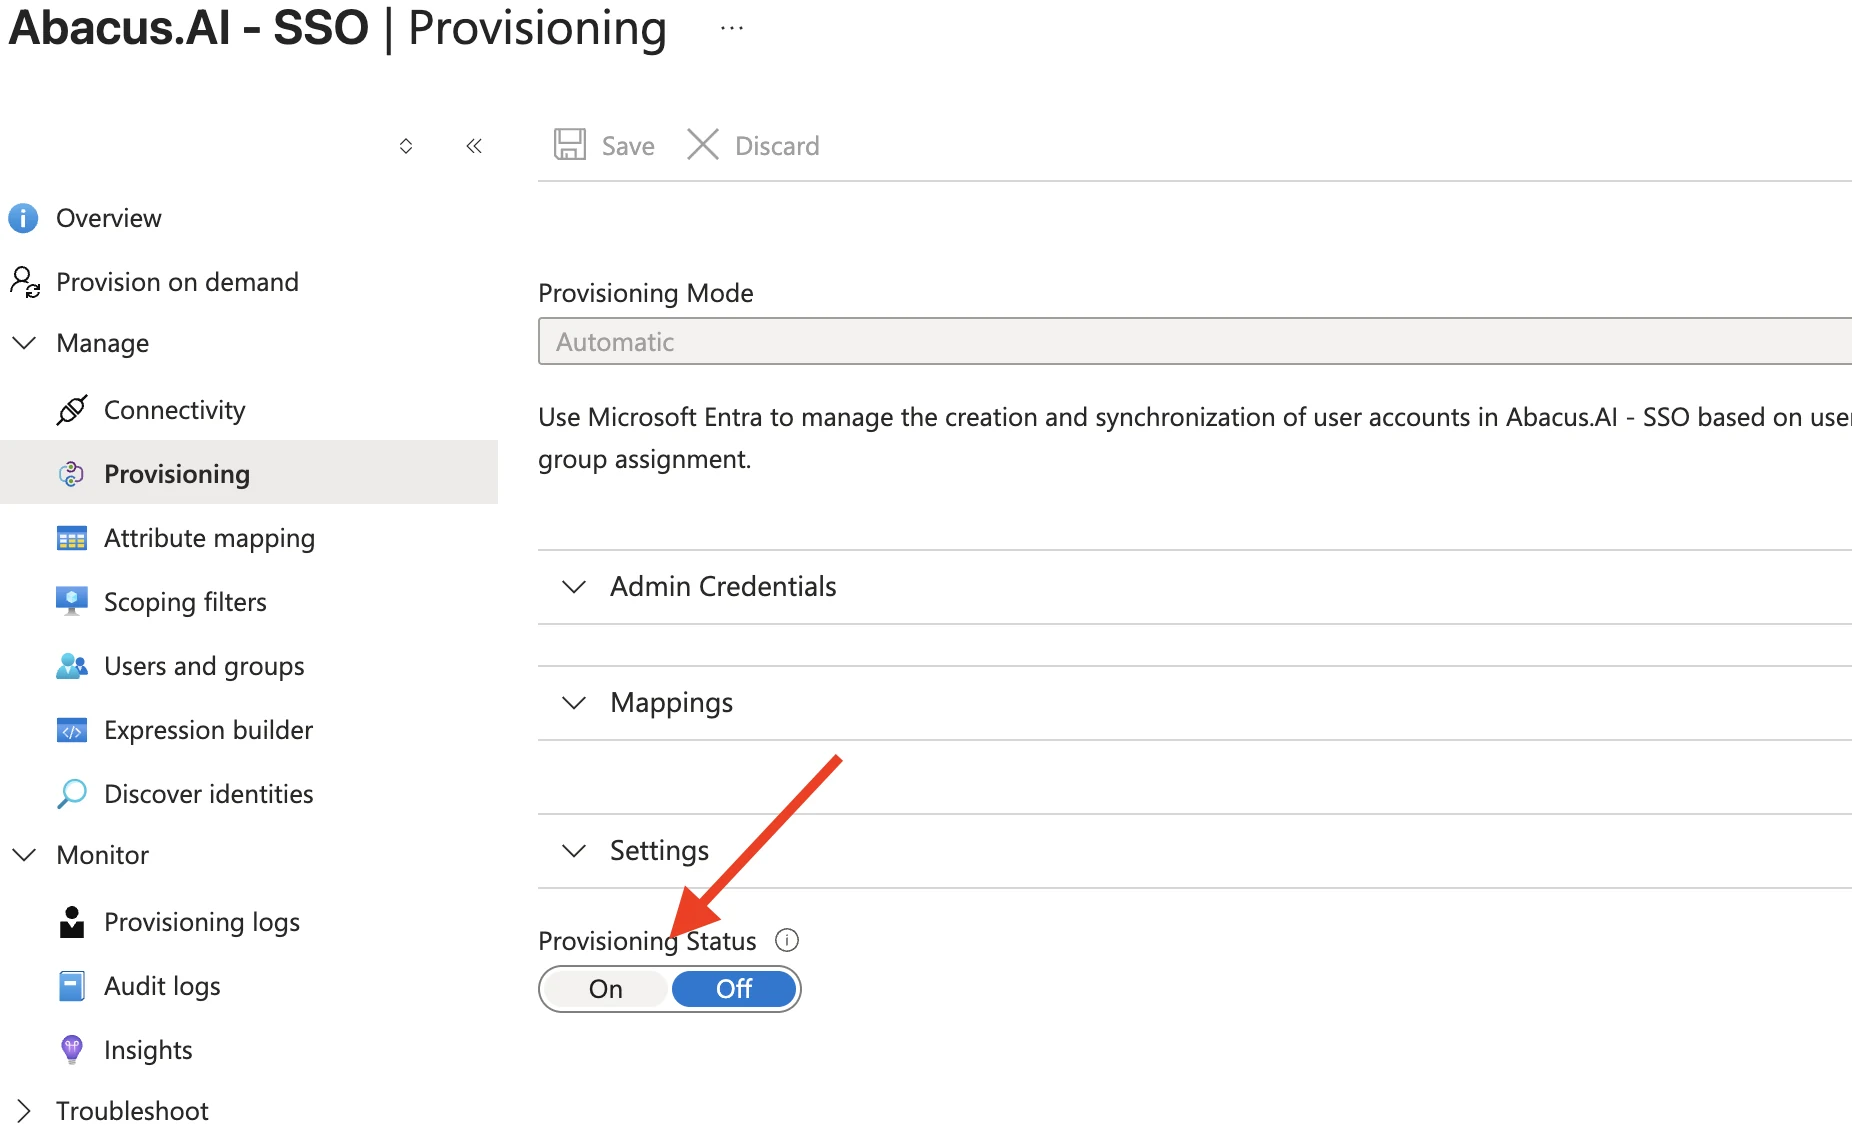
Leave Provisioning Status set to Off until the connection test passes and the attribute mappings look right. Use Provision on demand to push a single test user first, then turn the status on — that starts the initial cycle, which walks every assigned user.
Optional: assign Abacus.AI roles from Entra app roles
Instead of (or in addition to) group-based mapping, you can drive a user's Abacus.AI role from the app role they are assigned in Entra. Entra carries app role assignments on the SCIM roles attribute, and Abacus.AI resolves that value through the same group and role mappings table.
-
Create the app roles you want to use on the application that hosts provisioning, and assign them to users under Users and groups. Entra only sends the app role assignments of that application, so with OIDC sign-in the roles must live on the SCIM-only application you created above, not on the OIDC sign-in application. If you already created the custom roles from the Microsoft Entra SAML guide, reuse those exact names so a single role drives both sign-in and SCIM provisioning:
Entra app role Abacus.AI role to map it to abacusai_adminAdmin abacusai_platform_userPlatform abacusai_app_only_userApp only abacusai_chat_userChat only — no mapping row needed, this is the default These names are not built in: each one you want to grant needs a row in Group Role Mappings with the role from the table above.
-
Go to Attribute mapping → Users tab → Add attribute mapping (older blades: Provision Microsoft Entra ID Users → Add New Mapping), and configure:
- Mapping type:
Expression - Expression:
SingleAppRoleAssignment([appRoleAssignments]) - Default value (if null): optional — a placeholder such as
abacusai_chat_userfor users who have no app role assigned - Target attribute:
roles[primary eq "True"].value - Apply this mapping:
Always - Match objects using this attribute: leave unchecked — roles are not an identity key
- Mapping type:
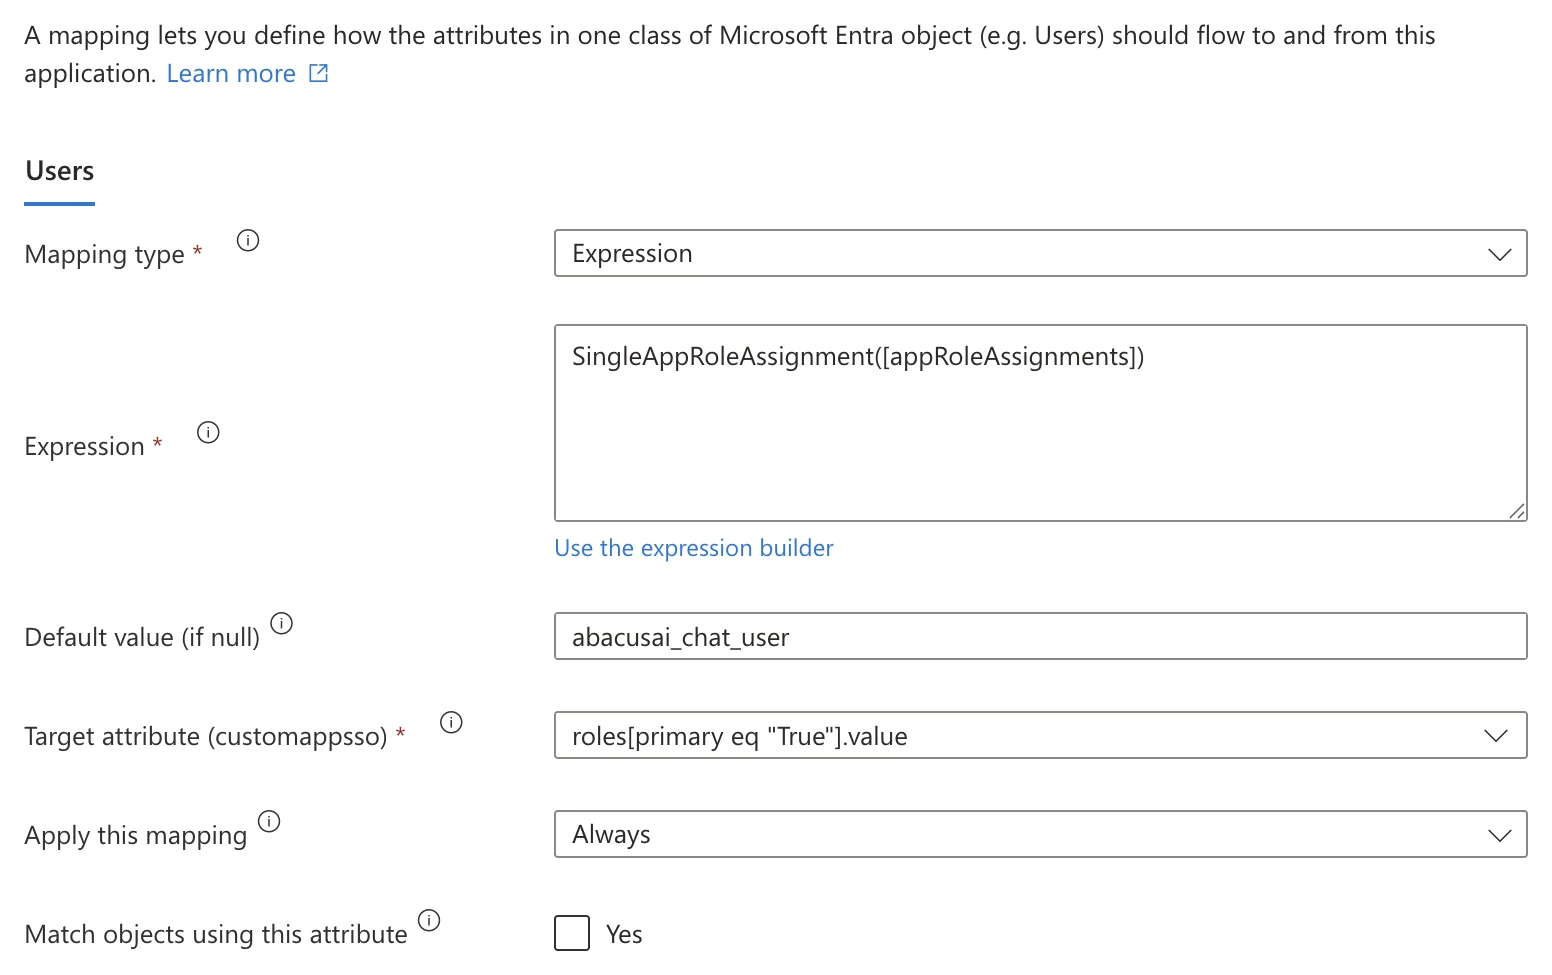
- Save the mapping, then use Provision on demand on a test user to confirm the role is sent.
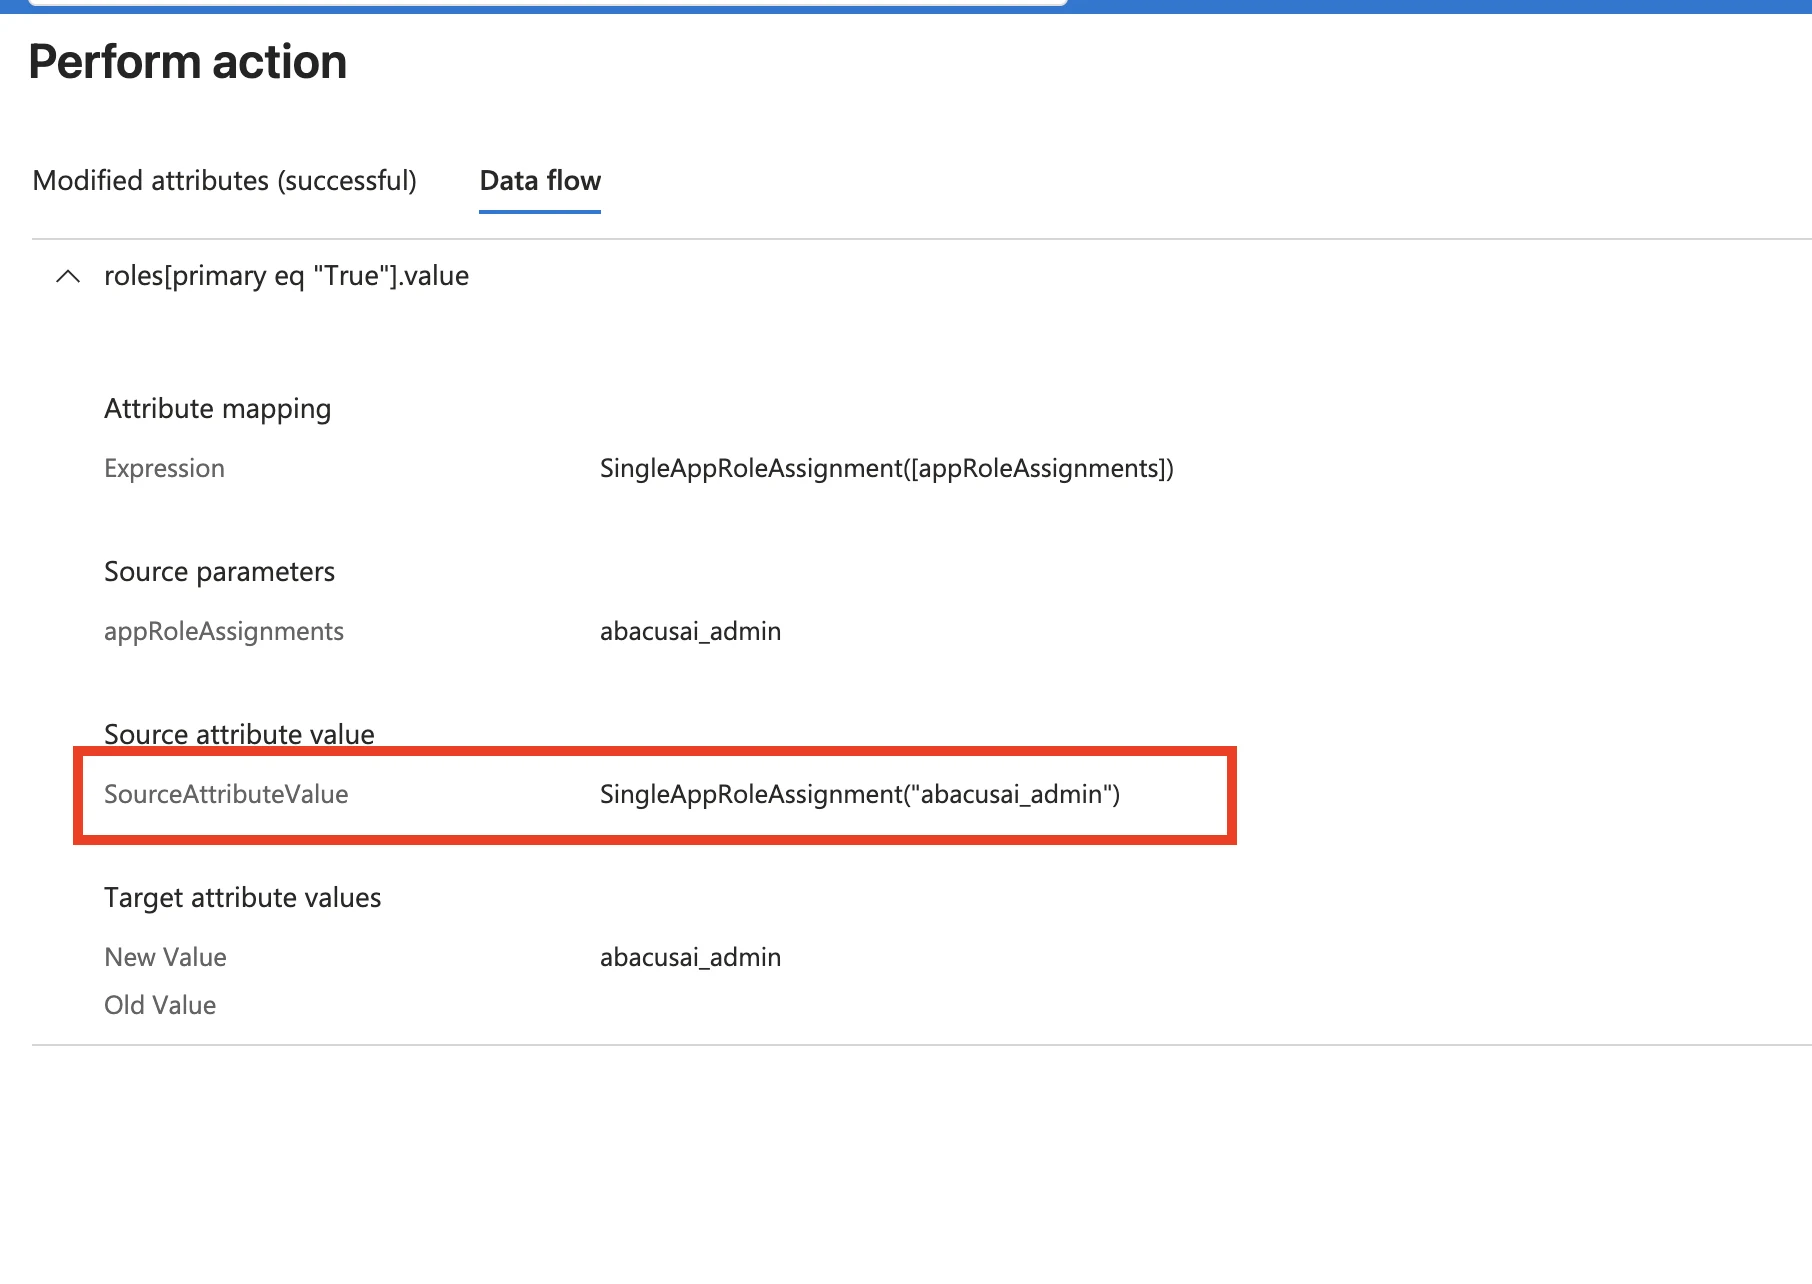
The provisioning log's Data flow view (above) shows the resolved value — here the app role abacusai_admin is sent as roles[primary eq "True"].value. Whatever value appears there is the key Abacus.AI looks up, so it must exactly match a row in Group Role Mappings.
SingleAppRoleAssignment sends one role per user. If a user holds several app roles, Entra picks one of them and warns in the provisioning log. To send every app role a user holds, use multiple app roles per user instead.
Default value (if null) only fills in for users who have no app role assigned. It does not have to be a real mapping key: a value that matches no row in Group Role Mappings simply leaves the user on the default chat-only role. That is why chat-only has no mapping key of its own — it is what an unmapped user already gets.
Multiple app roles per user
Abacus.AI accepts roles as a multi-valued attribute, so a user can be assigned several app roles in Entra and all of them are sent. Every role value is looked up in Group Role Mappings and the user gets the highest role that matches, together with any group-based mappings. A user who holds abacusai_app_only_user and abacusai_platform_user, for example, becomes Platform.
Entra's default target schema only lists the single-valued roles[primary eq "True"].value, so first add a multi-valued roles attribute, then map it:
- Create the app roles on the application that hosts provisioning, as in step 1 above, and assign each user every role they should hold under Users and groups. Each assignment is one user–role pair, so add the same user once per role.
- Go to Attribute mapping → Users tab. Under Advanced options, select Edit target User attributes (older blades: tick Show advanced options → Edit attribute list for customappsso).
- At the bottom of the list, add an attribute and save:
- Name:
roles - Type:
String - Multi-Value?: checked
- Name:
- Back on the Users tab, delete the existing mapping that targets
roles[primary eq "True"].value, if you created one above. Keeping both lets the single-role mapping overwrite the list with one role. - Click Add attribute mapping and configure:
- Mapping type:
Expression - Expression:
AssertiveAppRoleAssignmentsComplex([appRoleAssignments]) - Target attribute:
roles - Apply this mapping:
Always - Match objects using this attribute: leave unchecked
- Mapping type:
- Save, then use Provision on demand on a test user who holds two app roles. The request should carry a
roleslist with one entry per role, each with its app role value invalue.
If Edit target User attributes is missing, open the Entra admin portal through https://portal.azure.com/?Microsoft_AAD_Connect_Provisioning_forceSchemaEditorEnabled=true to enable the schema editor, then return to the application's Attribute mapping page.
Use AssertiveAppRoleAssignmentsComplex, not AppRoleAssignmentsComplex. The assertive form sends the user's complete role list on every update, so a role you unassign in Entra is removed in Abacus.AI too. AppRoleAssignmentsComplex only ever adds roles and never sends removals, so an unassigned role, and the access it grants, stays in place.
Both expressions apply only to users and groups assigned to the application; neither works with the Sync all users and groups scope.
Entra's initial cycle can take up to 40 minutes; subsequent incremental cycles run about every 40 minutes. Use Provision on demand to test a single user immediately.
Okta SAML
If you sign in with Okta SAML, configure SCIM from the same Okta application you created for SAML SSO — no second application is needed.
- In the Okta Admin Console, open Applications → your Abacus.AI SAML application.
- On the General tab, click Edit next to App Settings, set Provisioning to SCIM, and save.
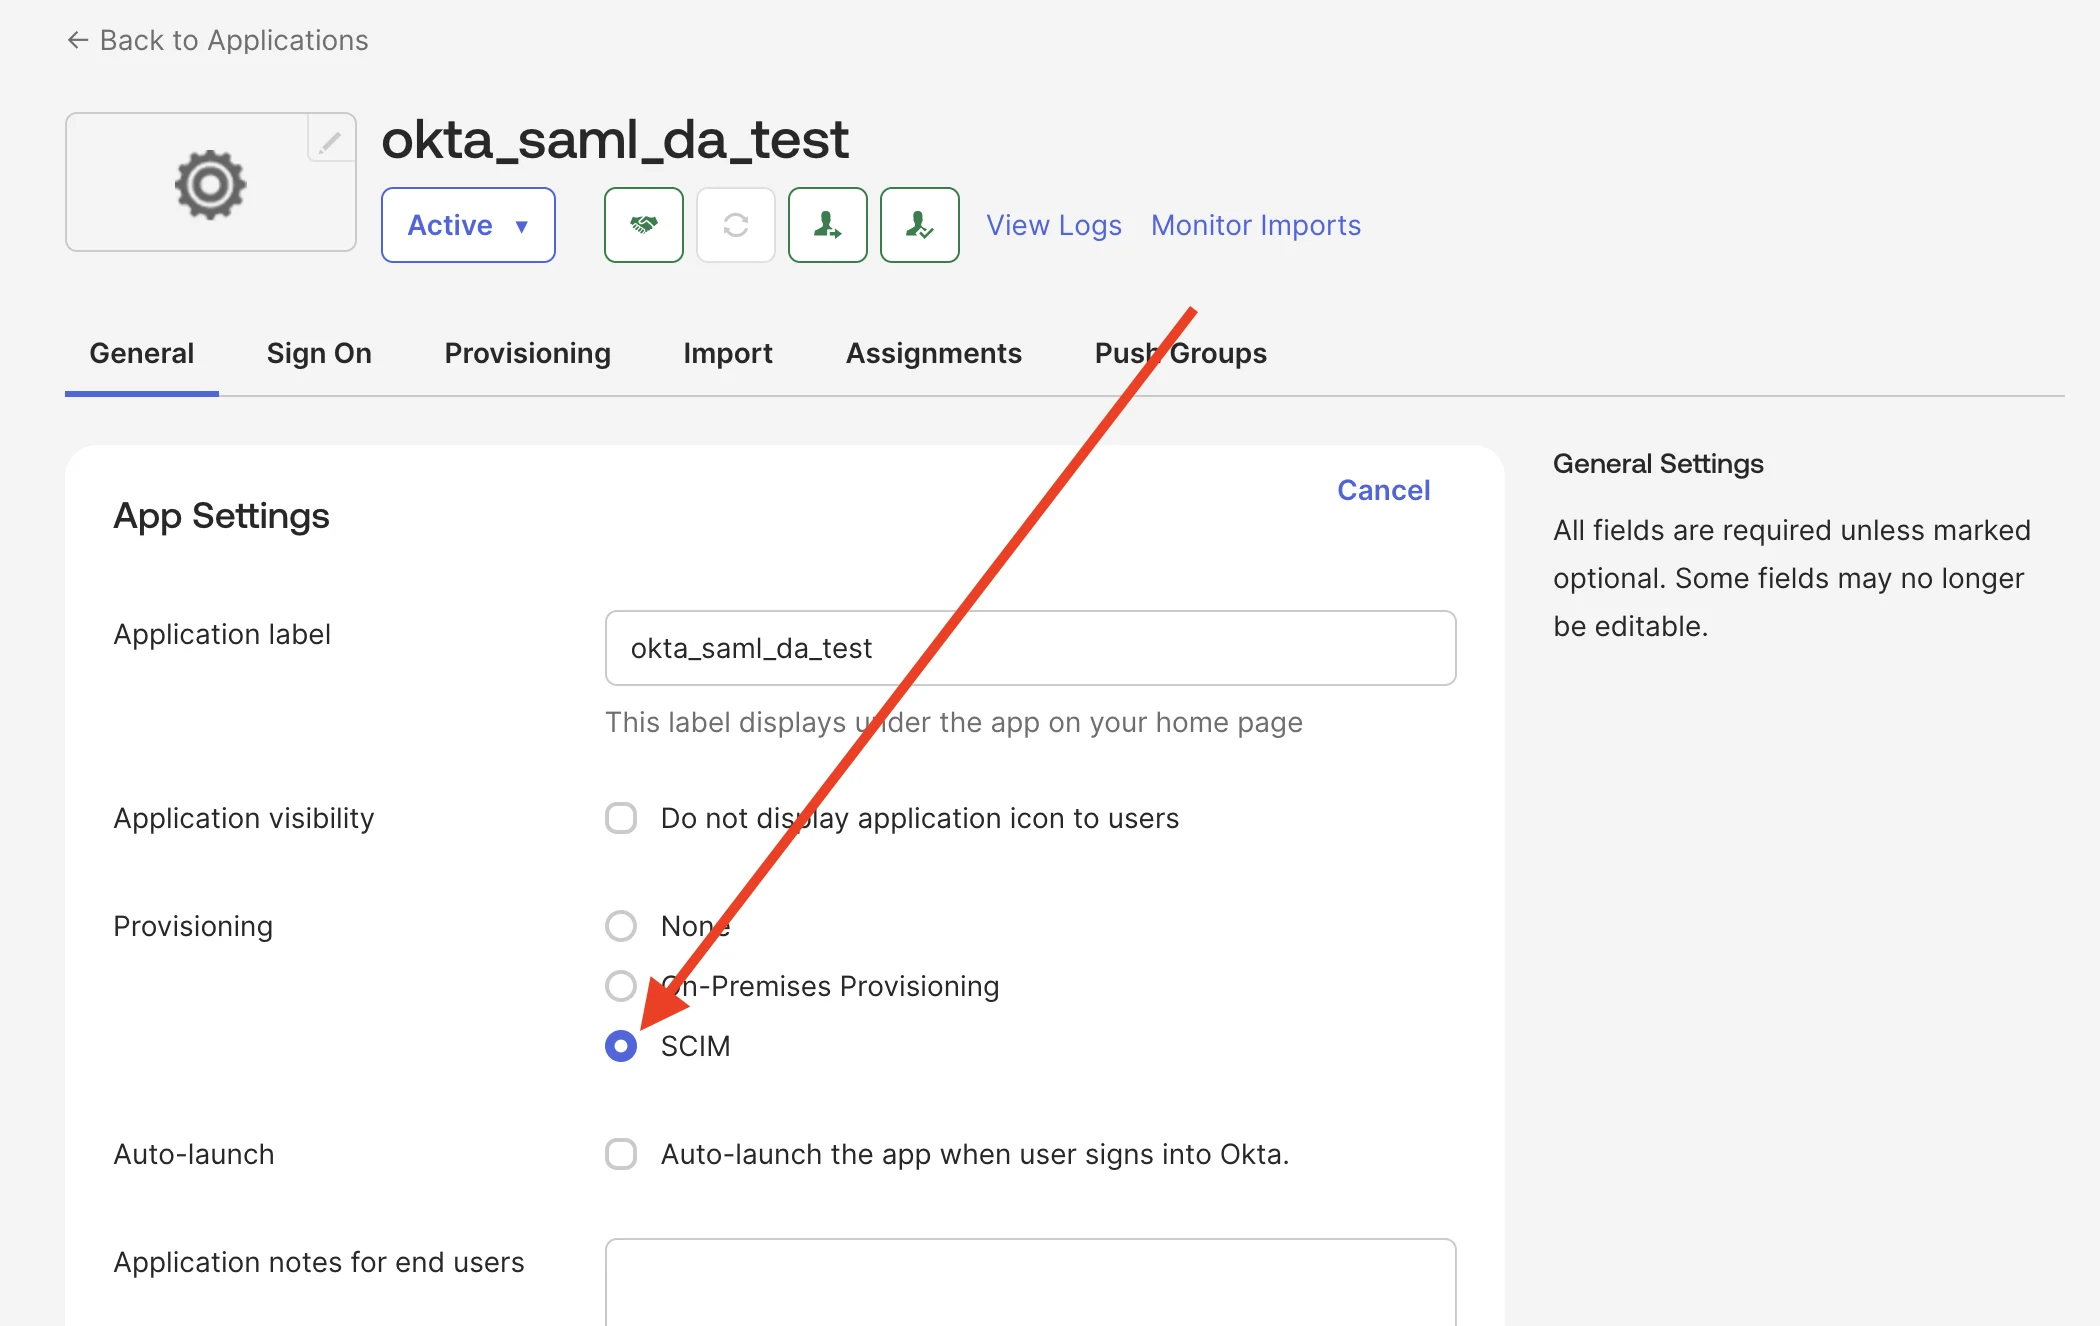
- A Provisioning tab now appears. Open it and click Edit under SCIM Connection, then set:
- SCIM connector base URL:
https://api.abacus.ai/scim/v2 - Unique identifier field for users:
user.email - Supported provisioning actions: enable Push New Users, Push Profile Updates, and Push Groups
- Authentication Mode: HTTP Header
- Authorization:
Bearer <token from Step 1>
- SCIM connector base URL:
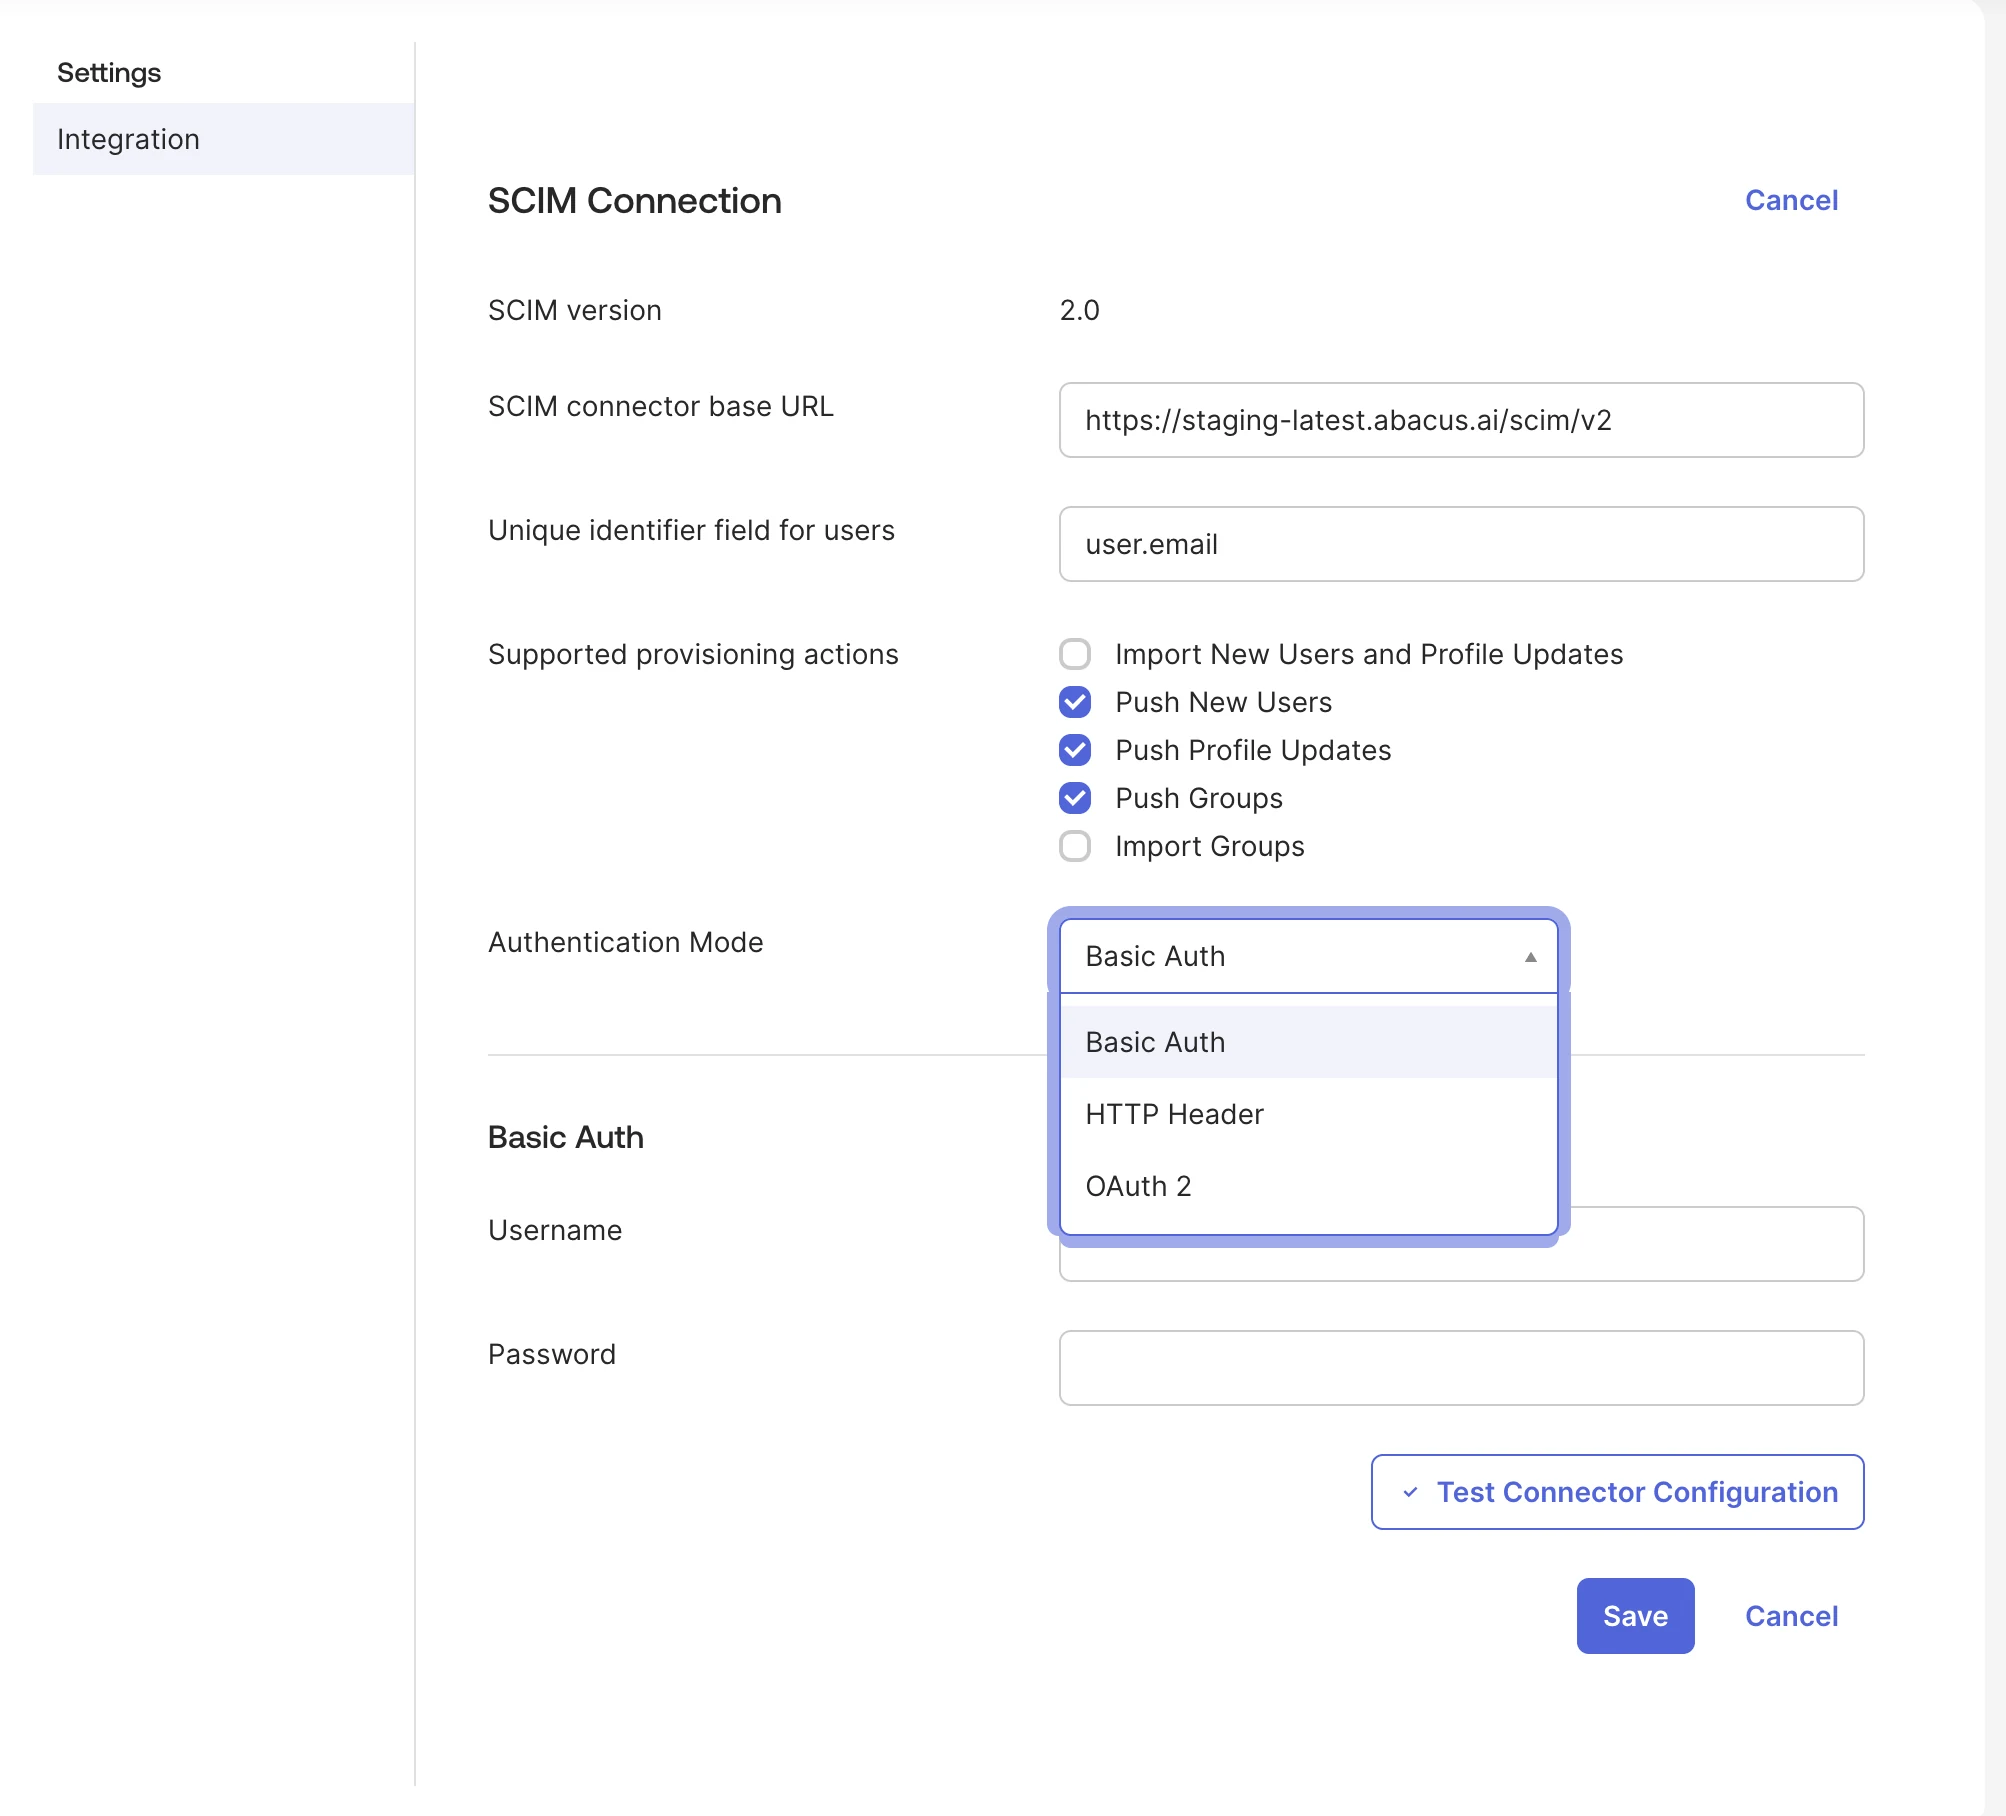
Use https://api.abacus.ai/scim/v2 as the base URL, even if the screenshot above shows a different value.
Choose HTTP Header in the Authentication Mode dropdown — not Basic Auth and not OAuth 2. Abacus.AI authenticates SCIM requests with the bearer token in the Authorization header, so the other two modes will fail the connector test.
-
Click Test Connector Configuration, then Save.
-
Under Provisioning → To App, click Edit and enable Create Users, Update User Attributes, and Deactivate Users.
-
Review the attribute mappings. Okta maps
userNametouser.emailby default with the settings above; keep it that way. -
Assign users and groups on the Assignments tab, and use the Push Groups tab to push the directory groups you want mirrored in Abacus.AI. If you already created the role-based groups from the Okta SAML guide, push those same groups so one group drives both SAML sign-in and SCIM provisioning:
Okta group Abacus.AI role to map it to abacusai_admin_roleAdmin abacusai_platform_user_rolePlatform abacusai_app_only_user_roleApp only abacusai_chat_user_roleChat only — no mapping row needed, this is the default Each group you want to grant needs a row in Group Role Mappings with the role from the table above. Okta's group push does not send a group ID, so use the group name exactly as it appears in Okta as the mapping key.
Email is the default and required attribute. Abacus.AI uses the SCIM userName as the user's email address and as the unique identity key, which is why Unique identifier field for users must be user.email and userName must be mapped to user.email. Mapping userName to an Okta login that is not an email address will cause users to be created with the wrong identity, or to fail to match their SSO login.
Okta may offer to sync passwords. Abacus.AI ignores any password sent over SCIM — sign-in is always handled by your IdP — so leaving password sync off is recommended.
Okta OIDC
Okta's OIDC / OAuth application type does not expose a Provisioning tab, so SCIM cannot be enabled on the app you use for OIDC sign-in. You need a separate Okta application dedicated to SCIM provisioning, alongside your existing OIDC application:
- Keep your existing OIDC application for sign-in exactly as described in the Okta guide. Do not change it.
- In the Okta Admin Console go to Applications → Browse App Catalog and add the SCIM 2.0 Test App (Header Auth) integration (or any custom app integration that supports SCIM with header authentication). Name it something clear, such as
Abacus.AI SCIM. - Open the new application's Provisioning tab → Integration → Edit, and fill in the same SCIM Connection settings shown in Okta SAML above:
- SCIM connector base URL:
https://api.abacus.ai/scim/v2 - Unique identifier field for users:
user.email - Supported provisioning actions: Push New Users, Push Profile Updates, Push Groups
- Authentication Mode: HTTP Header, Authorization:
Bearer <token from Step 1>
- SCIM connector base URL:
As with Okta SAML, the Authentication Mode must be HTTP Header — Basic Auth and OAuth 2 are not supported by the Abacus.AI SCIM endpoint.
- Click Test Connector Configuration, then Save.
- Under Provisioning → To App, enable Create Users, Update User Attributes, and Deactivate Users.
- Confirm that
userNamemaps touser.email. - Assign the same users and groups to this SCIM application that you assign to the OIDC sign-in application, and push groups from the Push Groups tab. Use the same role-based group names as Okta SAML above —
abacusai_admin_role,abacusai_platform_user_role,abacusai_app_only_user_role— and map them by name in Group Role Mappings.
Keep assignments on the two applications in sync. The OIDC application decides who can sign in; the SCIM application decides who exists in Abacus.AI and what role they get. A user assigned to only one of them will either be unable to sign in or will not be provisioned.
Generic SCIM 2.0
Any SCIM 2.0-compliant provisioning client can be used. Point it at:
- Base URL:
https://api.abacus.ai/scim/v2 - Authentication:
Authorization: Bearer <token>(OAuth bearer token) - Content type:
application/scim+json
The /ServiceProviderConfig, /ResourceTypes, and /Schemas endpoints describe exactly what is supported and can be used for discovery.
Attribute mapping
User attributes
| SCIM attribute | Required | How Abacus.AI uses it | Typical IdP source |
|---|---|---|---|
userName | Yes | The user's email address and unique identity in Abacus.AI | Entra: user.mail / user.userPrincipalName · Okta: user.email |
active | No | false deactivates the user and removes them from the organization | Entra: Not([IsSoftDeleted]) · Okta: managed by Okta lifecycle |
displayName | No | Display name shown in Abacus.AI | Entra: user.displayName · Okta: user.displayName |
name.givenName | No | Used to derive the display name when displayName is absent | user.givenName / user.firstName |
name.familyName | No | Used to derive the display name when displayName is absent | user.surname / user.lastName |
emails[].value | No | Echoed back on the user resource; the primary email is userName | user.mail / user.email |
externalId | No | Stable IdP identifier, used to re-link a user if their email changes | user.objectId / user.id |
roles[].value | No | Every value is matched against your group and role mappings; the highest match is granted | Entra, one role: SingleAppRoleAssignment([appRoleAssignments]) → roles[primary eq "True"].value · Entra, several roles: AssertiveAppRoleAssignmentsComplex([appRoleAssignments]) → roles |
Notes:
passwordis always ignored. Authentication is handled by SSO.- Boolean values sent as the strings
"True"/"False"(as Entra sometimes does) are accepted. - If a user already exists in Abacus.AI with the same email, SCIM links to that existing account instead of creating a duplicate.
Group attributes
| SCIM attribute | Required | How Abacus.AI uses it |
|---|---|---|
displayName | Yes | The Abacus.AI group name |
externalId | No | Stable IdP group identifier, used to re-link a group if it is renamed |
members[].value | No | The SCIM user IDs of group members |
Groups created through SCIM are marked as SCIM-managed in Abacus.AI. If your IdP does not send externalId for groups (Okta group push does not), Abacus.AI matches the existing group by name instead, so re-pushing a group does not create duplicates.
Group and role mapping
Abacus.AI decides a user's role from group role mappings: a list of entries that pair an identity from your IdP with an Abacus.AI role. Manage them under Profile → SCIM Provisioning → Group Role Mappings.
The mapping key
Each mapping key can be any one of the following, so it works with every provider:
- the group ID (
externalId) sent by your IdP, - the group display name (matched case-insensitively — use this with Okta, which does not send group IDs), or
- an app role value sent on the user's
rolesattribute (used by Microsoft Entra app role assignments).
The four Abacus.AI roles you can map to are Admin, Platform, App only, and Chat only.
Names that need no mapping at all
If you are creating groups or app roles from scratch, name them exactly as below and platform and app-only access work with no manual mapping — new SCIM configurations start with those two rows already in place:
| Group / app role name | Abacus.AI role | Created automatically? |
|---|---|---|
abacus_platform | Platform — full platform and chat access | Yes, seeded when you enable SCIM |
abacus_app_only | App only — restricted to apps | Yes, seeded when you enable SCIM |
abacus_admin | Admin — organization administrator | No — add it with Add Recommended |
| no name needed | Chat only — the default for anyone SCIM provisions | Not applicable — this is what an unmapped user gets |
Chat only is the baseline. Every provisioned user starts there, so you never need a group, app role, or mapping row to grant it. Mappings only ever raise a user above chat-only access.
Admin can be mapped like any other role — it is just not seeded for you. abacus_admin is offered as a recommended name, but Abacus.AI never creates that row automatically, because granting organization admin from your directory is a significant privilege. Click Add Recommended to insert it, or Add Mapping to map a key of your own to Admin, then Save Mappings. Deleting that row is what revokes the ability of your IdP to make organization admins.
Reusing the roles and groups you created for SAML
If you already configured SAML SSO, your directory already has role names — reuse them instead of renaming anything. They are not built-in keys, so add one row per name under Group Role Mappings:
| Identity provider | Name in your directory | Abacus.AI role |
|---|---|---|
| Microsoft Entra ID — app role, from the Entra SAML guide | abacusai_admin | Admin |
abacusai_platform_user | Platform | |
abacusai_app_only_user | App only | |
abacusai_chat_user | Chat only — no mapping row needed, this is the default | |
| Okta — pushed group, from the Okta SAML guide | abacusai_admin_role | Admin |
abacusai_platform_user_role | Platform | |
abacusai_app_only_user_role | App only | |
abacusai_chat_user_role | Chat only — no mapping row needed, this is the default |
Adding a row for the chat-only names is harmless, it just changes nothing: Chat only is what an unmapped user already gets.
The same names work for OIDC sign-in, except that both providers push them from a separate SCIM-only application: with Entra OIDC map the app role values assigned on that application, and with Okta OIDC map the groups pushed from it.
Adding mappings in the Abacus.AI dashboard
Go to Profile → SCIM Provisioning and scroll to the Group Role Mappings panel, below Provisioned Users and Synced Groups.
- Click Add Mapping to append an empty row. Each row has a key field, a role dropdown, and a Remove button.
- In the key field, enter the group ID, group name, or app-role value exactly as your IdP sends it. The easiest way to get this right is to copy it from the Synced Groups table — its Identity provider ID and Group columns show precisely what arrived over SCIM. For Entra app roles, use the value shown in the provisioning log's Data flow view.
- Pick the Abacus.AI role from the dropdown: Chat only, App only, Platform, or Admin. New rows start at Chat only.
- Click Save Mappings. Nothing is stored until you do — leaving the page first discards your edits.
Add Recommended fills in any of abacus_platform, abacus_app_only, and abacus_admin that are not already listed; on a fresh configuration that is just the admin row, since the other two are seeded. If they are all present already, Abacus.AI tells you so and adds nothing.
A few rules the dashboard enforces when you save:
- Every row must have a key. A blank key is rejected with "Every mapping needs an identity provider group ID".
- Keys must be unique, compared case-insensitively — you cannot map
Abacusai_Adminandabacusai_adminto different roles. - Surrounding whitespace is trimmed, but the key must otherwise match what your IdP sends.
To verify a mapping took effect, check the Mapped role column in Synced Groups — groups with no matching row read Chat only (unmapped) — and the Role granted by SCIM column in Provisioned Users.
Saving the table immediately recomputes the role of every active SCIM-linked user. You do not need to wait for the next provisioning cycle or ask people to sign in again.
How roles are resolved
- A provisioned user starts as Chat only. Any user who is not matched by a mapping stays Chat only.
- If a user matches several mappings, the highest role wins (Admin > Platform > App only / Chat only). Group mappings and app-role mappings are pooled together, so a user can match through either, and a user with several app roles is matched on all of them. Role values that match no row are ignored.
- Roles granted directly inside Abacus.AI by an admin are never downgraded by SCIM. SCIM only raises a user to the tier their mappings entitle them to.
- Removing a mapping row and saving revokes the role granted by that mapping right away. Removing a user from a mapped group in your IdP revokes it on the next sync, when the provider pushes the membership change.
- App only is a restricted platform tier; in self-service organizations it behaves as Chat only.
Managing SCIM after setup
The SCIM Provisioning page shows everything about the integration:
- Status — enable/pause the integration, plus the identity provider, time of the last request, active and deactivated user counts, number of synced groups, and the service account.
- Bearer Token — the masked token, when it was created and when it expires, and a Rotate Token button.
- Provisioned Users — every user created through SCIM, with their identity provider ID, status, the role granted by SCIM, and whether they are linked to an Abacus.AI account.
- Synced Groups — every SCIM-managed group with its identity provider ID, member count, mapped role, and creation date.
- Group Role Mappings — the mapping table described above.
- Danger Zone — Remove SCIM Provisioning.
| Action | Effect |
|---|---|
| Pause | Abacus.AI rejects incoming IdP requests but keeps all users, groups, and mappings. Resume at any time. |
| Rotate Token | Issues a new bearer token and invalidates the old one immediately. Update your IdP right away or provisioning will fail. |
| Remove SCIM Provisioning | Stops all synchronization and deletes the SCIM configuration. Provisioned users and groups are kept and become normally managed groups. Confirm by typing remove scim provisioning. |
Supported operations and limits
| Capability | Supported |
|---|---|
| Resources | /Users, /Groups, /ServiceProviderConfig, /ResourceTypes, /Schemas |
| Methods | GET, POST, PUT, PATCH, DELETE |
PATCH | Yes, including member add/remove/replace on groups |
| Filtering | Yes — eq and and only, on userName, externalId, displayName, and id |
| Pagination | Yes — startIndex and count, default 100 results, maximum 200 per page |
| Sorting | No |
| Bulk operations | No |
| ETag | No |
| Change password | No |
Deactivating a user (active: false) or issuing DELETE /Users/{id} removes them from the Abacus.AI organization. Their data is archived, so reactivating them in your IdP restores their access and their previous SCIM group memberships.
Troubleshooting and FAQ for SCIM Provisioning
Okta's connector test fails with an authentication error
The Authentication Mode is set to Basic Auth or OAuth 2. Abacus.AI only accepts the bearer token in the Authorization header — switch the mode to HTTP Header and paste Bearer <token> into the Authorization field.
The IdP reports 401 Unauthorized
The bearer token is wrong, was rotated, or the header is malformed. Confirm the IdP sends Authorization: Bearer <token> and that the token matches the current one in Abacus.AI. If in doubt, click Rotate Token and paste the new value into your IdP.
The IdP reports 403 Forbidden
SCIM is paused, or the configuration was removed. Check the Status panel and re-enable it.
Test Connection fails but the URL looks right
Make sure the URL is exactly https://api.abacus.ai/scim/v2 — no trailing slash, and no extra path such as /Users.
Users are created but always end up as Chat only
No mapping matched. Open Synced Groups — any group showing Chat only (unmapped) has no row in the mapping table. Copy its Identity provider ID or Group name into a new row under Group Role Mappings, pick the role, and save. If you reused your SAML names (abacusai_platform_user, abacusai_platform_user_role, and so on) remember those are not built-in keys and each needs its own row — only abacus_platform and abacus_app_only are mapped for you.
A user holds several Entra app roles but Abacus.AI only sees one
The roles mapping still uses SingleAppRoleAssignment, which sends one role. Switch to multiple app roles per user. If roles is missing from the target attribute dropdown, it has not been added as a multi-valued attribute yet (step 3 of that section).
An app role removed in Entra is still granting access
The mapping uses AppRoleAssignmentsComplex, which never sends removals. Change the expression to AssertiveAppRoleAssignmentsComplex([appRoleAssignments]). The next cycle sends each user's full role list and drops the stale roles.
My IdP is not making anyone an organization admin
Admin is mappable, but the row is never seeded — you have to add it. Click Add Recommended to insert abacus_admin, or Add Mapping to map your own group or app role to Admin, under Group Role Mappings, then save.
A user was removed in the IdP but can still sign in
Provisioning cycles are not instantaneous — Entra runs roughly every 40 minutes, and Okta pushes on change. Check the Last request value on the Status panel, and use your IdP's provisioning logs to confirm the deactivation was sent.
Group members are being skipped
Members that are not provisioned users in Abacus.AI, or that are deactivated, are skipped rather than failing the whole request. Assign those users to the application so they get provisioned, and the next sync will add them to the group.
Can I use SCIM without SSO?
SCIM will create the accounts, but users still need a working sign-in method. Pairing SCIM with your SSO integration is strongly recommended.
Do I need a separate application for SCIM?
Yes for the two OIDC flows, no for the two SAML flows:
| Sign-in method | Separate SCIM application? |
|---|---|
| Microsoft Entra ID (OIDC / OAuth) | Yes — a non-gallery enterprise application dedicated to SCIM |
| Microsoft Entra ID (SAML) | No — use the Provisioning section of the SAML application |
| Okta (SAML) | No — use the Provisioning tab of the SAML application |
| Okta (OIDC / OAuth) | Yes — a separate Okta application, since the OIDC app type has no Provisioning tab |
The Abacus.AI application in Entra has no usable Provisioning settings
That is the multi-tenant Abacus.AI OIDC sign-in application (Application ID b89bbf6f-22a7-4b66-9bcf-6a80edf04dc5), which does not expose an editable automatic provisioning configuration in your tenant. Create a SCIM-only non-gallery enterprise application and configure provisioning there, leaving the sign-in application unchanged.
Users sign in fine with Entra OIDC but are never provisioned
They are assigned to the OIDC sign-in application but not to the SCIM-only application. Only objects assigned to the application that hosts provisioning are pushed — assign the same users and groups to both, then use Provision on demand to verify.
Where do I get help?
Contact us at connectors@abacus.ai with your organization subdomain and the provisioning logs from your identity provider.